Connectors > Confluent®
Overview
ASAPIO Integration Add-on can connect to Confluent® or Apache Kafka® brokers, using the Confluent REST proxy.
The ASAPIO Connector is certified by Confluent (visit confluent.io for details).
| Add-on/component name | Type |
| ASAPIO Integration Add-on – Framework | Base component (required) |
| ASAPIO Integration Add-on – Connector for Confluent®/Apache Kafka® | Additional package |
REST Proxy:
Confluent REST Proxy for Kafka is mandatory for the connectivity and subject to a separate license.Please see https://github.com/confluentinc/kafka-rest for more details.
Direct connect/V3:
A Connector for Confluent Cloud direct connect (V3 REST API) is available as pre-release in the download section for registered customers. This connector can only handle outbound connectivity. For inbound, please use the REST proxy approach above. Read more in the Release note.
Key features:
- Certified for Confluent, visit Confluent Hub for details
- Supports a wide range of SAP NetWeaver based systems, including SAP ERP, S/4HANA, BW, HCM and many more
- Out-of-the-box connectivity to Confluent® Platform, Confluent® Cloud and Kafka® (REST API v2 only)
- REST-based outbound communication via Confluent Kafka REST proxy (push) or direct with V3 API (see Release note please)
- Inbound interface via Confluent Kafka REST proxy (pull)
- Choose between event-driven (single events) or batch mode (multiple events, also multiple events per REST proxy call)
- Supported communication direction: Outbound, Inbound
- Batch mode allows multi-threading with multiple SAP work processes
Block Architectures for Confluent and Kafka:


Set-up connectivity
To establish connectivity with the Confluent® Kafka® platform, please proceed with the following activities and refer to the specific chapters in this documentation.
- Create RFC destinations to Confluent REST proxy in SAP system settings
- Set-up authentication against the Confluent REST proxy
- Set-up connection instance in ASAPIO Integration Add-on customizing
- Configure example outbound message for a simple example to test the connectivity
Create RFC destination
Create a new RFC destination of type “G” (HTTP Connection to External Server).
- Transaction: SM59
- Create new destination of type “G”
- Specify Target Host: Endpoint of Confluent REST Proxy.
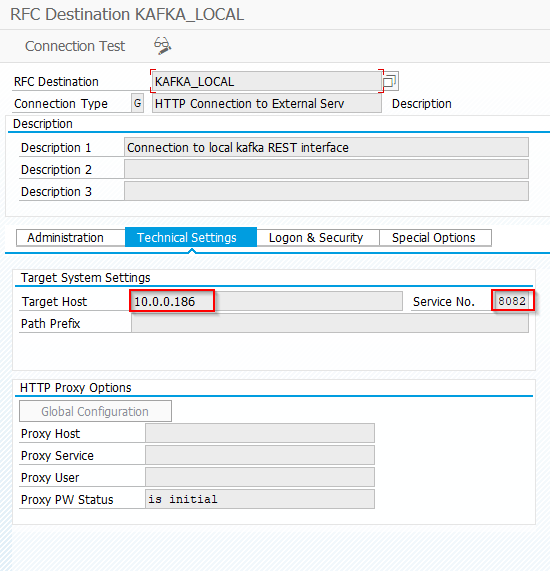
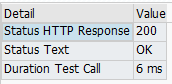
- Save and click on “Connection Test”, which should result in HTTP status code 200.
Set-up authentication to REST proxy
Pre-requisites:
Please make sure you have either the user and password available for the REST proxy or you exchanged the certificates with the SAP system beforehand.
For further details on how to set-up the proxy, please visit Confluent documentation
Configure authentification
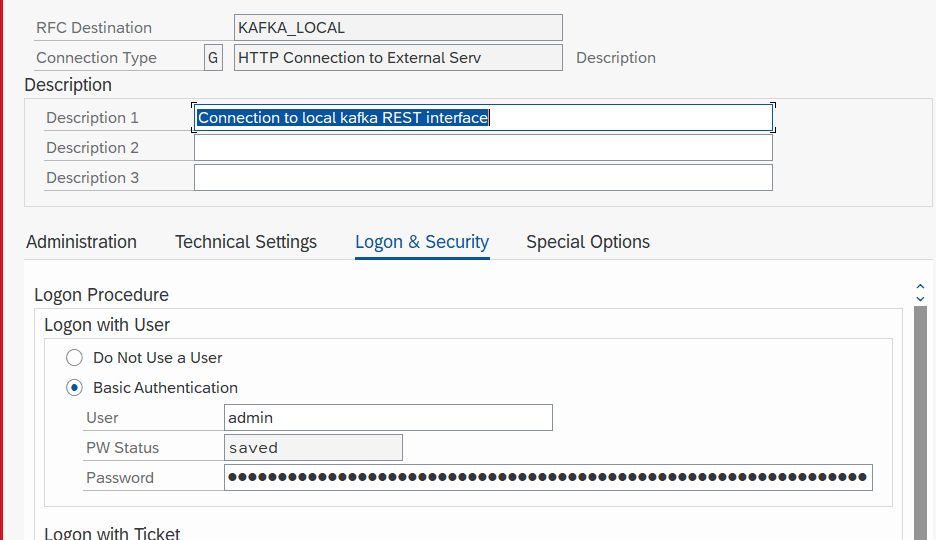
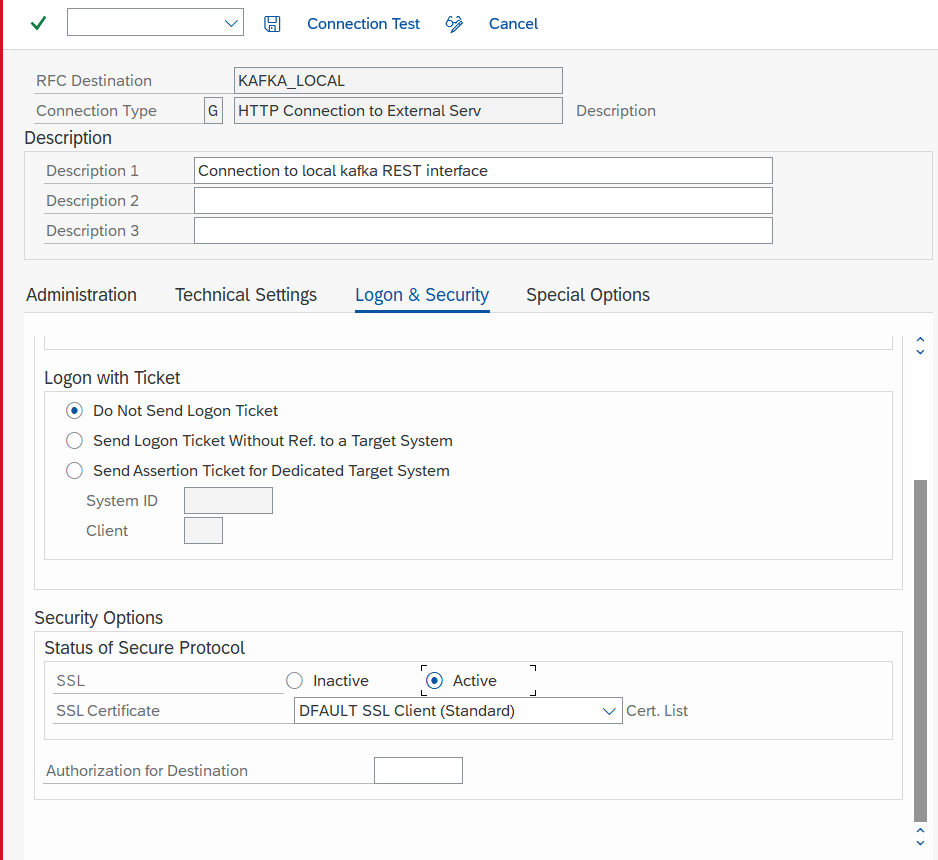
While creating the RFC connection to Confluent REST Proxy (see section above), please specifiy the authentification method.
- Transaction: SM59
- Choose the correct RFC destination
- Go to tab “Logon & Security”
- Select authentification method – Options:
- “Basic authentifcation”, with username and password
- SSL certificate-based authentication
Set-up basic settings
Activate BC-Sets
Business Configuration sets (BC-Sets) contain customizing and configuration-related table entries that are not imported with the add-on.
- Transaction: SCPR20
- BC-Set includes:
- Configuration for cloud adapter
- Configuration for cloud codepages
- Definition of IDoc segments
- Activate the BC-Set with default values: /ASADEV/ACI_BCSET_FRAMEWORK_KAFK
Configure cloud adapter
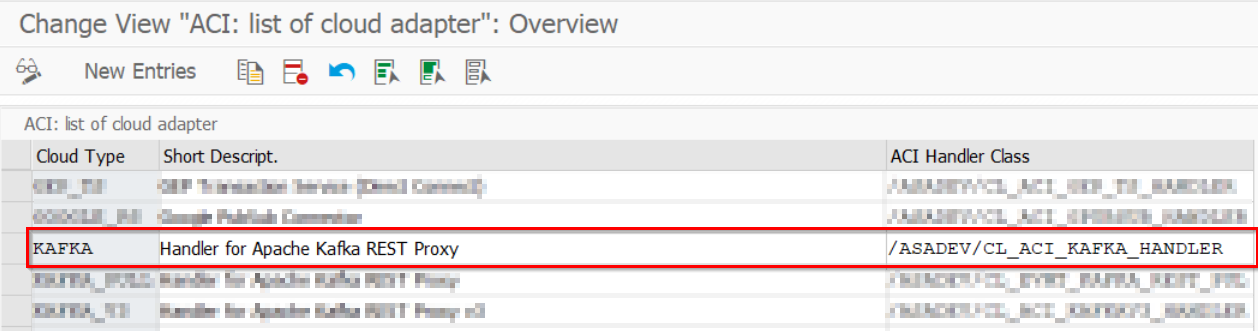
Add an entry for the connector to the list of cloud adapters:
- Transaction: SPRO
- Goto ASAPIO Cloud Integrator – Maintain Cloud Adapter.
- Add New Entry and specify:
- Cloud Type: name with which to reference this type of connector
ACI Handler Class: /ASADEV/CL_ACI_KAFKA_HANDLER
Set-up cloud codepages
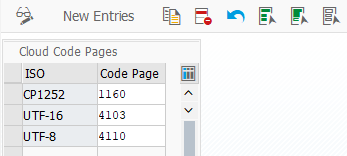
Specify codepages used in the integration:
- Transaction: SPRO
- Goto ASAPIO Cloud Integrator – Maintain Cloud Codepages
- Add New Entry and specify the code pages to be used:
Set-up connection instance
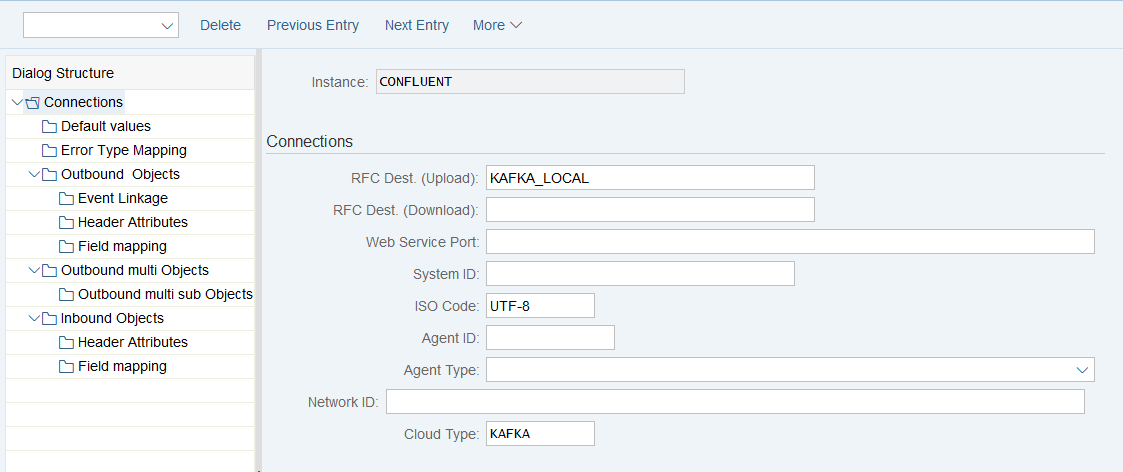
Create the connection instance customizing that ties together the RFC destination created earlier and the cloud connector type:
- Transaction: SPRO
- Goto ASAPIO Cloud Integrator – Connection and Replication Object Customizing
- Or go directly to transaction: /ASADEV/68000202
- Add New Entry and specify:
- Field Instance: a name for this connection in
- Field RFC Dest. (Upload): the RFC destination create for the messaging endpoint
- Field ISO Code: the code page to use
- Field Cloud Type: KAFKA (or the name you chose when adding the connector)
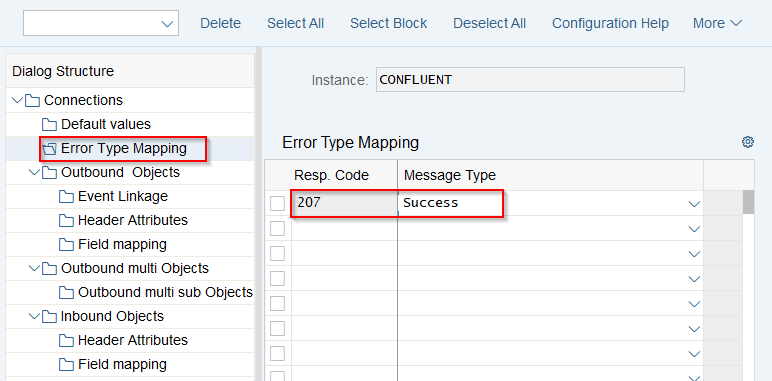
Set-up Error Type Mapping
Create an entry in section Error Type Mapping and specify at least the following mapping:
| Resp. Code | Message Type |
| 207 | Success |
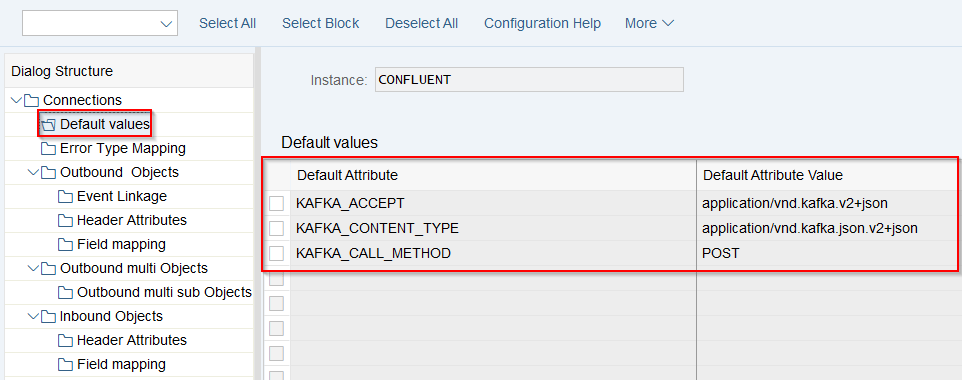
Set-Up Connection Values
Maintain Default values for the connection to Confluent. Connections -> Default values
| Default Attribute | Default Attribute Value |
| KAFKA_ACCEPT | application/vnd.kafka.v2+json |
| KAFKA_CALL_METHOD | POST |
| KAFKA_CONTENT_TYPE | application/vnd.kafka.json.v2+json for JSON payloads without schema information
or application/vnd.kafka.jsonschema.v2+json for JSON payloads with schema information (configured in header attributes) |
Set-up outbound messaging
Create Message Type
Example: in the example below, we use the Sales Order (BUS2032) event. Please choose any other suitable example if required.
For each object to be sent via ACI you have to create a message type:
- Transaction: WE81
- Add New Entry and specify:
- Message Type: unique name for the integration
- Description: description of the purpose

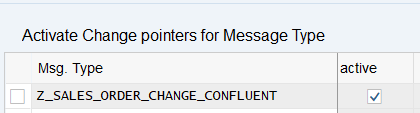
Activate Message Type
The created message type has to be activated:
- Transaction: BD50
- Add New Entryand specify:
- Message Type: the created message type
- Active: tick the checkbox
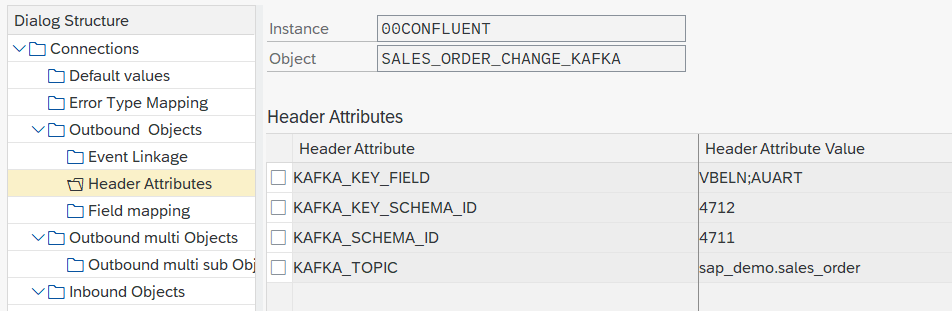
Set-up additional settings in ‘Header Attributes’
Configure the topic to send the events to, the fields to be used for the key and the Ids of the key/value schemas:
- Go to section Header Attributes
- Add New Entry and specify:
| Header Attribute | Header Attribute Value |
| KAFKA_TOPIC | <topic name> e.g. sap_demo.sales_order |
| KAFKA_KEY_FIELD | <fields for key> (separated by “;” if multiple), e.g. VBELN;AUART |
| KAFKA_SCHEMA_ID | <id of value schema in SchemaRegistry>, e.g. 4711 |
| KAFKA_KEY_SCHEMA_ID | <id of key schema in SchemaRegistry>, eg. 4712 |
Note: due to limitations in the REST proxy you always have to specify schemas for both key and value!
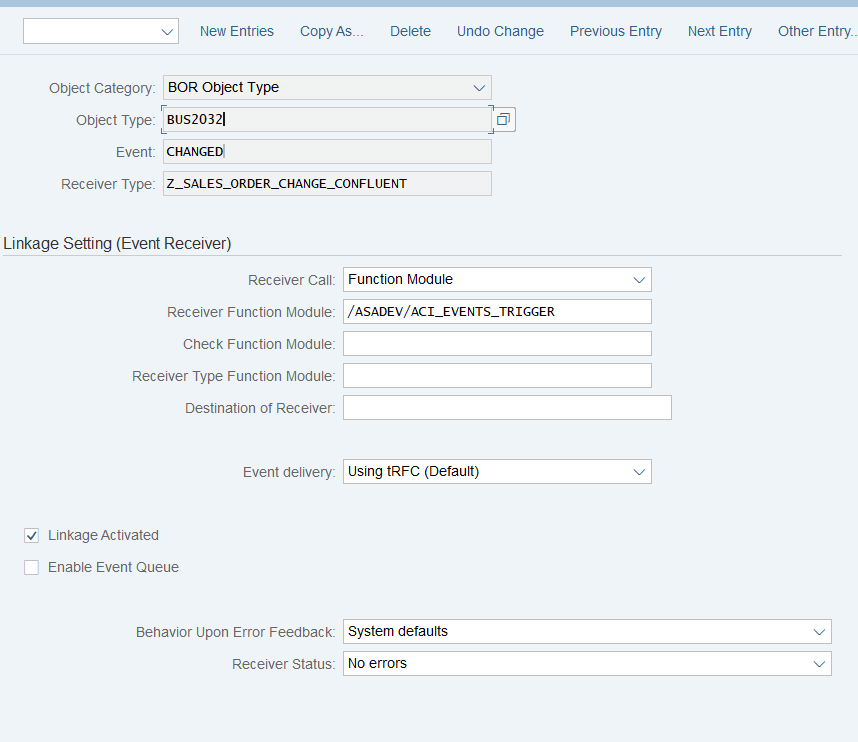
Set up ‘Business Object Event Linkage’
Link the configuration of the outbound object to a Business Object event:
- Go to section Header Attributes
- or use transaction SWE2
- Add New Entry and specify:
- Object Category: BO BOR Object Type
- Object Type: the Business Object Type sending the event
- Event: the event to react to
- Receiver Type: the message type of the outbound object (this is the link to the Addon configuration)
- Receiver Call: Function Module
- Receiver Function Module: /ASADEV/ACI_EVENTS_TRIGGER
- Linkage Activated: tick the checkbox
How to use Simple Notifications
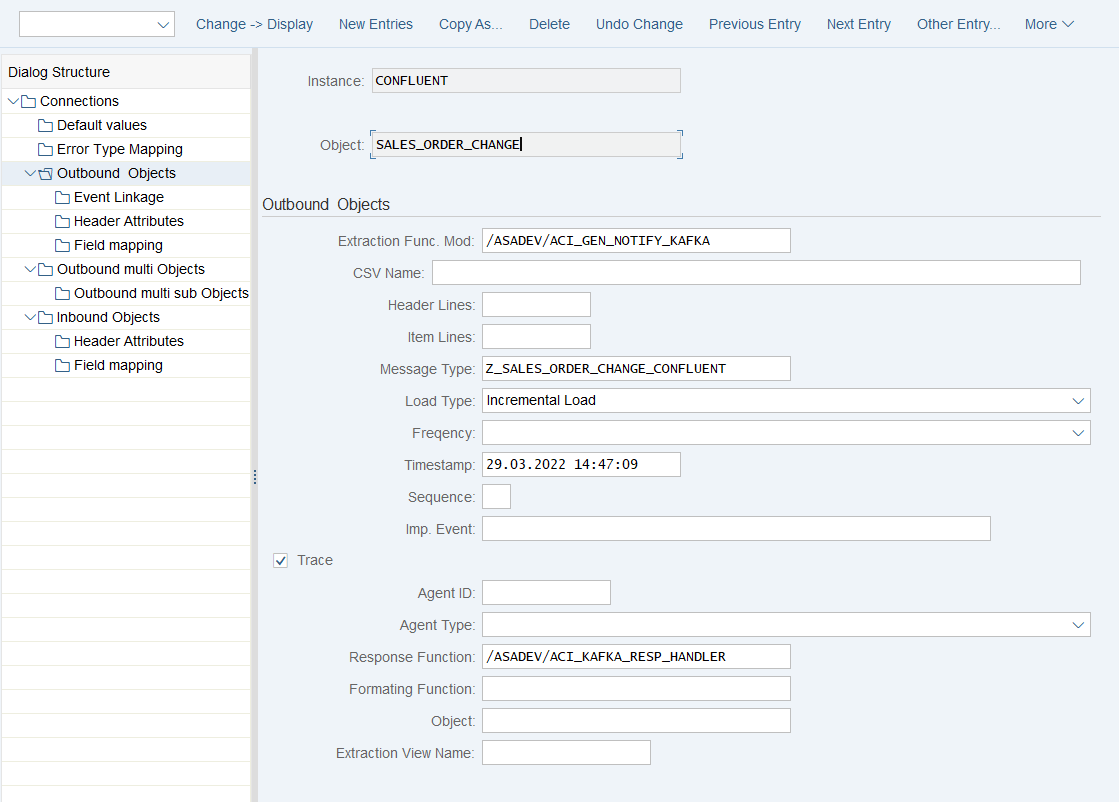
Create Outbound Object configuration
- Transaction: SPRO
- Goto ASAPIO Cloud Integrator – Connection and Replication Object Customizing
- Or go directly to transaction: /ASADEV/68000202
- Select the created Connection
- Go to section Outbound Objects
- Add New Entry and specify:
- Object: name of the outbound configuration
- Extraction Func. Module: /ASADEV/ACI_GEN_NOTIFY_KAFKA
- Message Type: the created message type
- Load Type: Incremental Load
- Trace: activate for testing purposes
- Response Function: /ASADEV/ACI_KAFKA_RESP_HANDLER
Test the outbound event creation
In the example above, please pick any test sales order in transaction /nVA02 and force a change event, e.g. by changing the requested delivery date on header level.
For outbound messaging, you can use and even combine the following methods:
- Simple Notifications
- Message Builder (Generic View Generator)
- IDoc capturing
- Custom-built triggers and extractors
Pre-requisite for all methods is to create a message type, which will be used throughout the configuration process.
The following articles explain the individual possibilities.
How to use Message Builder (Generic View Extractor)
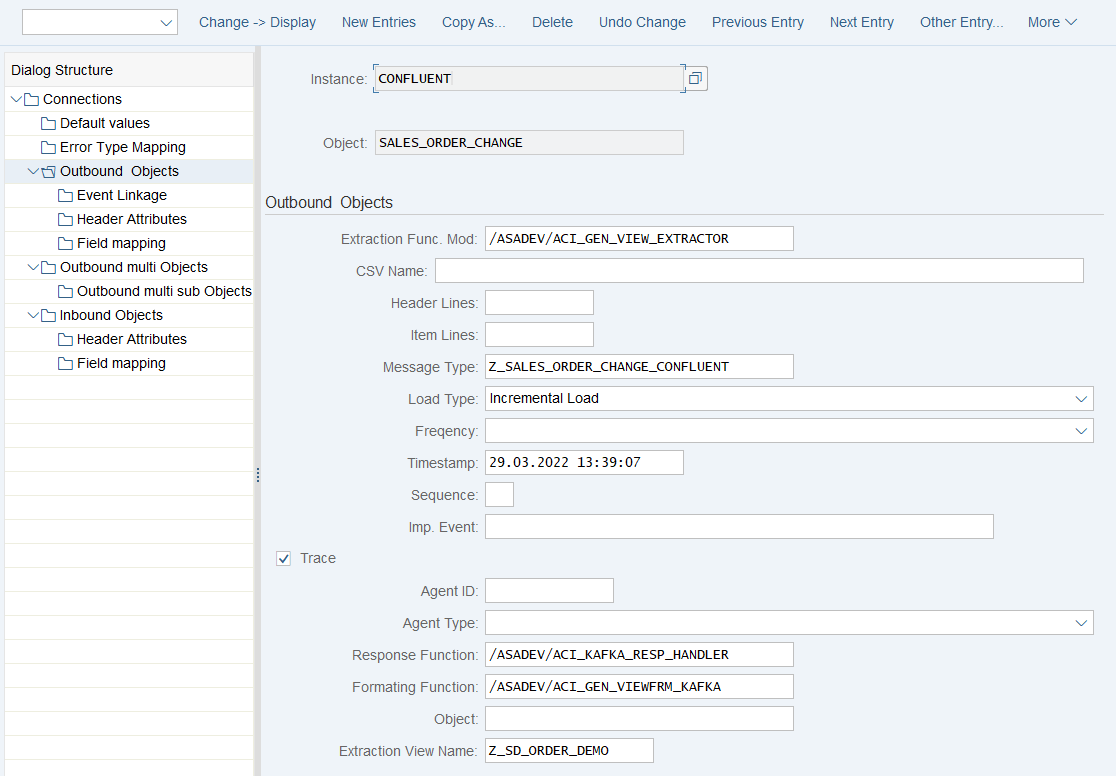
Create Outbound Object configuration
- Transaction: SPRO
- Goto ASAPIO Cloud Integrator – Connection and Replication Object Customizing
- Or go directly to transaction: /ASADEV/68000202
- Select the created Connection
- Go to section Outbound Objects
- Add New Entry and specify:
- Object: name of the outbound configuration
- Extraction Func. Module: /ASADEV/ACI_GEN_VIEW_EXTRACTOR
- Message Type: the created message type
- Load Type: Incremental Load
- Trace: activate for testing purposes
- Response Function: /ASADEV/ACI_KAFKA_RESP_HANDLER
- Formatting Function: /ASADEV/ACI_GEN_VIEWFRM_KAFKA
- Extraction View Name: create a Database View in transaction SE11 (Chapter 4.3.2)
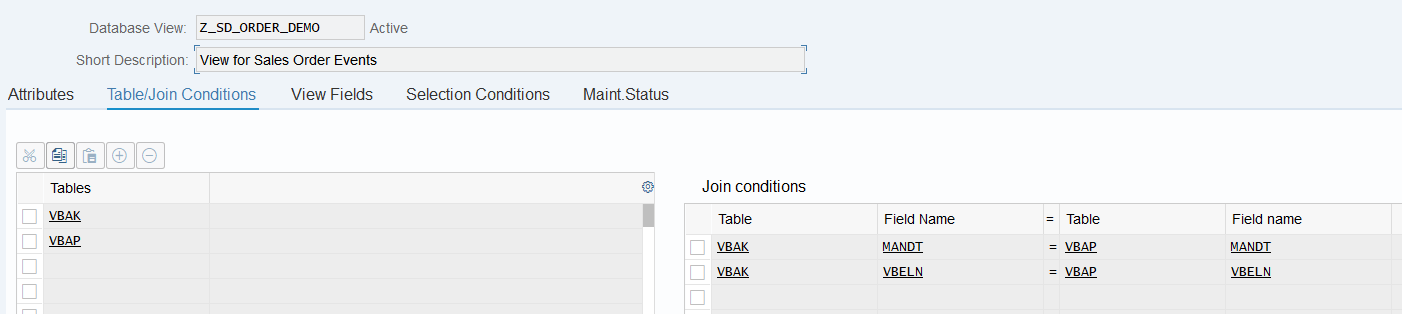
Create database view
For the data events also configure the DB view that is used to define the extraction:
- Transaction: SE11 (for SAP ERP or S/4HANA on-prem deployments with SAP GUI access)
- Alternatively, you can use Eclipse with ABAP Development Tools, or the SAP Fiori App “Create Custom CDS Views” to create a database view if you have this app available in SAP S/4HANA.
Example: Sales Order view (e.g. to be used for Sales Order (BUS2032) change events)

Test the outbound event creation
In the example above, please pick any test sales order in transaction /nVA02 and force a change event, e.g. by changing the requested delivery date on header level.
Set-up Batch Job (Job processed messaging)
Prevent synchronous call for message type
Note
With the following settings change pointers will be set but not being sent directly.
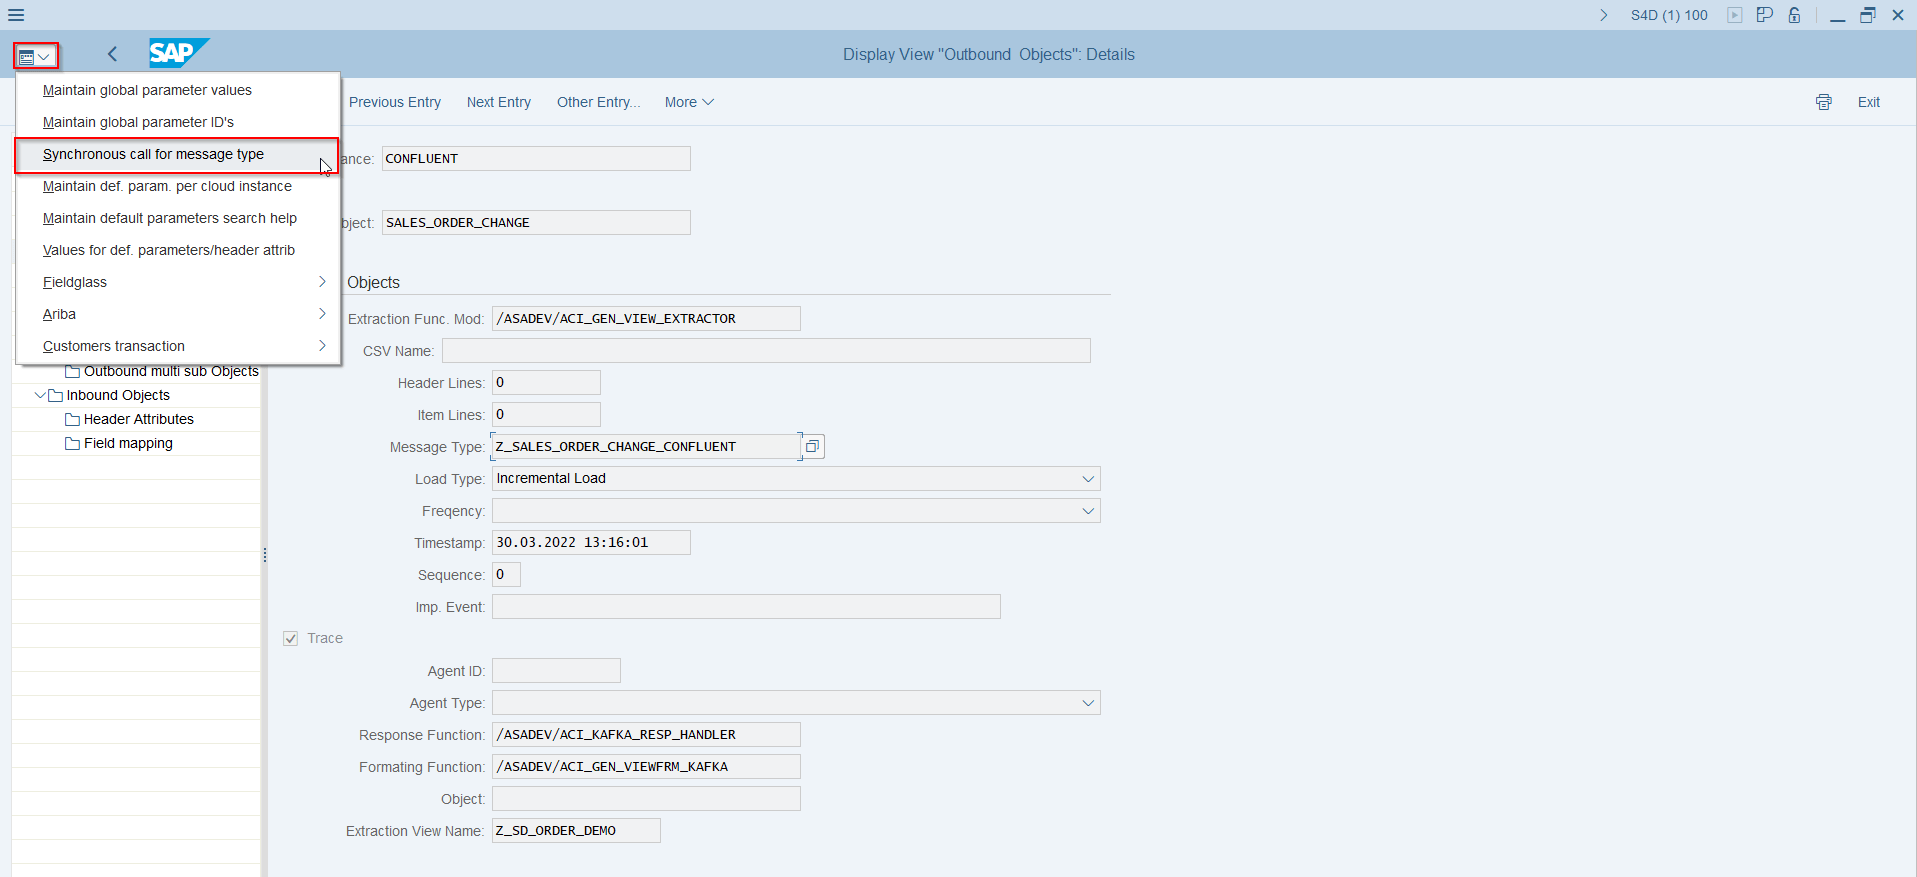
- Transaction: SPRO
- Go to ASAPIO Cloud Integrator – Connection and Replication Object Customizing
- Or go directly to transaction: /ASADEV/68000202
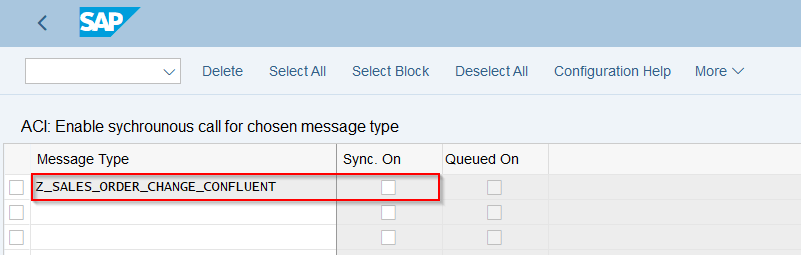
- Click on Synchronous call for message type
- Or go directly to transaction: /ASADEV/ACI_SYNC
- Add New Entry and specify:
- Message Type: the created message type
- Sync. On: Clear checkbox (Change Pointers will be set and the event is not being sent)
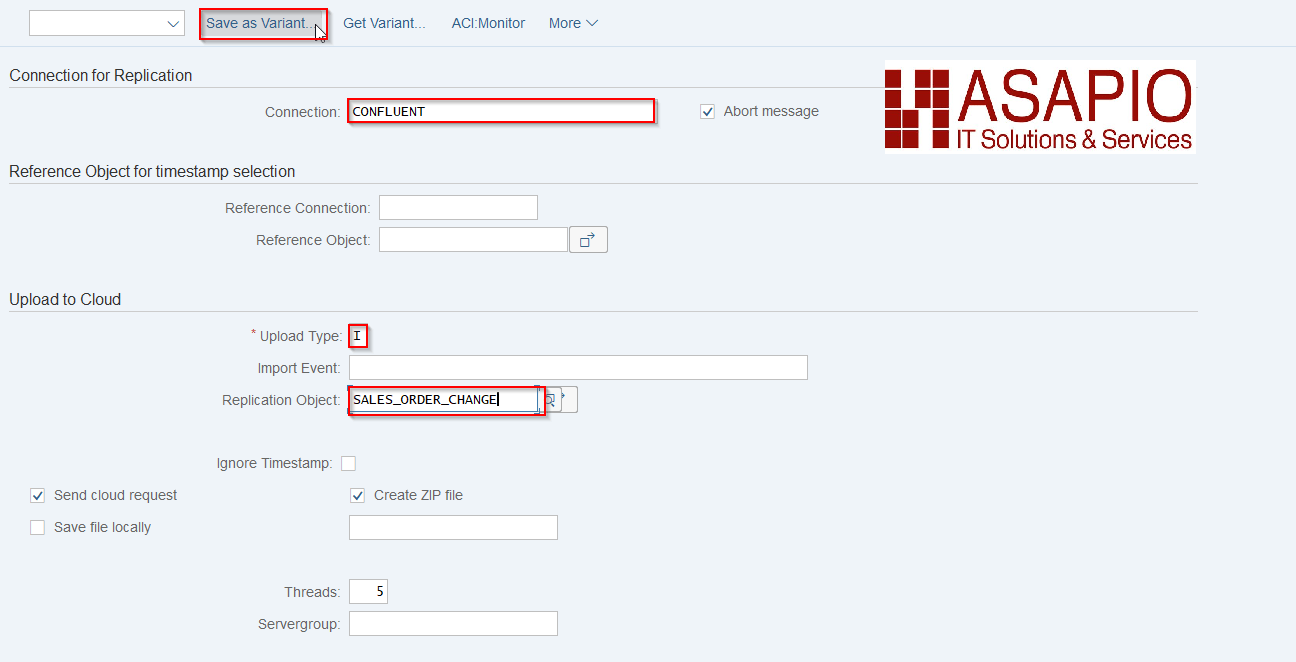
Define Variant
- Transaction: n/ASADEV/ACI
- Select the Connection and hit enter
- Select Upload Type: I
- Select Replication Object
- Save Variant
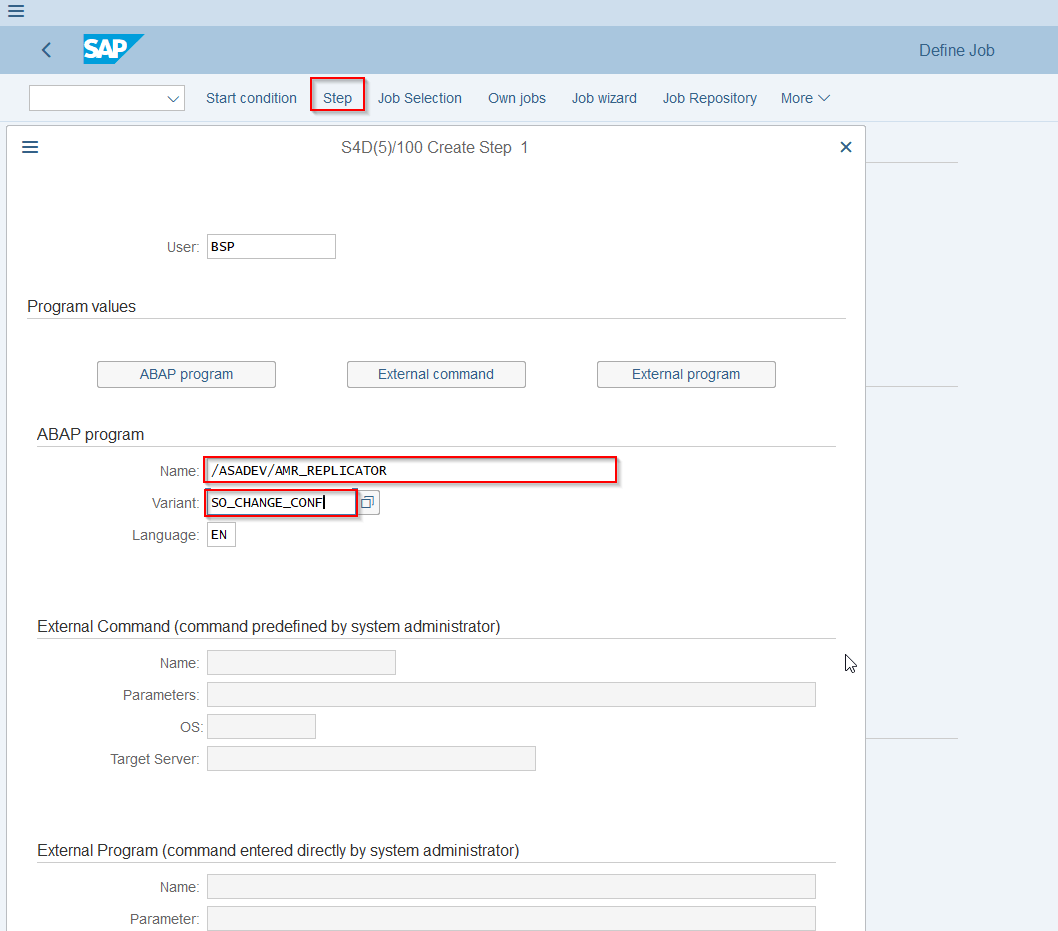
Schedule background job
- Transaction: SM36
- Choose your start conditions
- ABAP program: /ASADEV/AMR_REPLICATOR
- Variant: the created and saved Variant
Test background job
- First create an Event
- Then run the job
- Check the ACI_Monitor in transaction /ASADEV/ACI_MONITOR: You will be able to see the Variant and the Trace. For troubleshooting, check the SLG1-Log.

Set-up Packed Load (split large data)
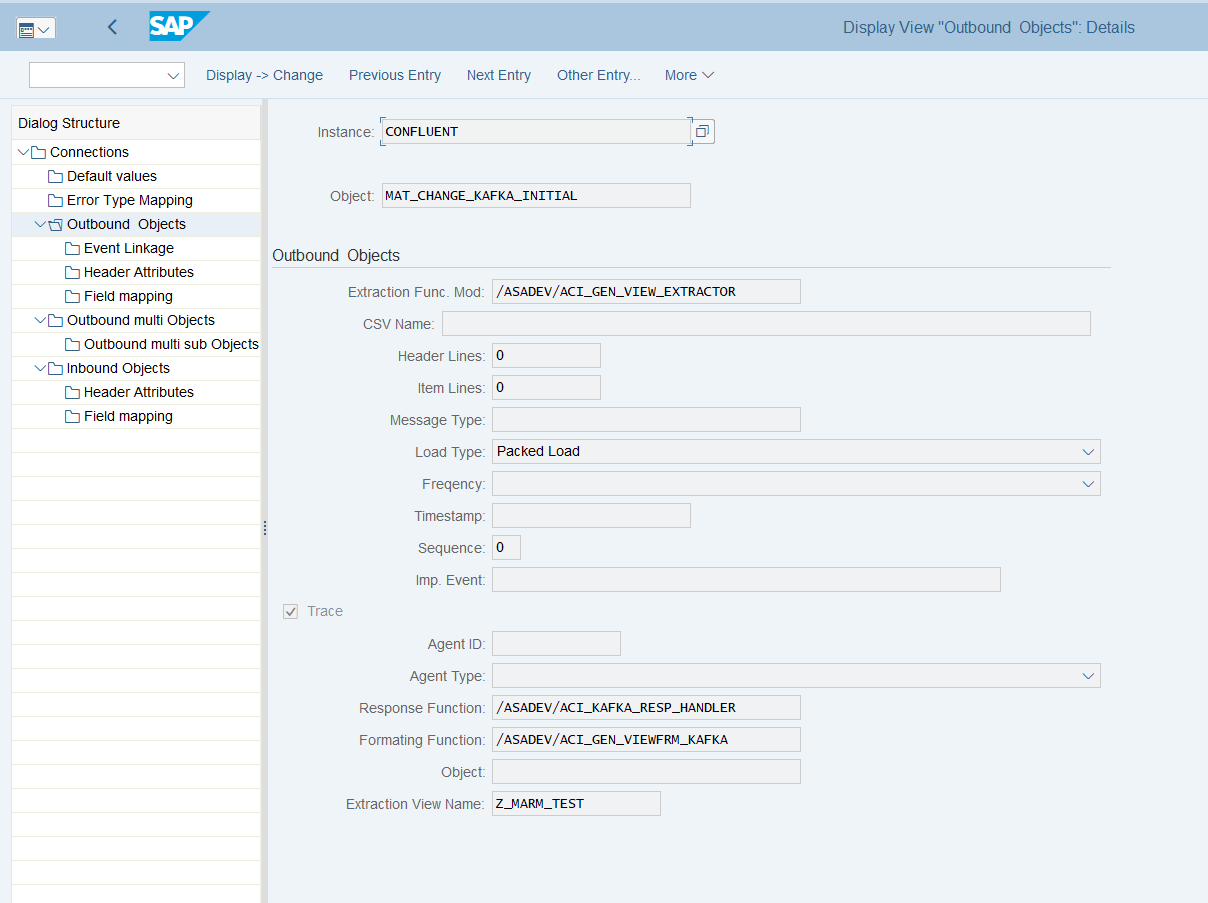
Create Outbound Object configuration
- Transaction: SPRO
- Goto ASAPIO Cloud Integrator – Connection and Replication Object Customizing
- Or go directly to transaction: /ASADEV/68000202
- Select the created Connection
- Go to section Outbound Objects
- Add New Entry and specify:
- Object: name of the outbound configuration
- Extraction Func. Module: /ASADEV/ACI_GEN_VIEW_EXTRACTOR
- Message Type: the created message type(optional)
- Load Type: Packed Load
- Trace: activate for testing purposes
- Response Function: /ASADEV/ACI_KAFKA_RESP_HANDLER
- Formatting Function: /ASADEV/ACI_GEN_VIEWFRM_KAFKA (depending on your use case)
- Extraction View Name: create a Database View in transaction SE11
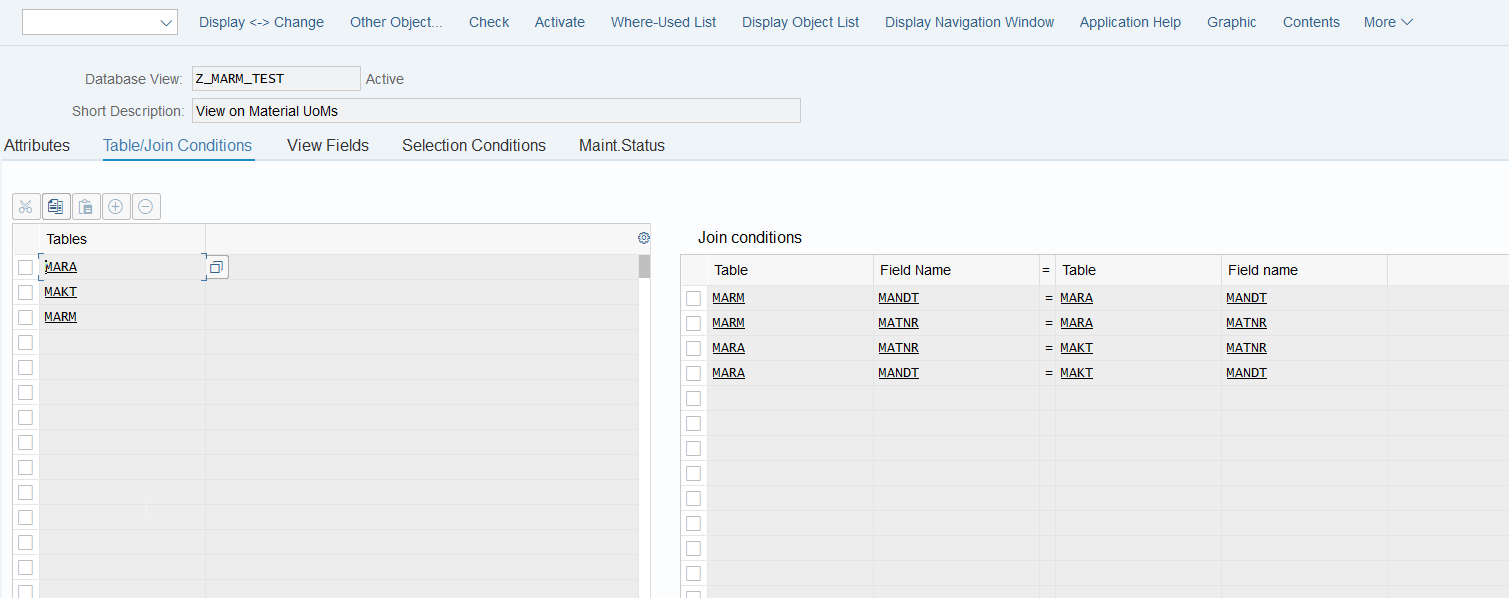
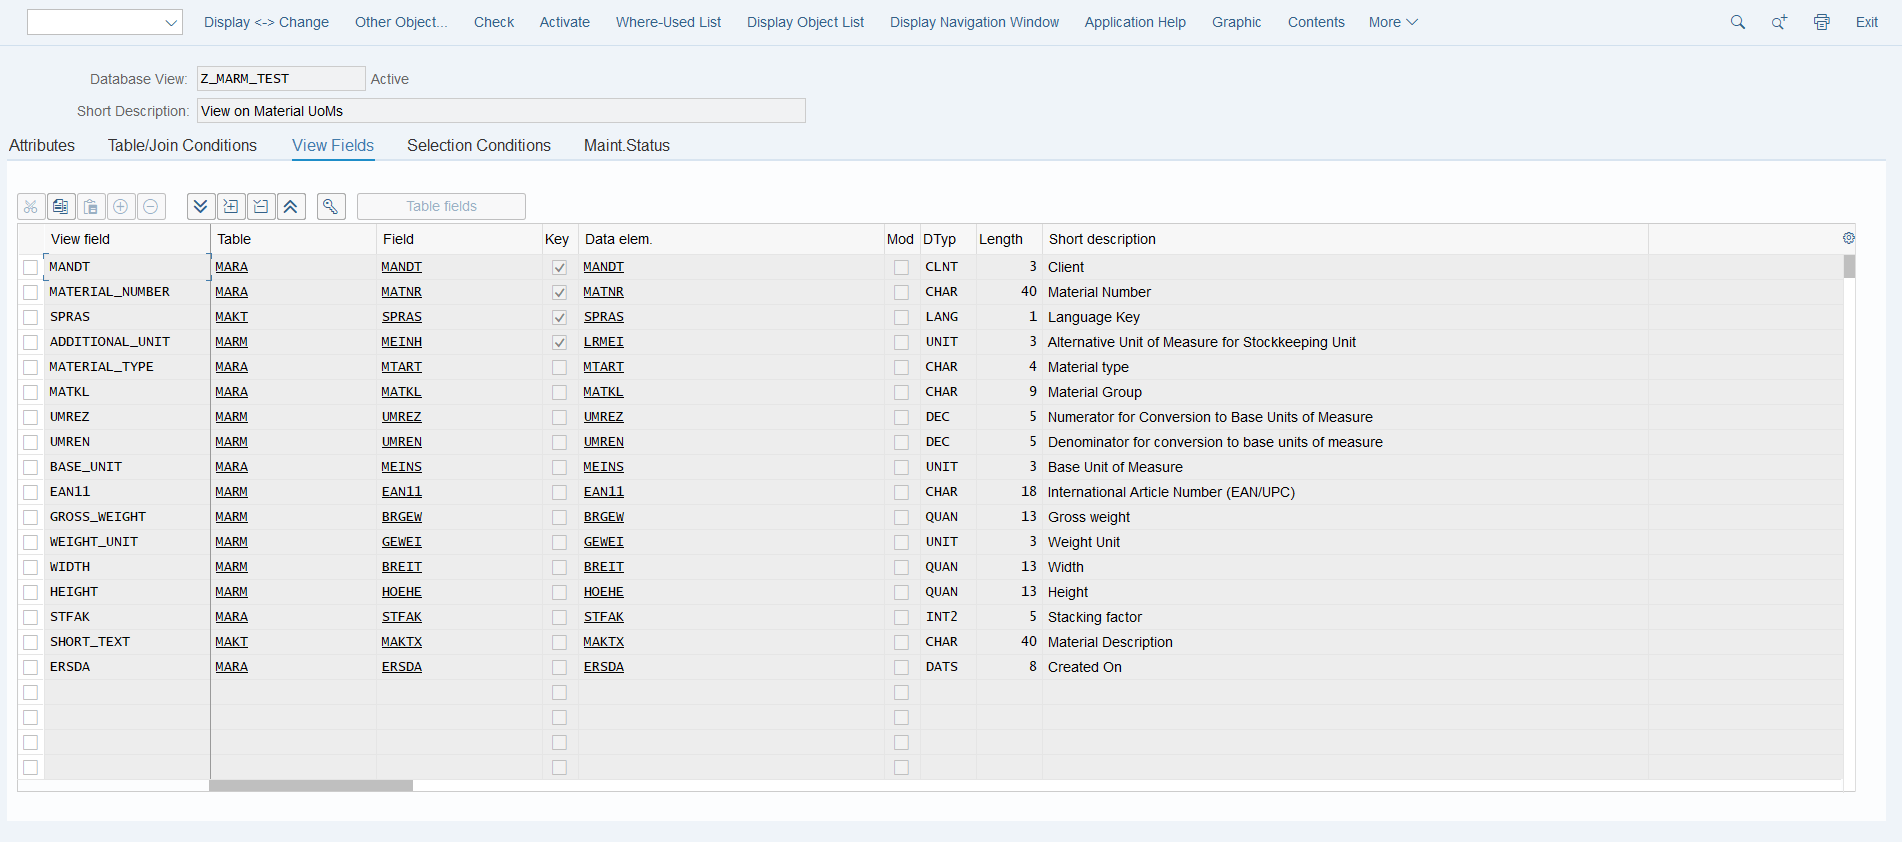
Create database view
Note
Please also refer to chapter 4.3.2
For the data events also configure the DB view that is used to define the extraction:
- Transaction: SE11 (for SAP ERP or S/4HANA on-prem deployments with SAP GUI access)
- Alternatively, you can use Eclipse with ABAP Development Tools, or the SAP Fiori App “Create Custom CDS Views” to create a database view if you have this app available in SAP S/4HANA.
Example: Material master view
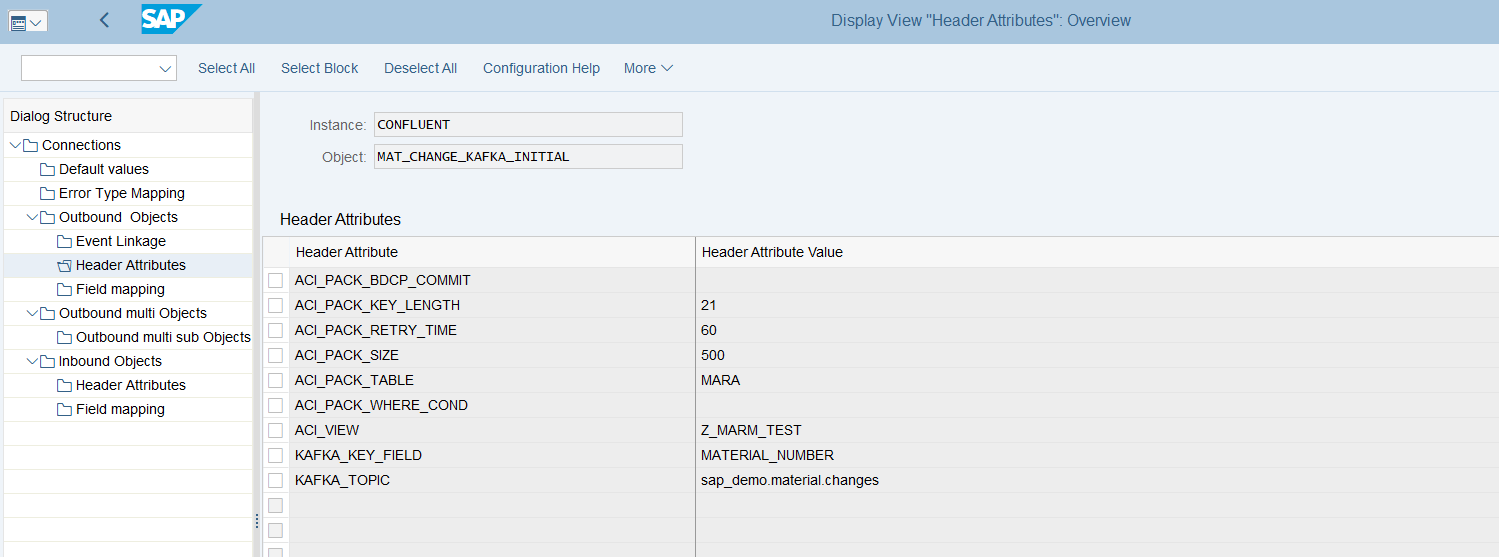
Set-up ‘Header Attributes’
- Go to section Header Attributes of the outbound object created previously
- Add New Entry and specify the header attributes and values
| Header attribute | Header attribute value | Example |
|---|---|---|
| ACI_PACK_BDCP_COMMIT | Flag for changepointer creation. If set, changepointers will be generated for every entry. IF this flag is set, a messagetype has to be maintained in the outbound object. Caution: This may heavily impact performance. |
X |
| ACI_PACK_TABLE | Name of the table to take the keyfields from. This is typically different then the db view specified in ‘ACI_VIEW‘ as we only want to build packages based on the header object and the db view typically contains sub-objects as well | MARA |
| ACI_PACK_RETRY_TIME | Time in seconds. This is the duration in which the framework will attempt to get a new ressource from the servergroup | 60 |
| ACI_PACK_WHERE_COND
(Optional) |
Condition that is applied to the table defined in ‘ACI_PACK_TABLE’ | Example: AEDAT GT ‘20220101’ |
| ACI_PACK_SIZE | Number of entries to send | 500 |
| ACI_PACK_KEY_LENGTH | Length of the key to use from the ACI_PACK_TABLE (e.g. MANDT + MATNR) | 13 |
| KAFKA_KEY_FIELD | name of the Key Field | MATERIAL_NUMBER |
| KAFKA_TOPIC | Topic name in your Confluent broker | Example.topic |
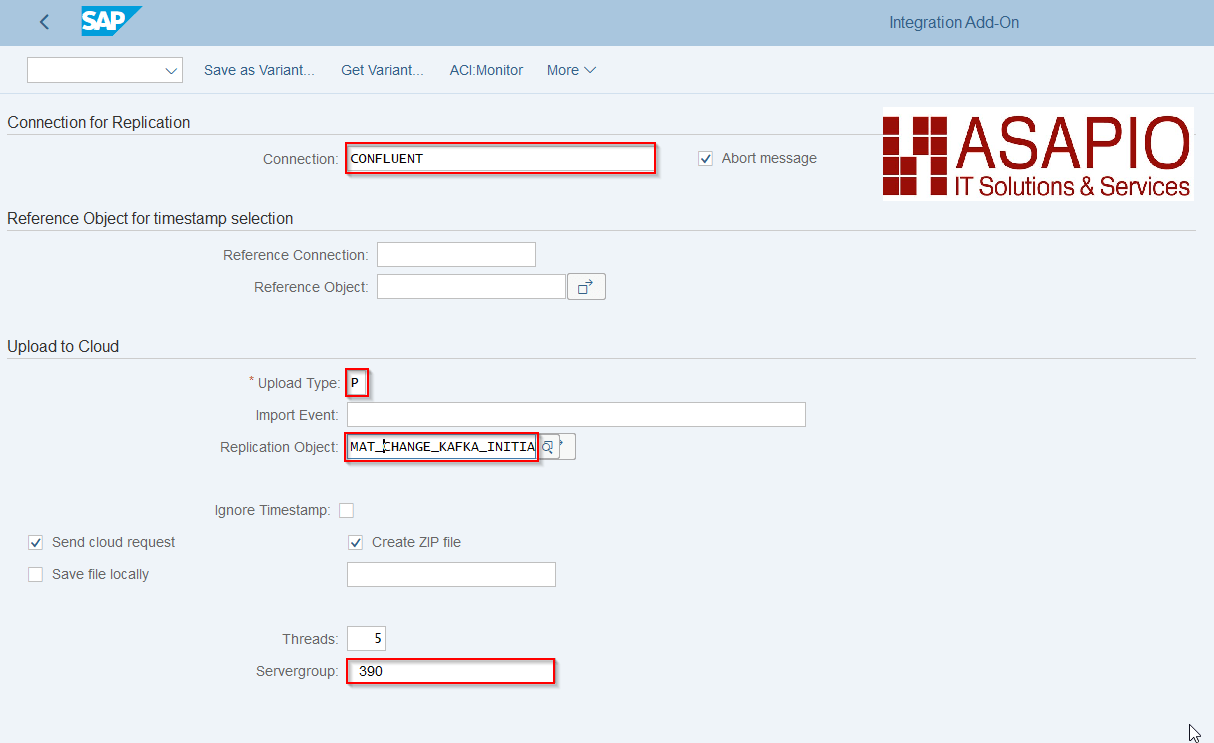
Execute the initial load
Warning
depending on the amount of data this can stress the SAP system servers immensely.
Please always consult with your basis team for the correct server group to use!
- Transaction: /ASADEV/ACI
- Select the Connection and hit enter
- Select Upload Type: P
- Select Replication Object
- Select a Servergroup (this is mandatory)
Standard Function Modules
Function Modules: Event Linkage
| Function name | Description |
| /ASADEV/ACI_EVENTS_TRIGGER | Customizable trigger for event processing |
Function Modules: Outbound
Mandatory Response Handler: /ASADEV/ACI_KAFKA_RESP_HANDLER (Kafka response handler method)
| Extraction Func. Module | Formatting Function |
| /ASADEV/ACI_GEN_NOTIFY_KAFKA
(Simple notification event) |
|
| /ASADEV/ACI_GEN_VIEW_EXTRACTOR
(Dynamic data selection) |
/ASADEV/ACI_GEN_VIEWFRM_KAFKA
(Formatting function for DB-View extraction) |
Function Modules: Inbound
| Function name | Description |
| /ASADEV/ACI_SAMPLE_IDOC_JSON | Inbound JSON to generic IDoc |
| /ASADEV/ACI_JSON_TO_IDOC | Inbound JSON to IDoc |
| /ASADEV/ACI_IDOC_JSON_AS_XML | Obsolete |
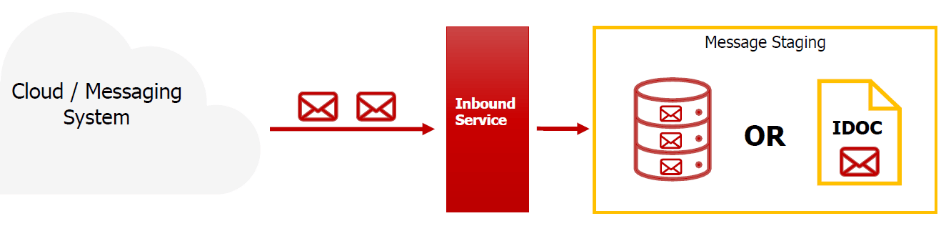
Set-up inbound messaging
The Asapio Integration Add-On is delivered with a possibility to pull data from the Confluent® Kafka® REST Proxy back into the SAP-System. Configuration and customization of the inbound function modules is explained in this chapter.
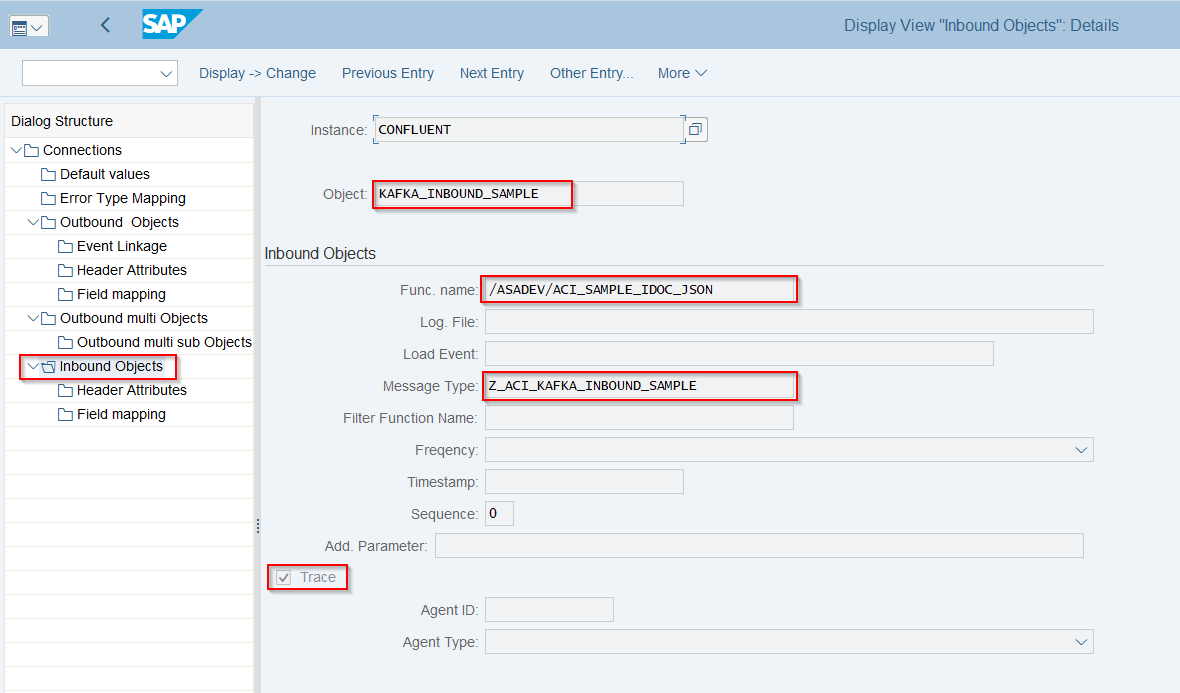
Configure Inbound Object
Create Inbound Object configuration
- Transaction: SPRO
- Goto ASAPIO Cloud Integrator – Connection and Replication Object Customizing
- Or go directly to transaction: /ASADEV/68000202
- Select the created Connection
- Go to section Inbound Objects
- Add New Entry and specify:
- Object: name of the inbound configuration
- Func. Name: /ASADEV/ACI_SAMPLE_IDOC_JSON or any FM with a correct Interface, chapter 5.6.3
- Message Type: the created message type
- Trace: activate for testing purposes
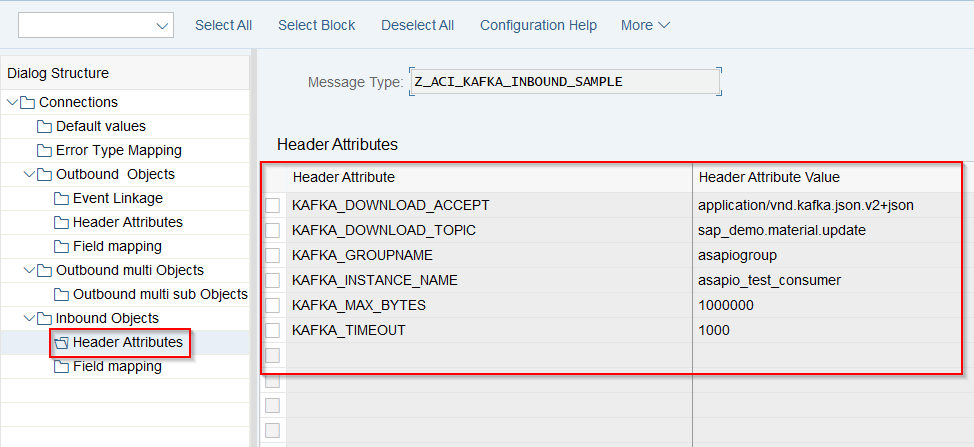
Pull-Based Inbound offers following Header Attributes which can be maintained to receive new messages.
Connections → Inbound Objects → Header Attributes
| Default Attribute | Default Attribute Value |
| KAFKA_CALL_METHOD | POST |
| KAFKA_CONTENT_TYPE | application/vnd.kafka.json.v2+json |
| KAFKA_DOWNLOAD_TOPIC | example.topic |
| KAFKA_DOWNLOAD_ACCEPT | application/vnd.kafka.json.v2+json |
| KAFKA_GROUPNAME | examplegroup |
| KAFKA_INSTANCE_NAME | example_matmas_consumer |
| KAFKA_MAX_BYTES | 1000000 |
| KAFKA_TIMEOUT | 1000 |
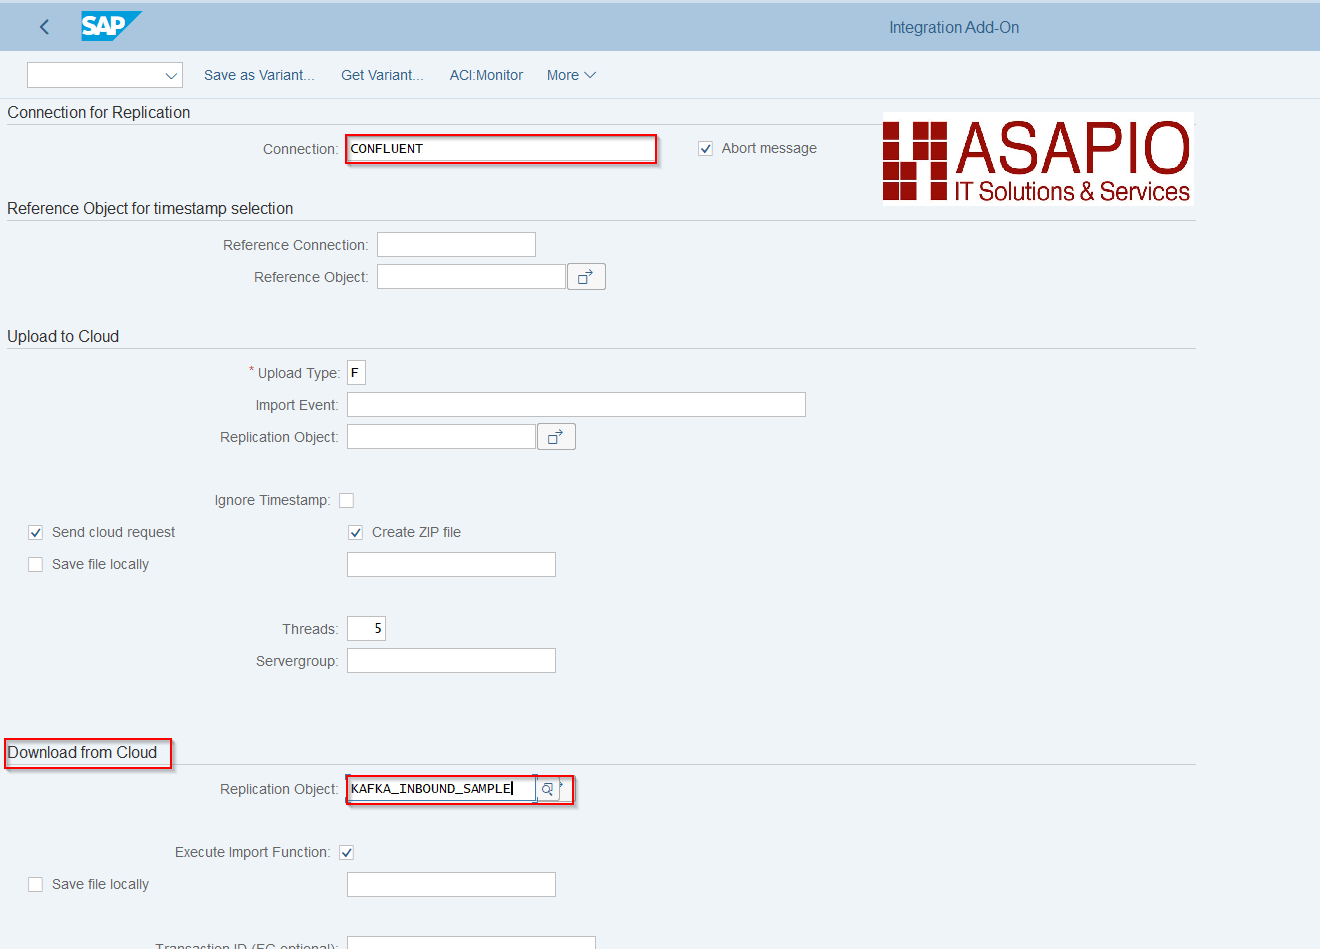
Execute Inbound message pull
- Transaction: /ASADEV/ACI
- Select the Connection and hit enter
- Select Replication Object
- Set Background Job as seen in chapter 5.5.7.3
Inbound processing
We recommend to store the inbound data first and without any processing logic. That way the HTTP connection can be released quickly, and processing can take place asynchronously in parallel/afterwards.
The ASAPIO-specific generic IDoc type /ASADEV/ACI_GENERIC_IDOC can be used to store the message with payload.
Note
IDocs have the advantage that they can be processed multi-threaded afterwards.
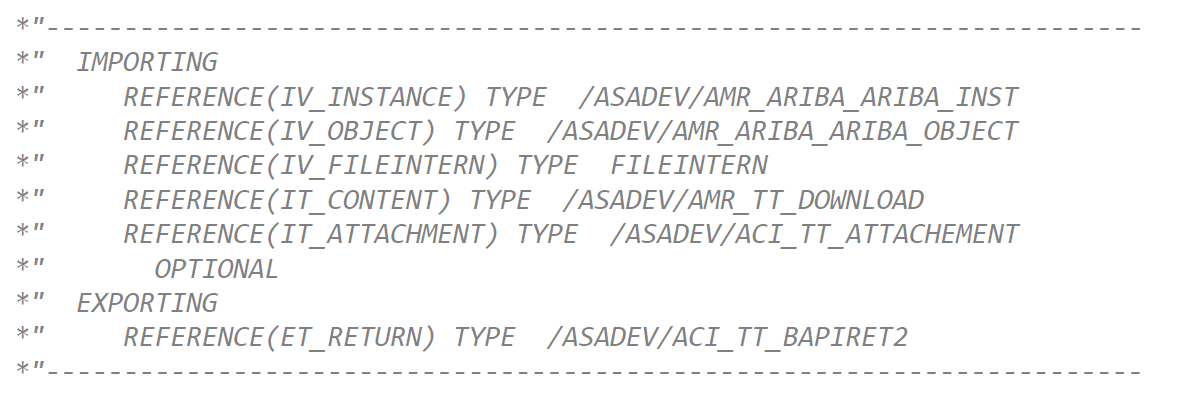
Example interface for inbound processing function modules
If you don’t want to use the delivered function module that creates an IDoc, you can implement a custom function module, using the following interface. The payload is received in an importing parameter IT_CONTENT: