Docs / Connectors / Confluent
Confluent Connector
Overview
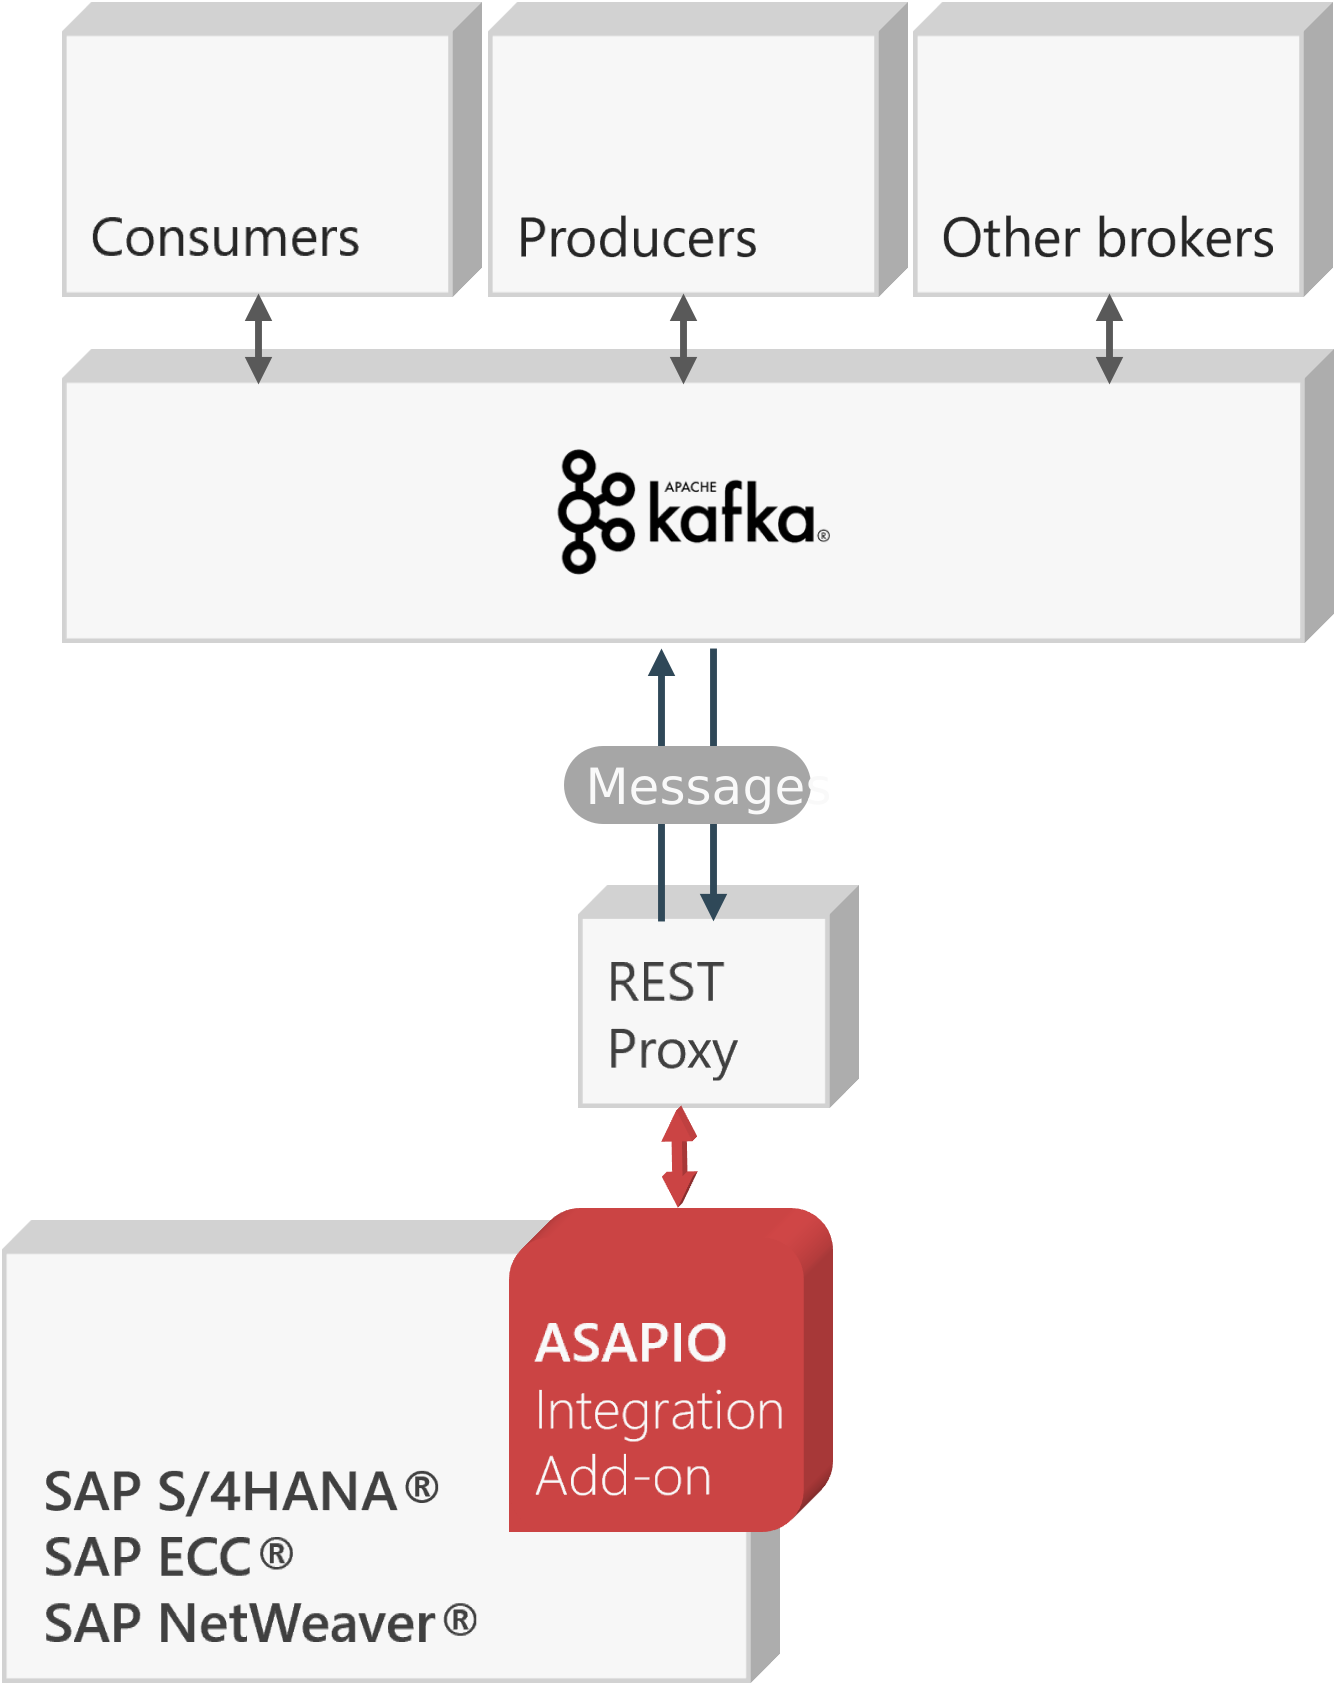
The ASAPIO Integration Add-on can connect to Confluent® or Apache Kafka® brokers, either via the Confluent REST Proxy, the Confluent Cloud V3 API, or directly via the native Kafka protocol.
The ASAPIO Connector is certified by Confluent (visit confluent.io for details).
| Add-on / Component name | Type |
|---|---|
| ASAPIO Integration Add-on – Framework | Base component (required) |
| ASAPIO Integration Add-on – Connector for Confluent®/Apache Kafka® | Additional package |
REST Proxy
Confluent REST Proxy for Kafka is required only for REST-based connectivity (including Avro support) and is subject to a separate license. If you don't need REST-based connectivity or Avro, the native Kafka protocol does not require a REST Proxy at all – see Set-up Kafka protocol connectivity below. For the REST Proxy itself, see github.com/confluentinc/kafka-rest for more details.
Key features:
- Certified for Confluent — visit Confluent Hub for details
- Supports a wide range of SAP NetWeaver-based systems, including SAP ERP, S/4HANA, BW, HCM, and many more
- Out-of-the-box connectivity to Confluent® Platform, Confluent® Cloud, and Kafka® (REST API v2 only)
- REST-based outbound communication via the Confluent Kafka REST Proxy (push)
- Inbound interface via the Confluent Kafka REST Proxy (pull)
- Choose between event-driven (single events) or batch mode (multiple events, also multiple events per REST Proxy call)
- Supported communication direction: Outbound, Inbound
- Batch mode allows multi-threading with multiple SAP work processes
Block architectures for Confluent and Kafka:

Set-up REST-based connectivity
To establish connectivity with the Confluent® Kafka® platform, proceed with the following activities and refer to the specific sections in this documentation.
- Create RFC destinations to the Confluent REST Proxy in SAP system settings
- Set up authentication against the Confluent REST Proxy
- Set up a connection instance in ASAPIO Integration Add-on customizing
- Configure an example outbound message to test the connectivity
Create RFC destination
Create a new RFC destination of type "G" (HTTP Connection to External Server).
- Transaction: SM59
- Create a new destination of type "G"
- Specify Target Host: endpoint of the Confluent REST Proxy
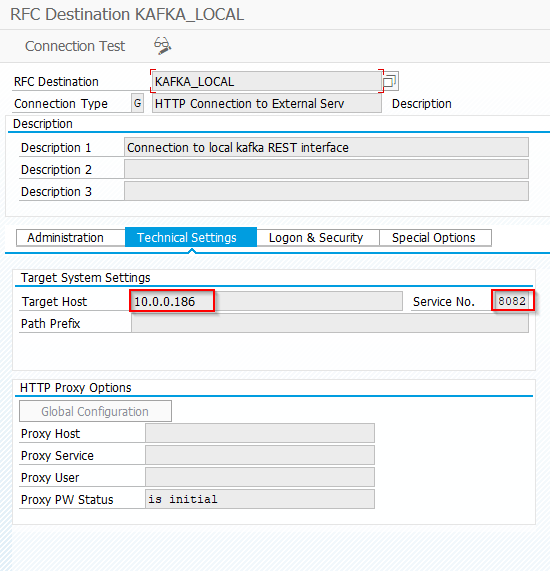
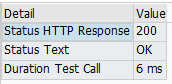
- Save and click Connection Test, which should result in HTTP status code 200
Set-up authentication to REST proxy
Prerequisites: Make sure you have either the user and password available for the REST Proxy, or that you exchanged certificates with the SAP system beforehand.
For further details on how to set up the proxy, see the Confluent documentation.
Configure authentication
While creating the RFC connection to the Confluent REST Proxy (see above), specify the authentication method.
- Transaction: SM59
- Choose the correct RFC destination
- Go to tab Logon & Security
- Select the authentication method:
- "Basic authentication", with username and password
- SSL certificate-based authentication


Set-up basic settings
Activate BC-Set
Business Configuration Sets (BC-Set) contain customizing and configuration-related table entries that are not imported with the add-on.
- Transaction: SCPR20
- BC-Set includes:
- Configuration for the cloud adapter
- Configuration for cloud codepages
- Definition of IDoc segments
- Activate the BC-Set with default values:
/ASADEV/ACI_BCSET_FRAMEWORK_KAFK
Configure cloud adapter
Add an entry for the connector to the list of cloud adapters:
- Transaction: SPRO
- Go to ASAPIO Cloud Integrator – Maintain Cloud Adapter
- Add New Entry and specify:
- Cloud Type: name with which to reference this type of connector
ACI Handler Class: /ASADEV/CL_ACI_KAFKA_HANDLER

Set-up cloud codepages
Specify the codepages used in the integration:
- Transaction: SPRO
- Go to ASAPIO Cloud Integrator – Maintain Cloud Codepages
- Add New Entry and specify the code pages to be used
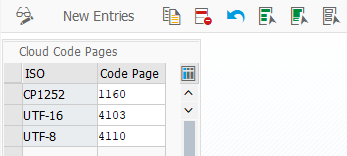
Set-up connection instance
Create the connection instance customizing that ties together the RFC destination created earlier and the cloud connector type:
- Transaction: SPRO
- Go to ASAPIO Cloud Integrator – Connection and Replication Object Customizing
- Or go directly to transaction:
/ASADEV/68000202 - Add New Entry and specify:
- Field Instance: a name for this connection
- Field RFC Dest. (Upload): the RFC destination created for the messaging endpoint
- Field ISO Code: the code page to use
- Field Cloud Type:
KAFKA(or the name you chose when adding the connector)
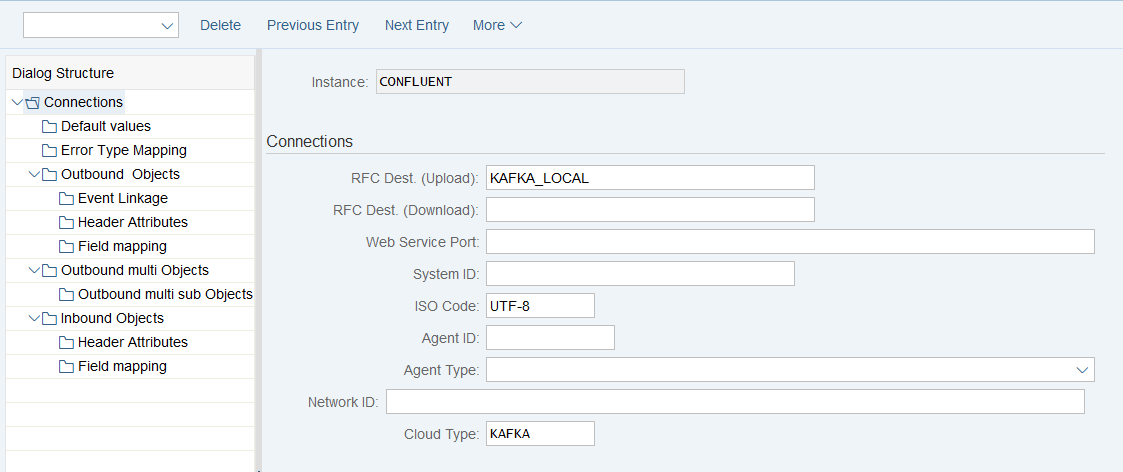
Set-up Error Type Mapping
Create an entry in the Error Type Mapping section and specify at least the following mapping:
| Resp. Code | Message Type |
|---|---|
| 207 | Success |
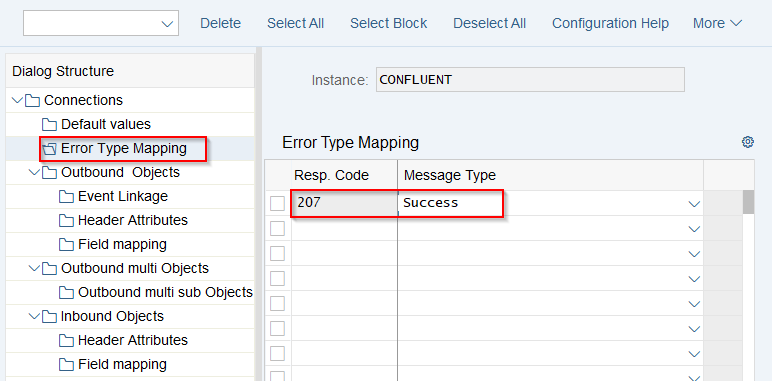
Set-Up Connection Values
Maintain default values for the connection to Confluent: Connections → Default values.
| Default Attribute | Default Attribute Value |
|---|---|
KAFKA_ACCEPT | application/vnd.kafka.v2+json |
KAFKA_CALL_METHOD | POST |
KAFKA_CONTENT_TYPE | application/vnd.kafka.json.v2+json for JSON payloads without schema information, or application/vnd.kafka.jsonschema.v2+json for JSON payloads with schema information (configured in header attributes) |
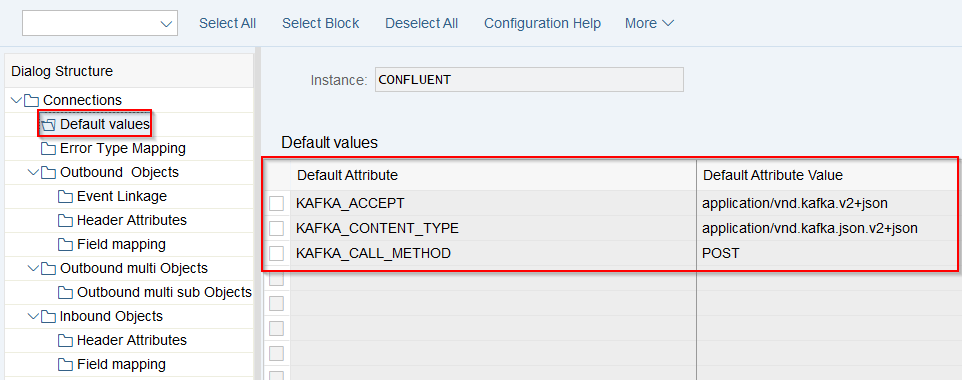
Set-up Kafka protocol connectivity
The connector for Kafka and Confluent also supports connectivity without a REST Proxy, via the native Kafka protocol. The Kafka connector sends the data to an ABAP daemon, which maintains a constant connection and session to your configured Kafka broker.
Kafka broker compatibility (native protocol)
On connect, the native protocol connector queries the broker (via ApiVersions) for the version range it supports per API, and negotiates the highest version both sides support. For the connection to work, your broker must support at least the minimum version listed below for each API:
| API | API Key | We support | Purpose |
|---|---|---|---|
| ApiVersions | 18 | v0 | Initial handshake, required on every broker to negotiate the versions below |
| SaslHandshake | 17 | v0 – v1 | Negotiate the SASL mechanism (PLAIN) before authentication |
| SaslAuthenticate | 36 | v0 – v1 | SASL/PLAIN authentication (username/password) |
| Metadata | 3 | v0 – v8 | Cluster/broker/topic/partition discovery, including partition leaders |
| Produce | 0 | v2 – v8 | Sending messages (record batches) to a partition leader |
These are all long-established version ranges supported by any current Confluent Platform, Confluent Cloud, or Apache Kafka broker; compatibility issues are only expected with very old (legacy) broker versions. If the broker's supported range for an API doesn't overlap with ours at all, the connection fails with an API_VERSION_MISMATCH error naming the exact API and the two ranges involved.
Create RFC Destination
Create a new RFC destination of type "G" (HTTP Connection to External Server).
- Transaction: SM59
- Create a new destination of type "G"
- Specify Target Host and Service No. (Port): endpoint for the Kafka broker

Add the certificates for the created destination to the certificate list selected on the Logon & Security tab:

Set-up Kafka protocol cloud adapter
Add an entry for the connector to the list of cloud adapters:
- Transaction: SPRO
- Go to ASAPIO Cloud Integrator – Maintain Cloud Adapter. Add New Entry and specify:
- Cloud Type: name with which to reference this type of connector
- ACI Handler Class:
/ASADEV/CL_S4_KAFKA_HANDLER

Set-up connection instance
Create the connection instance customizing that ties together the RFC destination created earlier and the cloud connector type:
- Transaction: SPRO
- Go to ASAPIO Cloud Integrator – Connection and Replication Object Customizing
- Or go directly to transaction:
/ASADEV/ACI_SETTINGS - Add New Entry and specify:
- Field Instance: a name for this connection
- Field RFC Dest. (Upload): the RFC destination created for the messaging endpoint
- Field ISO Code: the code page to use
- Field Cloud Type:
S4KAFKA(or the name you chose when adding the connector)

Default Values
| Default Attribute | Fallback value | Description |
|---|---|---|
DAEMON_BUSY_TICK_MS | 50 | Interval in milliseconds for the next processing tick while the daemon is busy and queue entries are available. Controls how frequently messages are actively processed. |
DAEMON_IDLE_SLEEP_MS | 300 | Interval in milliseconds for the next processing tick while the daemon is idle and no queue entries are available. Reduces unnecessary CPU usage during idle periods. |
DAEMON_MAX_ITEM_BYTES | 524288 | Maximum allowed size of a single payload in bytes. |
DAEMON_QUEUE_MAX_BYTES | 209715200 | Maximum total size of the in-memory queue in bytes. If the queue would exceed this limit, new messages are dropped due to backpressure. |
DAEMON_QUEUE_MAX_ITEMS | 10000 | Maximum number of messages allowed in the local in-memory queue. Additional messages are rejected once the limit is reached. |
DAEMON_QUEUE_TTL_SEC | 0 | Maximum time in seconds a message may remain in the local queue before it expires. A value of 0 means queue TTL handling is disabled. |
DAEMON_SEND_TIMEOUT_MS | 60000 | Timeout in milliseconds for sent messages waiting for a producer callback. |
DAEMON_TIMEOUT_CHECK_MS | 1000 | Interval in milliseconds for running timeout checks on queued and pending messages. |
DAEMON_SEND_PER_TICK | 50 | Maximum number of queued messages sent per daemon tick (batch size). Values below 1 are treated as 1. |
DAEMON_HANDOFF_RETRY_COUNT | 2 | Number of retry attempts when handing a batch off to the daemon fails with a retryable error (daemon not attached/temporarily unreachable). |
DAEMON_HANDOFF_RETRY_DELAY_MS | 1000 | Delay in milliseconds between handoff retry attempts. |
KAFKA_USERNAME | kafka_user | Username used for the Kafka connection (SASL). |
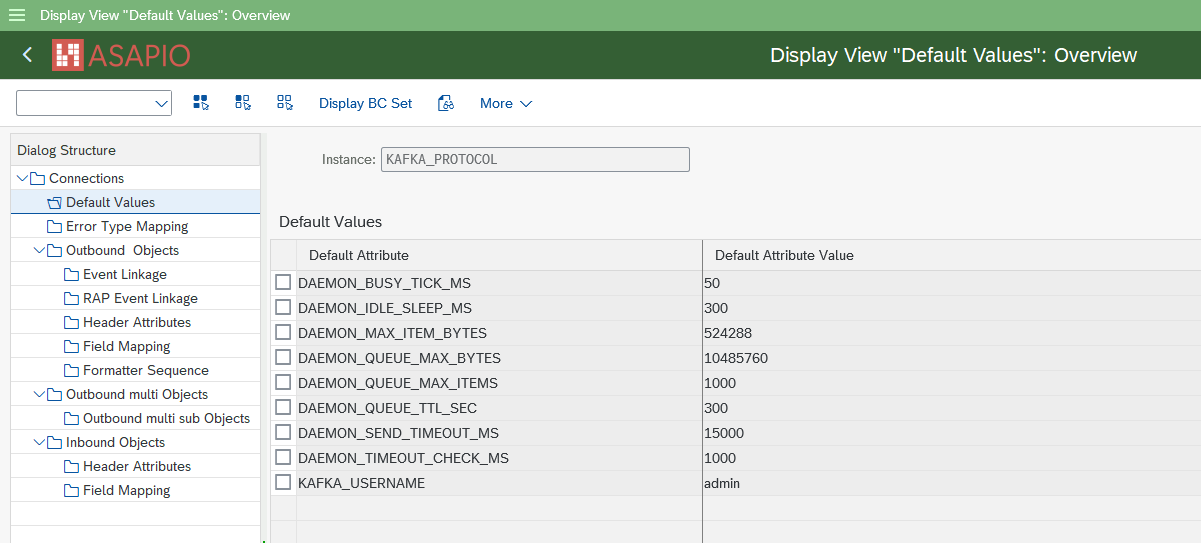
Set up SASL configuration
To perform authentication via SASL, you need a username and a password. These can be found in the broker settings. Note that there is usually a separate endpoint for SASL, and this must be configured.
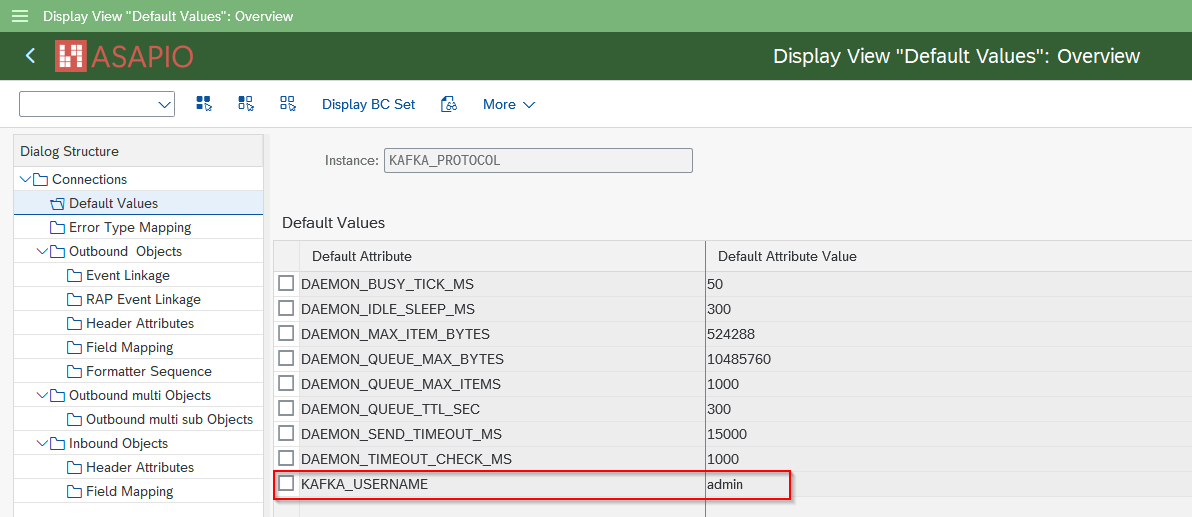
Save the username in Default Values
For SASL authentication, a username has to be saved in Default Values.
- Go to section Default Values
- Add New Entry and specify:
- KAFKA_USERNAME: e.g.
kafka_user
- KAFKA_USERNAME: e.g.
Save the password in SAP Secure Store
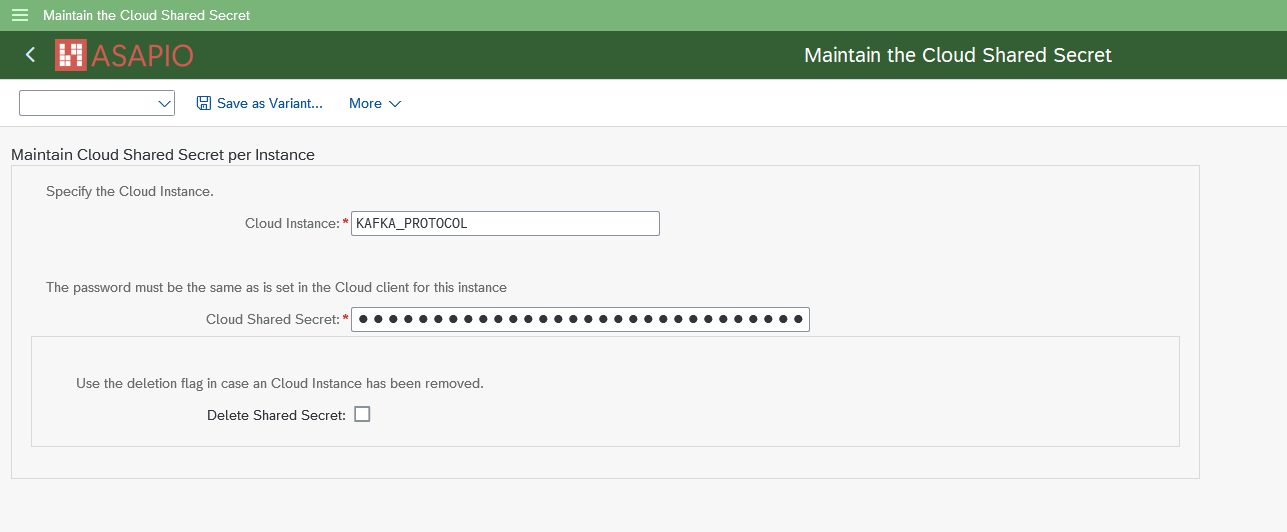
For SASL authentication, a password has to be stored in the system's SAP Secure Store.
Enter the password in the SAP Secure Store:
- Transaction: SPRO
- Go to ASAPIO Cloud Integrator – Set the cloud connection password
- Or go directly to transaction:
/ASADEV/SCI_TPW - Select the created Cloud Instance
- Enter the password in the Cloud Shared Secret field and execute
Cluster discovery, leader-aware routing, and partitioning
Bootstrap and cluster discovery – The RFC destination configured for the native protocol connector (see Create RFC Destination above) only needs to point to a single bootstrap broker endpoint; it does not need to list every broker in the cluster. On connect, the connector sends a Metadata request to this bootstrap broker and receives the full cluster topology in return: all brokers, all topics/partitions, and the current partition leader for each partition. This metadata is cached and refreshed automatically (e.g. on connection loss or leader change).
Leader-aware routing – Once the partition leader for a given topic/partition is known, the connector opens a direct connection to that broker and sends the Produce request there, not through the bootstrap broker. If a topic's partitions are spread across multiple brokers, the connector transparently maintains one connection per broker as needed and routes each message to the correct leader. This matches the behavior of standard Kafka client libraries and requires no additional configuration beyond the single bootstrap RFC destination.
Partition assignment (KAFKA_KEY_FIELD) – When a message key is provided (via KAFKA_KEY_FIELD), the connector hashes the key (MurmurHash2, the same algorithm used by Kafka's own default partitioner) to consistently select a partition: the same key value always maps to the same partition, preserving relative ordering for that key while still allowing consumers to process different partitions in parallel. Without a key, messages are distributed across partitions at random, with no ordering guarantee.
Error Handling and Tracing
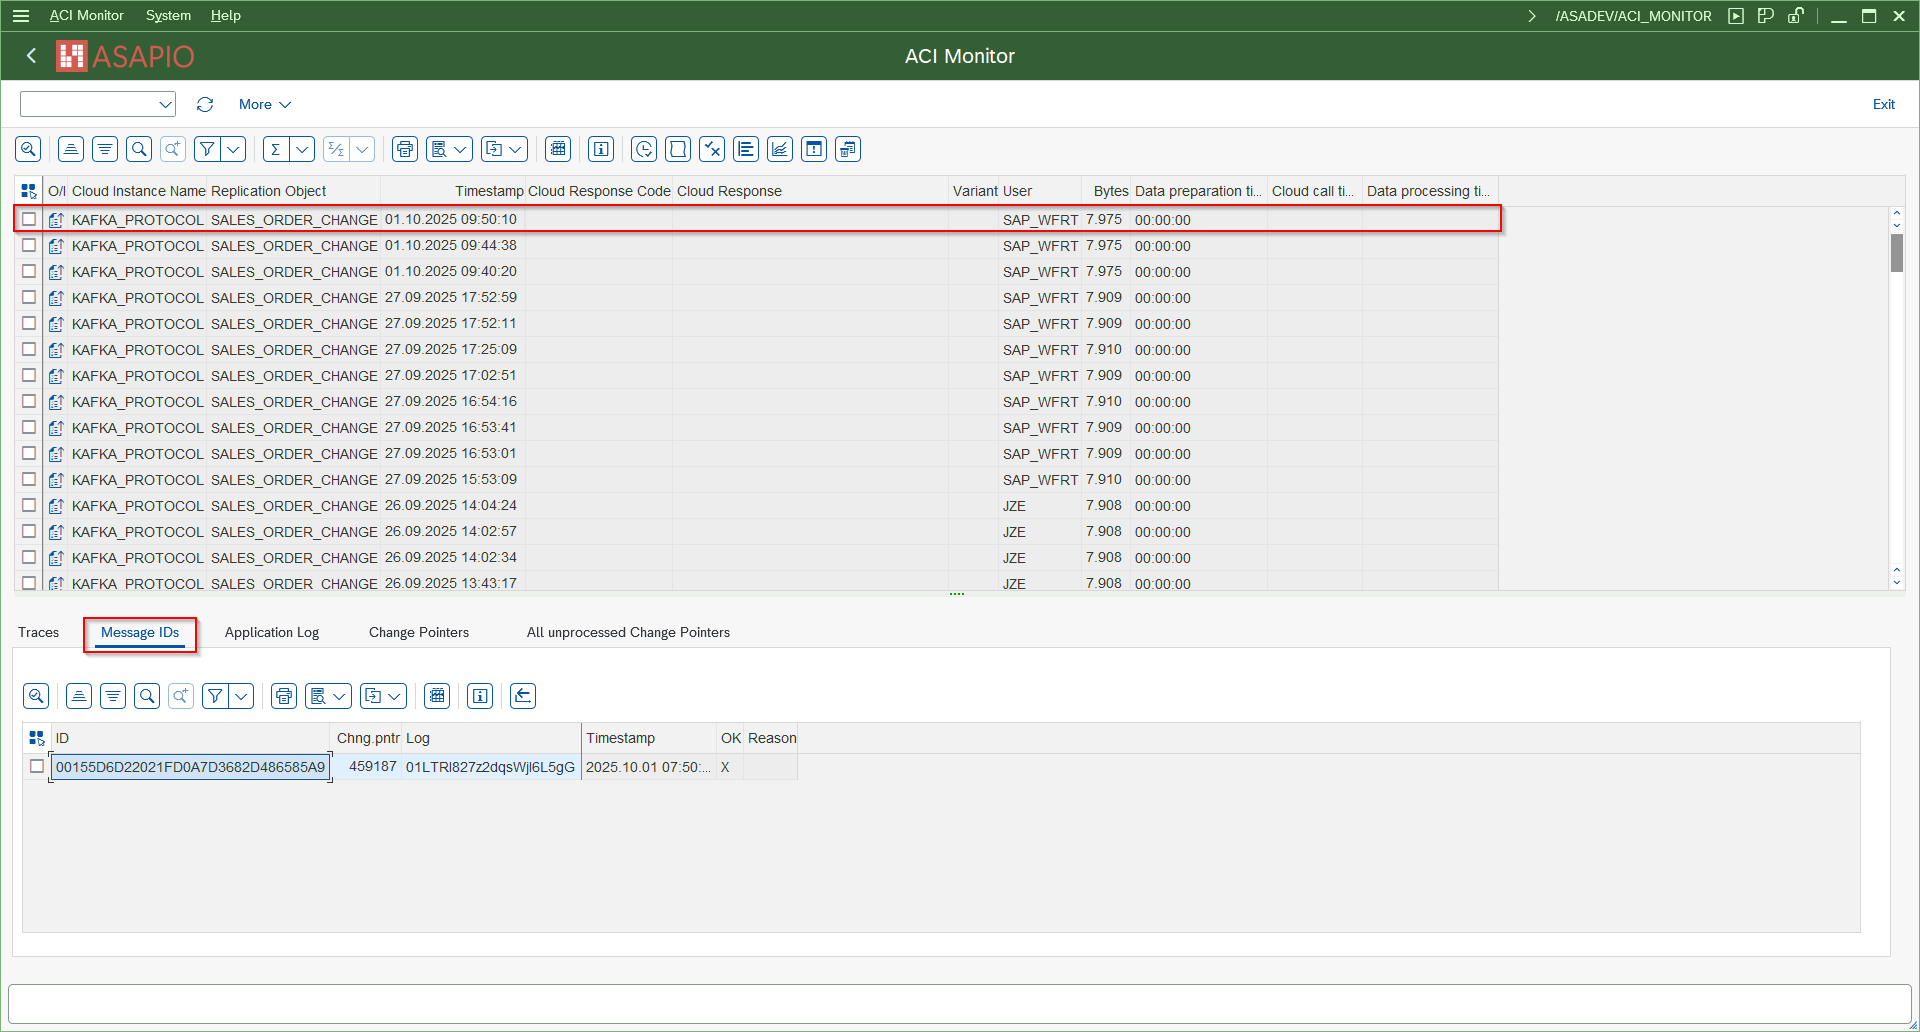
The Kafka protocol connector hands off messages to the ABAP daemon asynchronously. Successful delivery and final failures (after exhausting retries) are reported back and visible in the ACI Monitor under the Message IDs tab. Intermediate retry attempts are only visible in the daemon's own log.
Monitor and restart the Kafka daemon
The native Kafka protocol connector runs as a persistent ABAP Daemon instance, managed through ASAPIO's own daemon administration transaction (not the generic SAP daemon monitor).
- Transaction:
/ASADEV/DAEMON_CONF - Instances configured in
/ASADEV/ACI_SETTINGSappear here automatically - From here you can start, stop, restart the daemon instance, and reset the configuration stored in the daemon startup config
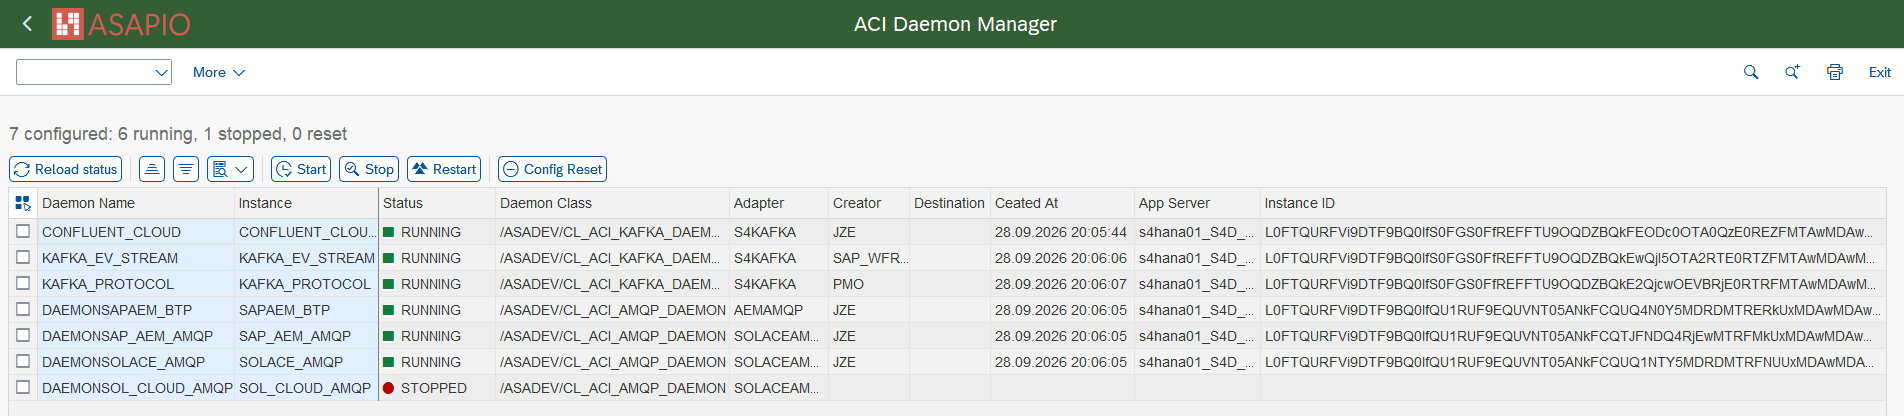
/ASADEV/DAEMON_CONF) – overview of all configured daemon instances and their statusThe daemon automatically reconnects to the broker on connection loss; a manual restart via /ASADEV/DAEMON_CONF is normally only needed for troubleshooting.
Set-up outbound messaging
Create Message Type
Example: the examples below use the Sales Order (BUS2032) event. Choose any other suitable example if required.
For each object to be sent via ACI, you have to create a message type:
- Transaction: WE81
- Add New Entry and specify:
- Message Type: unique name for the integration
- Description: description of the purpose

Activate Message Type
The created message type has to be activated:
- Transaction: BD50
- Add New Entry and specify:
- Message Type: the created message type
- Active: tick the checkbox
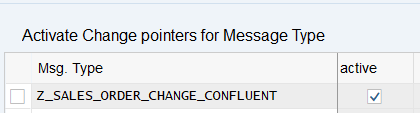
Set-up additional settings in 'Header Attributes'
Configure the topic to send the events to, the fields to be used for the key, and the IDs of the key/value schemas:
- Go to section Header Attributes
- Add New Entry and specify:
| Header Attribute | Header Attribute Value |
|---|---|
KAFKA_TOPIC | <topic name>, e.g. sap_demo.sales_order |
KAFKA_KEY_FIELD | <fields for key> (separated by ";" if multiple), e.g. VBELN;AUART |
KAFKA_SCHEMA_ID | <id of value schema in Schema Registry>, e.g. 4711 |
KAFKA_KEY_SCHEMA_ID | <id of key schema in Schema Registry>, e.g. 4712 |
Due to limitations in the REST Proxy, you always have to specify schemas for both key and value.
Format of the key with multiple fields – When a single field is configured in KAFKA_KEY_FIELD, the raw field value is used as the Kafka message key. When multiple fields are configured (separated by ;), the resulting key is a JSON object with the SAP field names as keys, e.g.:
{
  "VBELN": "162",
  "AUART": "OR"
}
This is an ASAPIO-specific convention (there is no universal standard for composite Kafka message keys) – documented here so consumers know what to expect when parsing the key.

Using Apache Avro
Use the format function /ASADEV/ACI_AVRO_JSON_FORMAT (together with extraction function /ASADEV/ACI_GEN_PDVIEW_EXTRACT) on the outbound object configuration to serialize messages against a schema registered in the Confluent Schema Registry. We support Avro JSON serialization encoding (not Avro binary).
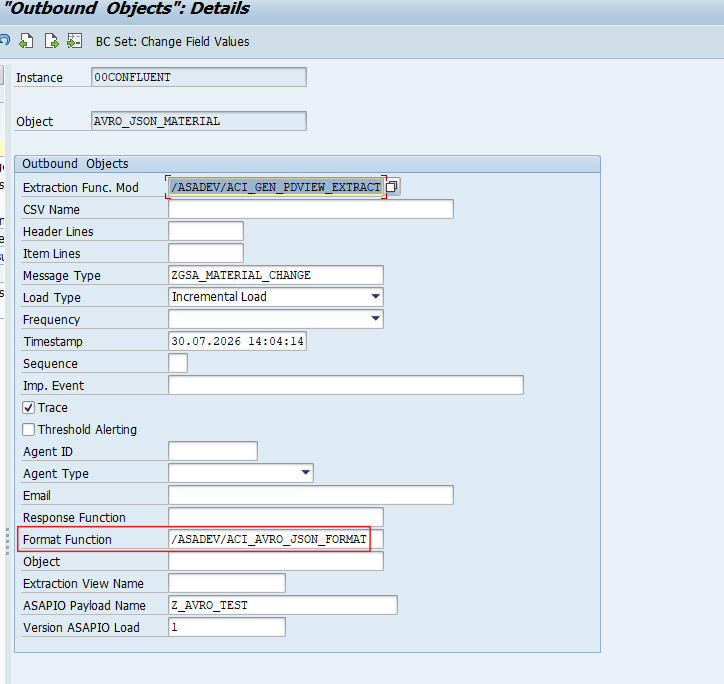
Set these header attributes on the outbound object, in addition to KAFKA_TOPIC, KAFKA_SCHEMA_ID and KAFKA_KEY_SCHEMA_ID above:
| Header Attribute | Header Attribute Value |
|---|---|
KAFKA_CONTENT_TYPE | application/vnd.kafka.avro.v2+json |
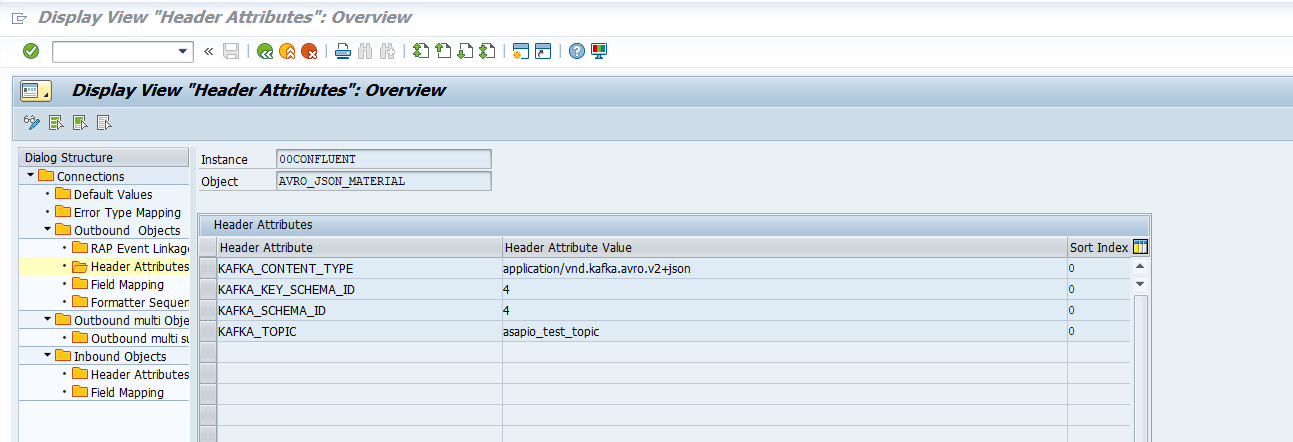
KAFKA_REGISTRY_URL does not need to be set per outbound object – the Confluent Schema Registry URL is read from the connection level (as a default value), so it only needs to be configured once for the connection, not repeated per interface.
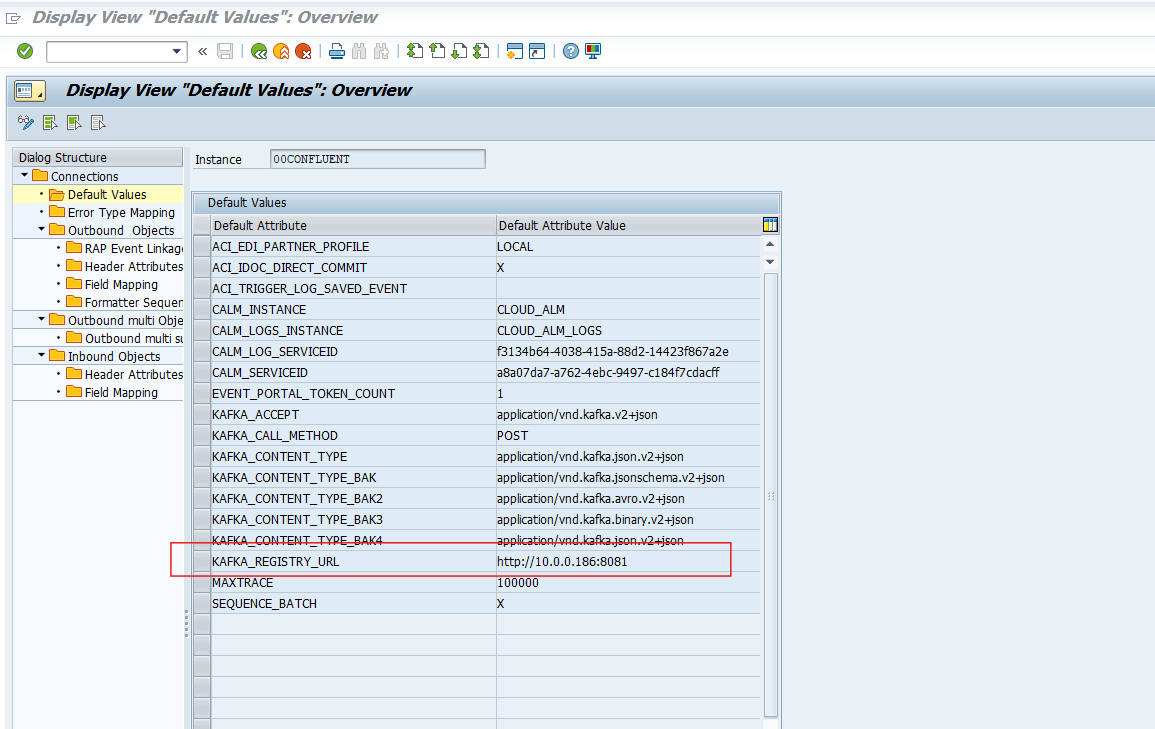
KAFKA_REGISTRY_URLThe payload itself must be built in the Payload Designer (/n/ASADEV/DESIGN) before the Avro schema can be registered: each table's name and each field's PayloadFieldName must match the names used in the schema, and parent/child table relationships must mirror the nesting the schema defines. A mismatch between the two surfaces as a validation error when the outbound object runs.
Registering the schema in Kafka
Before an outbound object can use a schema ID, that schema must already exist in the Confluent Schema Registry:
- Open Confluent Control Center and navigate to the target topic.
- Go to the Schema tab.
- Choose Set a schema (or Edit schema if one already exists and you are evolving it).
- Select AVRO as the schema type.
- Paste in the
.avscschema definition (see structure notes below). - Register/Save. Control Center returns a numeric schema ID – this is the value to put into
KAFKA_SCHEMA_ID(andKAFKA_KEY_SCHEMA_IDif a separate key schema was registered).
Registering the same schema content again under a different subject reuses the same ID rather than creating a duplicate; changing the schema's content (e.g. adding a field) creates a new schema ID – outbound objects using the old ID need to be updated to the new one.
Schema structure notes
- Every table – including the root/header table – wraps its own fields under its own name in the actual JSON output (e.g.
{"MARA": [...]}). The schema must reflect this: even the root table's fields sit inside an array wrapper named after that table. - A table's name in the schema must match its configured payload name (Payload Designer's PayloadTableName), not necessarily the raw ABAP table name – these can differ.
- Optional fields are expressed as a union with null:
["null", "string"], with"default": null. - Boolean fields are a plain
"boolean"type (never nullable). - Date fields use the date logical type:
["null", {"type": "int", "logicalType": "date"}]. - Decimal/currency/quantity fields use the decimal logical type, with both precision and scale specified:
["null", {"type": "bytes", "logicalType": "decimal", "precision": 13, "scale": 3}]. - Nested tables (e.g. a child table under a parent) are arrays of records, nested inside the parent record's own field list.
Example (Material Master, MARA + MARD):
{
  "type": "record",
  "name": "MaterialEvent",
  "fields": [
    {
      "name": "MARA",
      "type": {
        "type": "array",
        "items": {
          "type": "record",
          "name": "Mara",
          "fields": [
            { "name": "MANDT", "type": "string" },
            { "name": "MATNR", "type": "string" },
            { "name": "ERSDA", "type": ["null", {"type": "int", "logicalType": "date"}], "default": null },
            { "name": "ERNAM", "type": ["null", "string"], "default": null },
            { "name": "LVORM", "type": "boolean" },
            {
              "name": "MARD",
              "type": {
                "type": "array",
                "items": {
                  "type": "record",
                  "name": "Mard",
                  "fields": [
                    { "name": "WERKS", "type": "string" },
                    { "name": "LGORT", "type": "string" }
                  ]
                }
              }
            }
          ]
        }
      }
    }
  ]
}
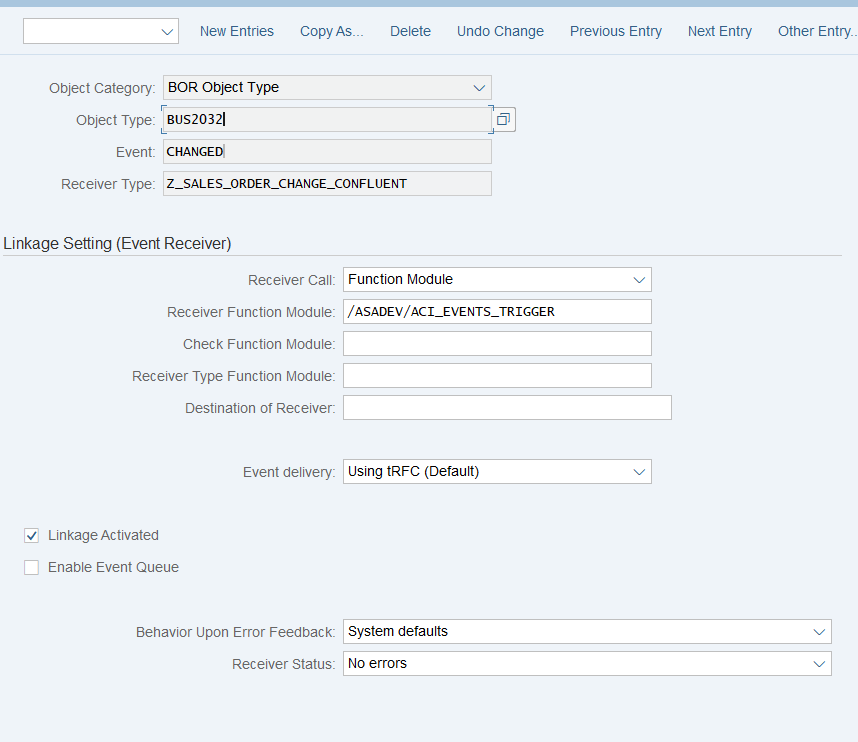
Set up 'Business Object Event Linkage'
Link the configuration of the outbound object to a Business Object event:
- Go to section Header Attributes, or use transaction SWE2
- Add New Entry and specify:
- Object Category: BO BOR Object Type
- Object Type: the Business Object Type sending the event
- Event: the event to react to
- Receiver Type: the message type of the outbound object (this is the link to the add-on configuration)
- Receiver Call: Function Module
- Receiver Function Module:
/ASADEV/ACI_EVENTS_TRIGGER - Linkage Activated: tick the checkbox
How to use Simple Notifications
Create Outbound Object configuration
- Transaction: SPRO
- Go to ASAPIO Cloud Integrator – Connection and Replication Object Customizing
- Or go directly to transaction:
/ASADEV/68000202 - Select the created Connection
- Go to section Outbound Objects
- Add New Entry and specify:
- Object: name of the outbound configuration
- Extraction Func. Module:
/ASADEV/ACI_GEN_NOTIFY_KAFKA - Message Type: the created message type
- Load Type: Incremental Load
- Trace: activate for testing purposes
- Response Function:
/ASADEV/ACI_KAFKA_RESP_HANDLER

Test the outbound event creation
In the example above, pick any test sales order in transaction /nVA02 and force a change event, e.g. by changing the requested delivery date on header level.
For outbound messaging, you can use and even combine the following methods:
- Simple Notifications
- Message Builder (Generic View Generator)
- IDoc capturing
- Custom-built triggers and extractors
A prerequisite for all methods is to create a message type, which is used throughout the configuration process. The following sections explain the individual options.
How to use Message Builder (Generic View Extractor)
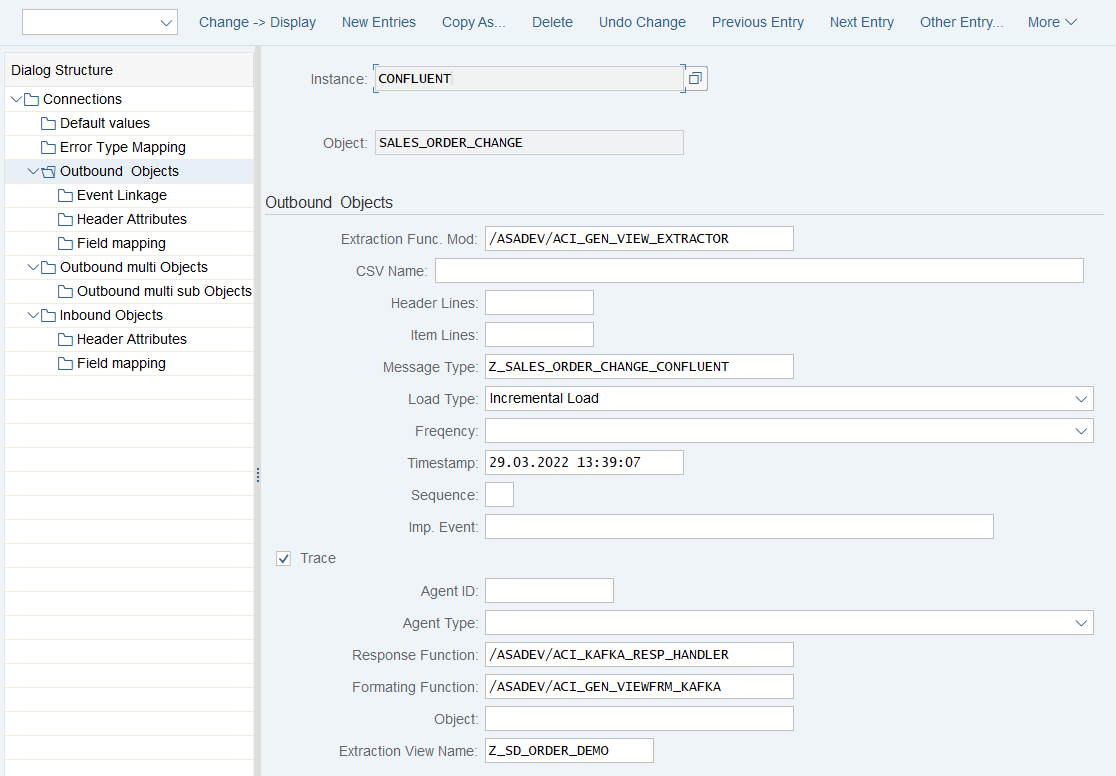
Create Outbound Object configuration
- Transaction: SPRO
- Go to ASAPIO Cloud Integrator – Connection and Replication Object Customizing
- Or go directly to transaction:
/ASADEV/68000202 - Select the created Connection
- Go to section Outbound Objects
- Add New Entry and specify:
- Object: name of the outbound configuration
- Extraction Func. Module:
/ASADEV/ACI_GEN_VIEW_EXTRACTOR - Message Type: the created message type
- Load Type: Incremental Load
- Trace: activate for testing purposes
- Response Function:
/ASADEV/ACI_KAFKA_RESP_HANDLER - Formatting Function:
/ASADEV/ACI_GEN_VIEWFRM_KAFKA - Extraction View Name: create a database view in transaction SE11 (see Create database view below)
Create database view
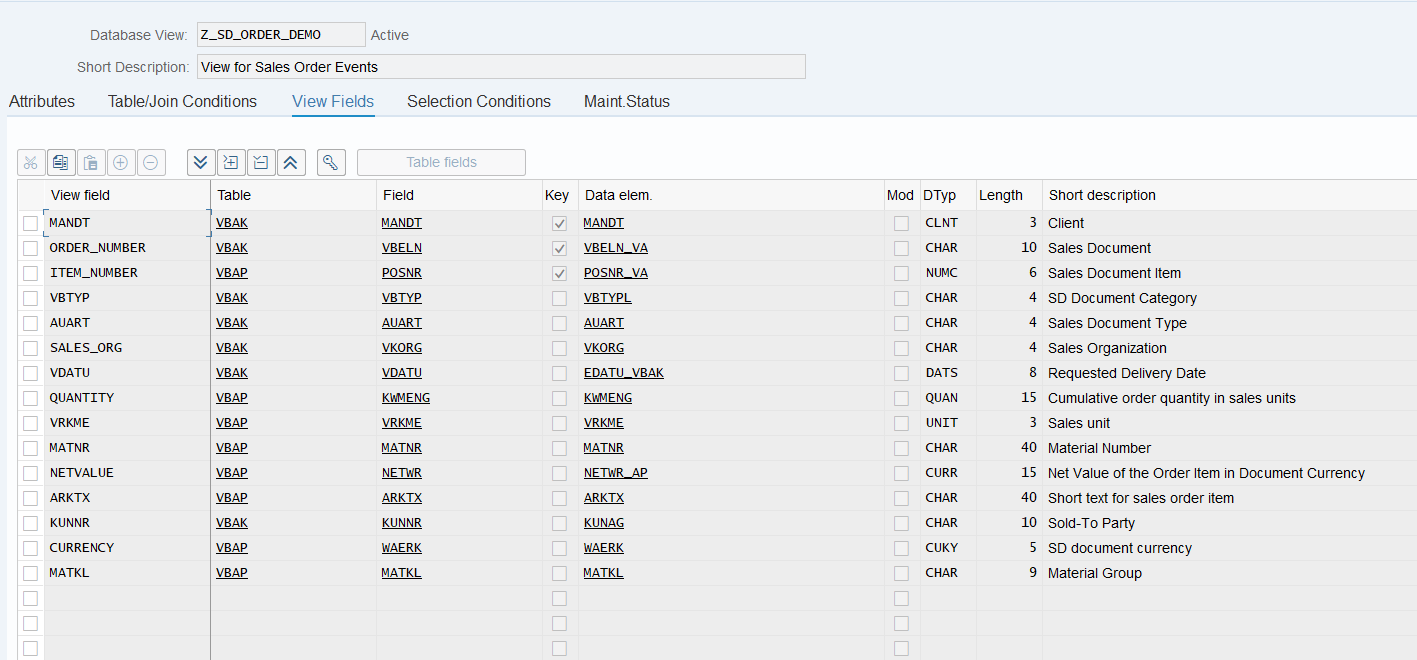
For the data events, also configure the DB view that is used to define the extraction:
- Transaction: SE11 (for SAP ERP or S/4HANA on-premise deployments with SAP GUI access)
- Alternatively, use Eclipse with ABAP Development Tools, or the SAP Fiori app "Create Custom CDS Views", if available in your SAP S/4HANA system
Example: Sales Order view (e.g. to be used for Sales Order (BUS2032) change events)

Test the outbound event creation
In the example above, pick any test sales order in transaction /nVA02 and force a change event, e.g. by changing the requested delivery date on header level.
Set-up Batch Job (Job processed messaging)
The Batch Job method allows scheduling periodic full or delta loads to Kafka without relying on SAP event linkage. This is useful for initial loads or when real-time event triggers are not feasible.
Prevent synchronous call for message type
Note
With the following settings, change pointers will be set but not sent directly.
- Transaction: SPRO
- Go to ASAPIO Cloud Integrator – Connection and Replication Object Customizing
- Or go directly to transaction:
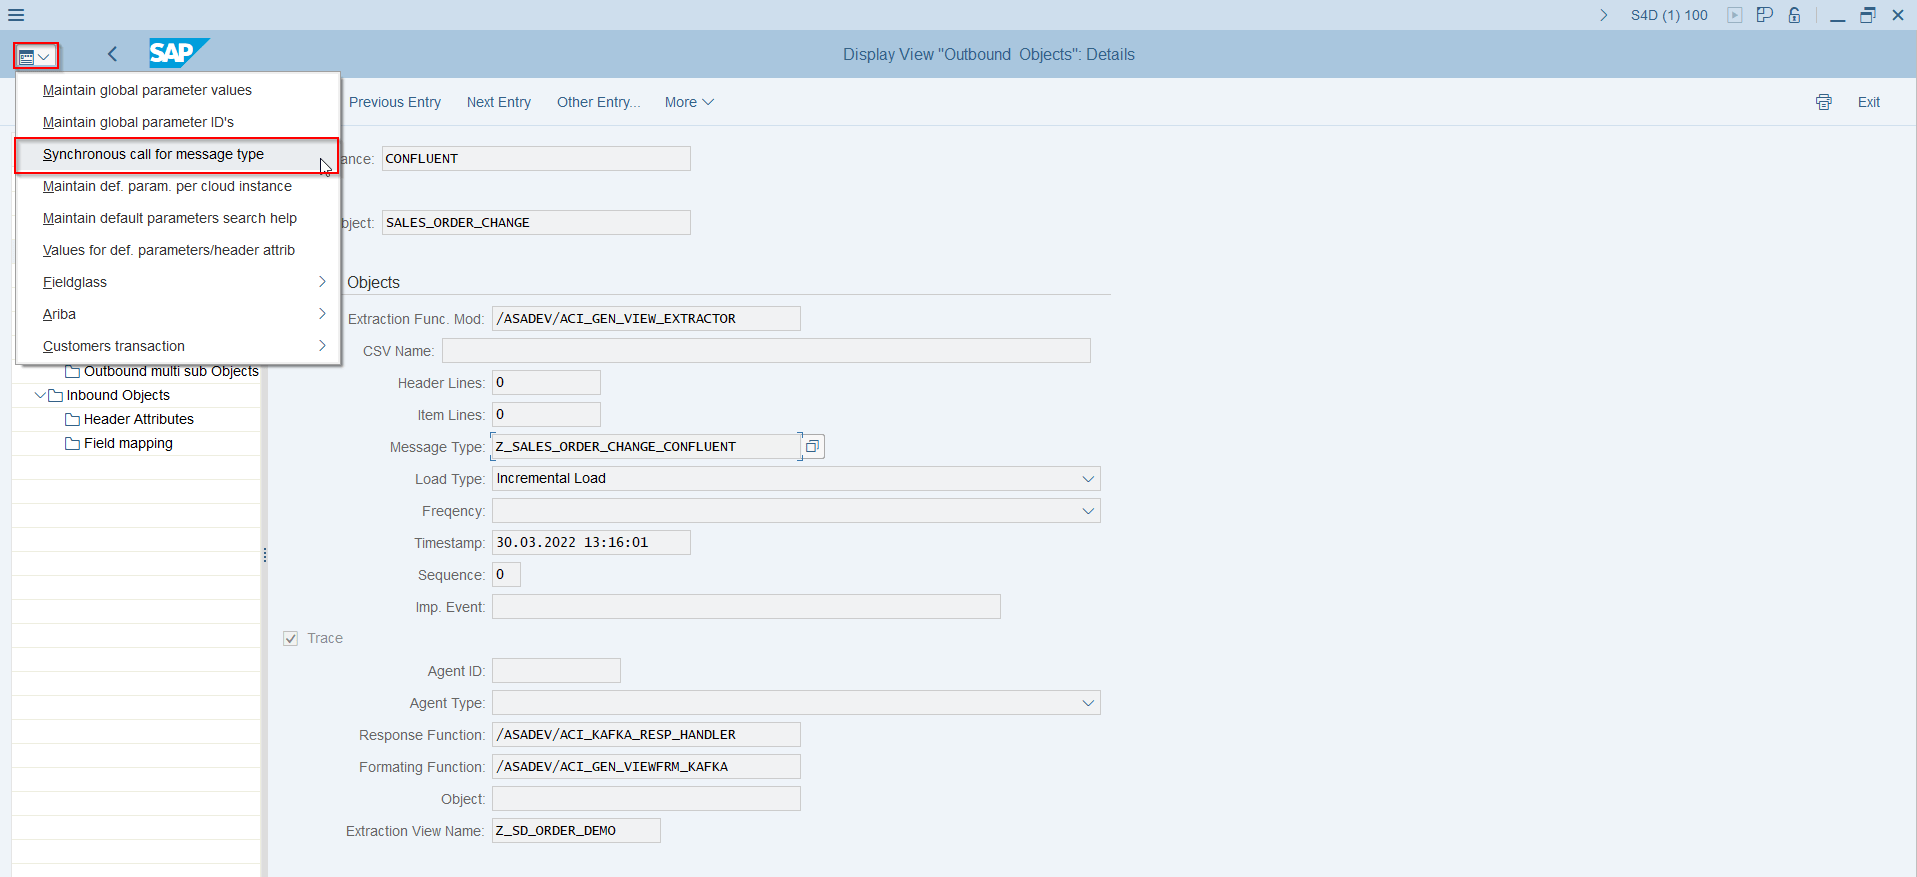
/ASADEV/68000202 - Click on Synchronous call for message type, or go directly to transaction
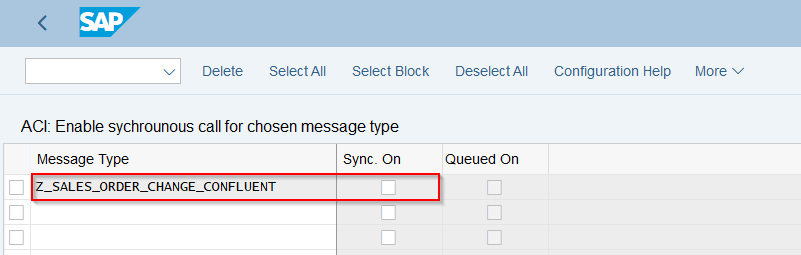
/ASADEV/ACI_SYNC - Add New Entry and specify:
- Message Type: the created message type
- Sync. On: clear the checkbox (change pointers will be set and the event is not sent)
Define Variant
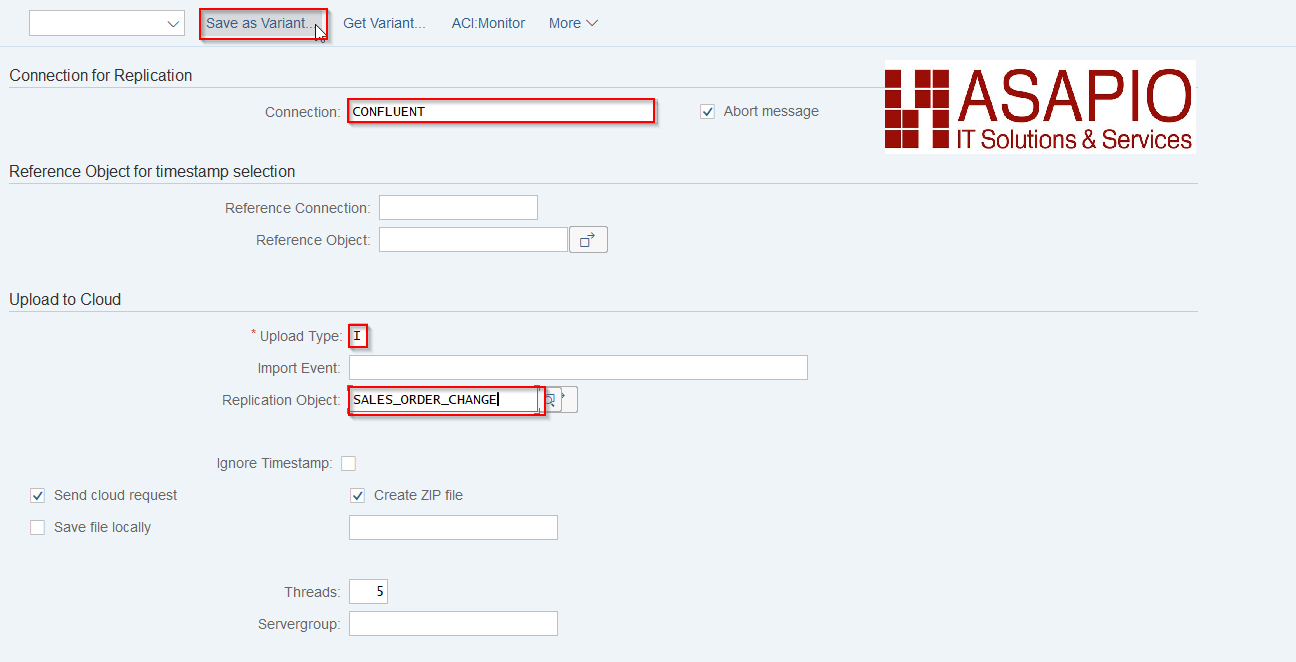
- Transaction:
/ASADEV/ACI - Select the Connection and hit enter
- Select Upload Type: I
- Select Replication Object
- Save Variant
Schedule background job
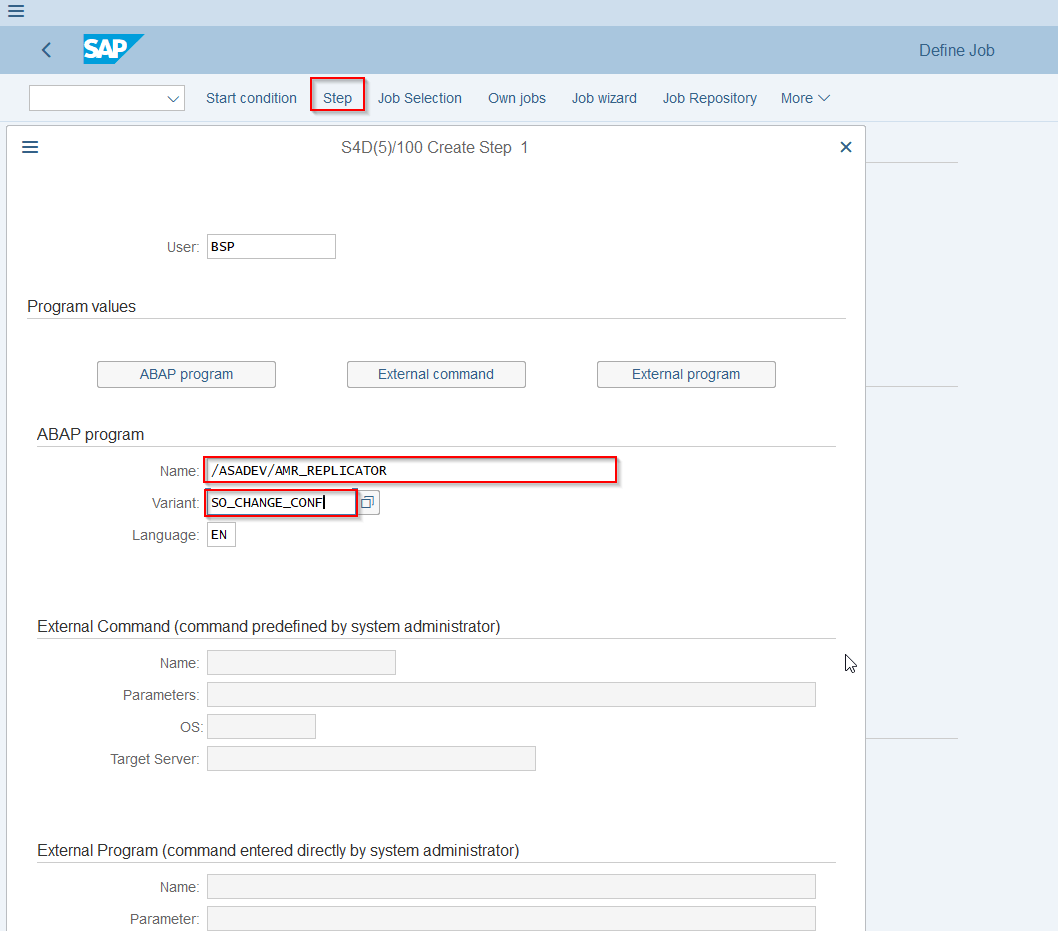
- Transaction: SM36
- Choose your start conditions
- ABAP program:
/ASADEV/AMR_REPLICATOR - Variant: the created and saved variant
Test background job
- First create an event
- Then run the job
- Check the ACI Monitor in transaction
/ASADEV/ACI_MONITOR: you can see the Variant and the Trace. For troubleshooting, check the SLG1 log.

Set-up Packed Load (split large data)
Create Outbound Object configuration
- Transaction: SPRO
- Go to ASAPIO Cloud Integrator – Connection and Replication Object Customizing
- Or go directly to transaction:
/ASADEV/68000202 - Select the created Connection
- Go to section Outbound Objects
- Add New Entry and specify:
- Object: name of the outbound configuration
- Extraction Func. Module:
/ASADEV/ACI_GEN_VIEW_EXTRACTOR - Message Type: the created message type (optional)
- Load Type: Packed Load
- Trace: activate for testing purposes
- Response Function:
/ASADEV/ACI_KAFKA_RESP_HANDLER - Formatting Function:
/ASADEV/ACI_GEN_VIEWFRM_KAFKA(depending on your use case) - Extraction View Name: create a database view in transaction SE11
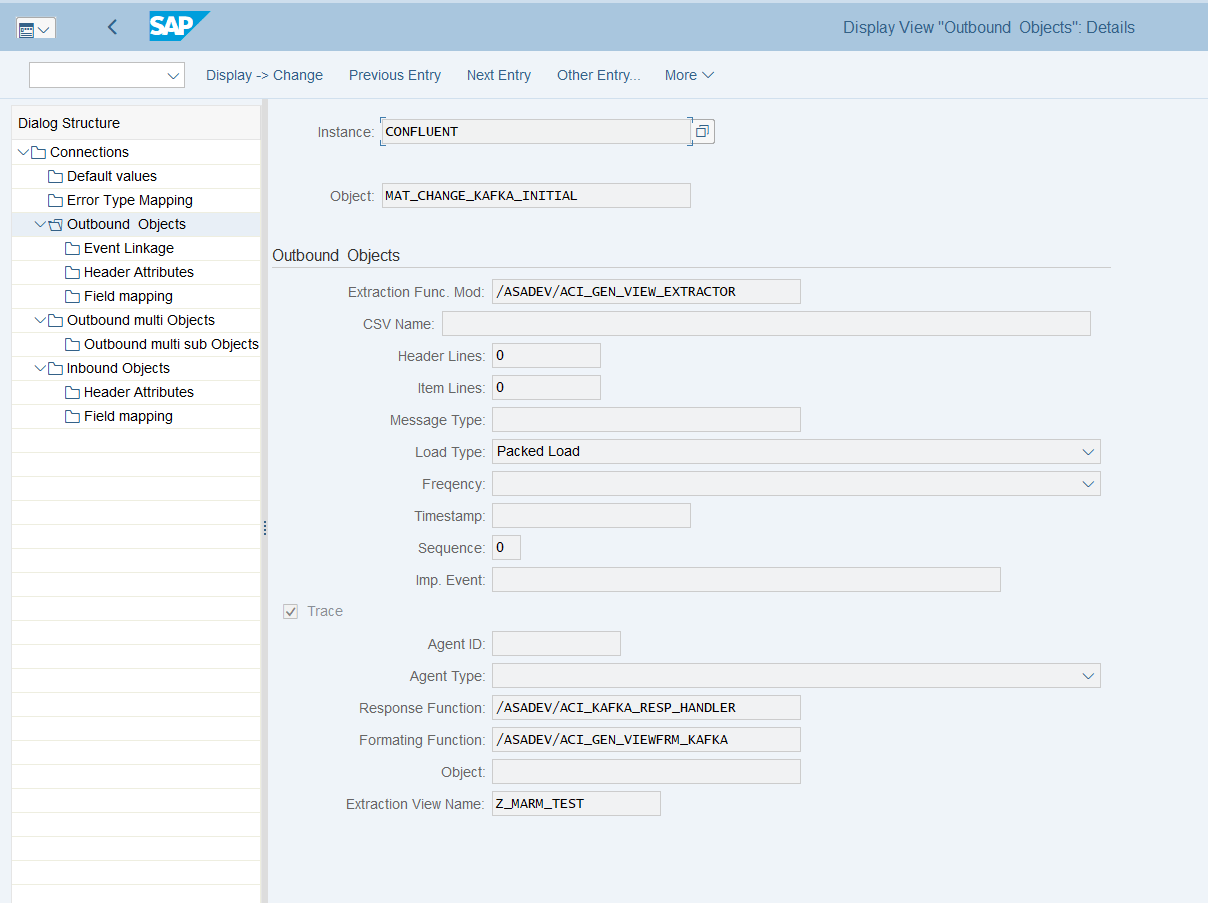
Create database view
Note
See also Create database view above.
For the data events, also configure the DB view that is used to define the extraction:
- Transaction: SE11 (for SAP ERP or S/4HANA on-premise deployments with SAP GUI access)
- Alternatively, use Eclipse with ABAP Development Tools, or the SAP Fiori app "Create Custom CDS Views", if available in your SAP S/4HANA system
Example: Material master view
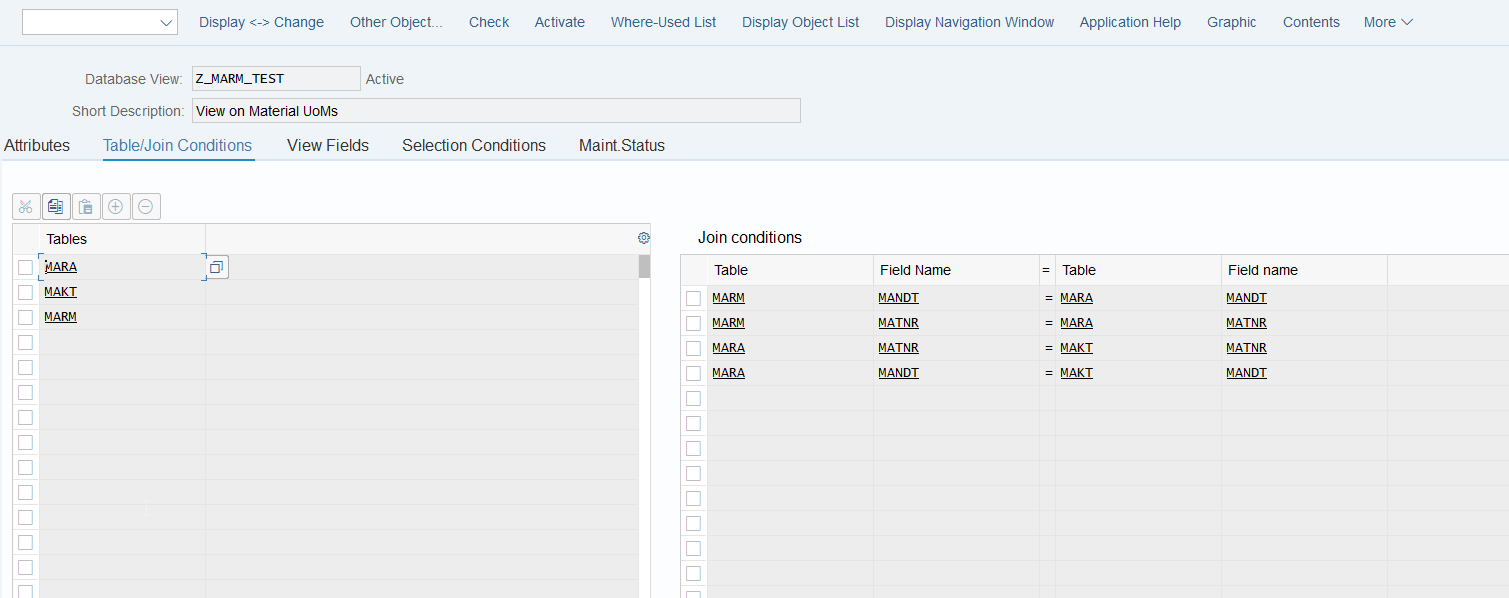
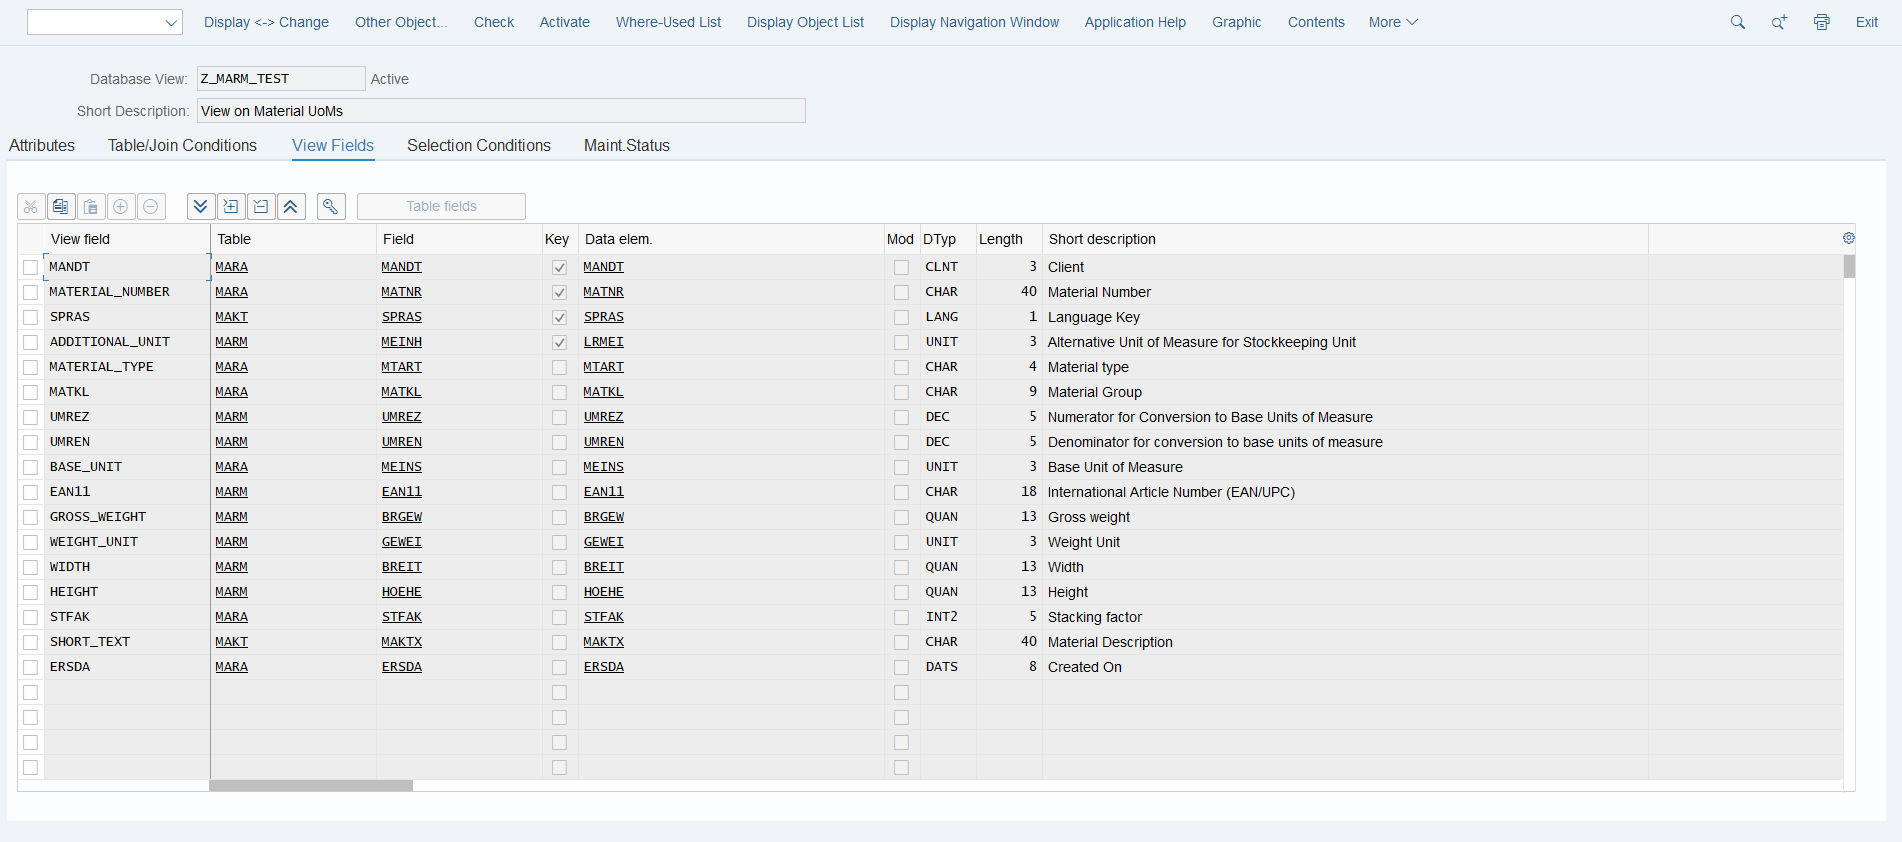
Set-up 'Header Attributes'
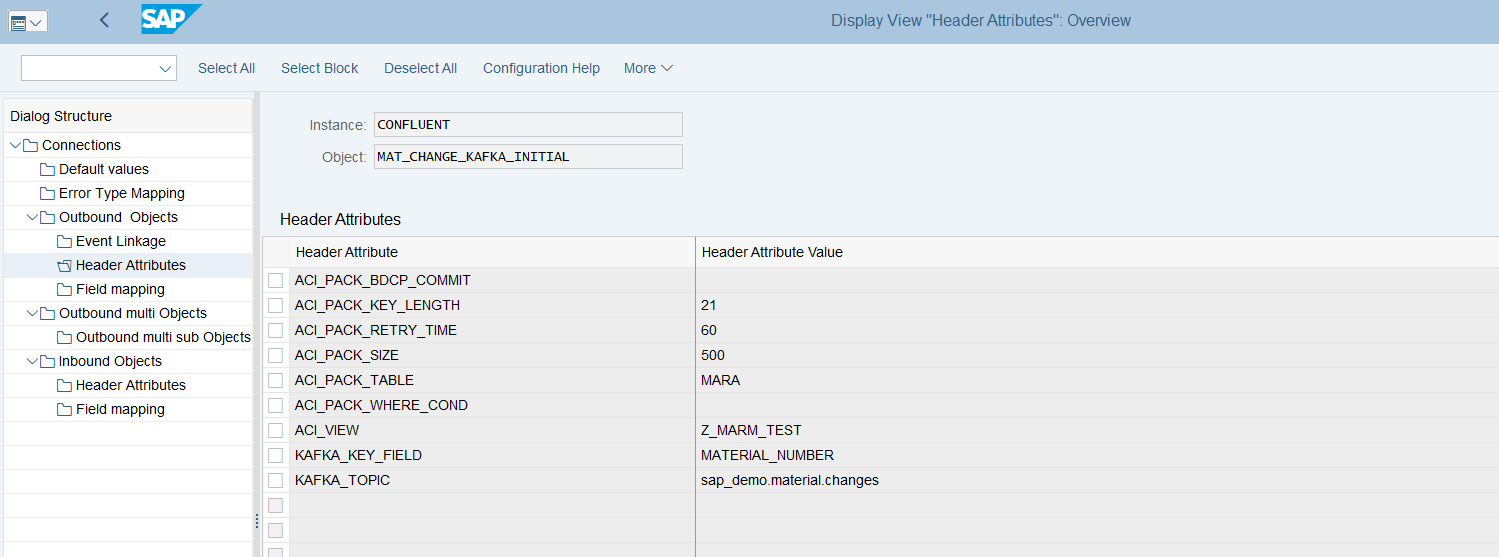
- Go to section Header Attributes of the outbound object created previously
- Add New Entry and specify the header attributes and values
| Header attribute | Description | Example |
|---|---|---|
ACI_PACK_BDCP_COMMIT | Flag for change pointer creation. If set, change pointers will be generated for every entry. If this flag is set, a message type has to be maintained in the outbound object. Caution: this may heavily impact performance. | X |
ACI_PACK_TABLE | Name of the table to take the key fields from. This is typically different from the DB view specified in ACI_VIEW, as we only want to build packages based on the header object, and the DB view typically contains sub-objects as well. | MARA |
ACI_PACK_RETRY_TIME | Time in seconds. This is the duration in which the framework will attempt to get a new resource from the server group. | 60 |
ACI_PACK_WHERE_COND (optional) | Condition that is applied to the table defined in ACI_PACK_TABLE. | e.g. AEDAT GT '20220101' |
ACI_PACK_SIZE | Number of entries to send. | 500 |
ACI_PACK_KEY_LENGTH | Length of the key to use from ACI_PACK_TABLE (e.g. MANDT + MATNR). | 13 |
KAFKA_KEY_FIELD | Name of the key field. | MATERIAL_NUMBER |
KAFKA_TOPIC | Topic name in your Confluent broker. | Example.topic |
Execute the initial load
Warning
Depending on the amount of data, this can stress the SAP system servers immensely. Always consult with your basis team for the correct server group to use.
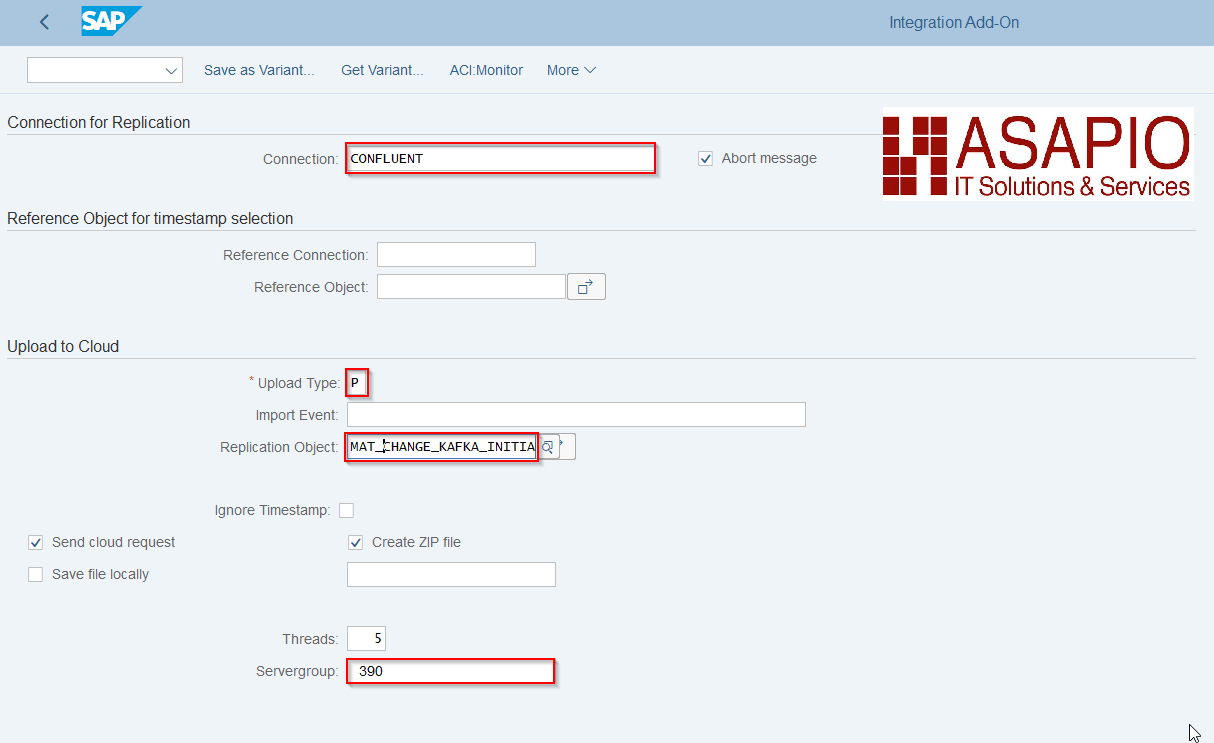
- Transaction:
/ASADEV/ACI - Select the Connection and hit enter
- Select Upload Type: P
- Select Replication Object
- Select a Server group (this is mandatory)
Set-up Dead Letter Queues (DLQ)
With release 2510, ASAPIO introduced the option to send a message to an alternate topic (Dead Letter Queue) in two cases:
- if a message fails repeatedly (e.g. after a specified number of retries)
- on specified error codes
Outbound Object configuration
In the Confluent/Kafka instances, the relevant header attributes need to be configured for the outbound objects that should push messages to a Dead Letter Queue:
- Transaction: SPRO
- Go to ASAPIO Integration Add-on – Connection and Replication Object Customizing, or go directly to transaction
/ASADEV/ACI_SETTINGS - Select your Confluent/Kafka instance and go to Outbound Objects
- Select the relevant outbound object and go to Header Attributes:
- Field: Header Attribute – attribute identifier
- Field: Header Attribute Value
- Add the relevant header attributes:
- DLQ_TOPIC: the DLQ topic that the message needs to be pushed to
- DLQ_ERROR_CODES: the HTTP error codes that should push the message directly to the DLQ topic, without retries
- DLQ_RETRIES: the number of retries after which a message should be pushed to the DLQ topic
| Header Attribute | Header Attribute Example Value |
|---|---|
DLQ_TOPIC | sap_demo.dlq |
DLQ_ERROR_CODES | 900,700,302 |
DLQ_RETRIES | 2 |

Standard Function Modules
Function Modules: Event Linkage
| Function name | Description |
|---|---|
/ASADEV/ACI_EVENTS_TRIGGER | Customizable trigger for event processing |
Function Modules: Outbound
Mandatory Response Handler: /ASADEV/ACI_KAFKA_RESP_HANDLER (Kafka response handler method)
| Extraction Func. Module | Formatting Function |
|---|---|
/ASADEV/ACI_GEN_NOTIFY_KAFKA (Simple notification event) | — |
/ASADEV/ACI_GEN_VIEW_EXTRACTOR (Dynamic data selection) | /ASADEV/ACI_GEN_VIEWFRM_KAFKA (Formatting function for DB-View extraction) |
/ASADEV/ACI_GEN_PDVIEW_EXTRACT (Payload Designer-based extraction) | /ASADEV/ACI_AVRO_JSON_FORMAT (Avro serialization against a registered Schema Registry schema) |
Function Modules: Inbound
| Function name | Description |
|---|---|
/ASADEV/ACI_SAMPLE_IDOC_JSON | Inbound JSON to generic IDoc |
/ASADEV/ACI_SAMPLE_IDOC_JSON2 | Inbound JSON to the new and improved generic IDoc |
/ASADEV/ACI_JSON_TO_IDOC | Converts a specially formatted JSON message to a SAP standard IDoc |
/ASADEV/ACI_IDOC_JSON_AS_XML | Obsolete — use /ASADEV/ACI_SAMPLE_IDOC_JSON2 instead |
Set-up inbound messaging
The ASAPIO Integration Add-on is delivered with a way to pull data from the Confluent® Kafka® REST Proxy back into the SAP system. This section explains configuration and customization of the inbound function modules.
With version 9.32405 (SP09), the data pull correctly supports the host header to support load-balanced REST Proxy instances, e.g. one pull process always goes to the same REST Proxy instance.
Configure Inbound Object
Create Inbound Object configuration
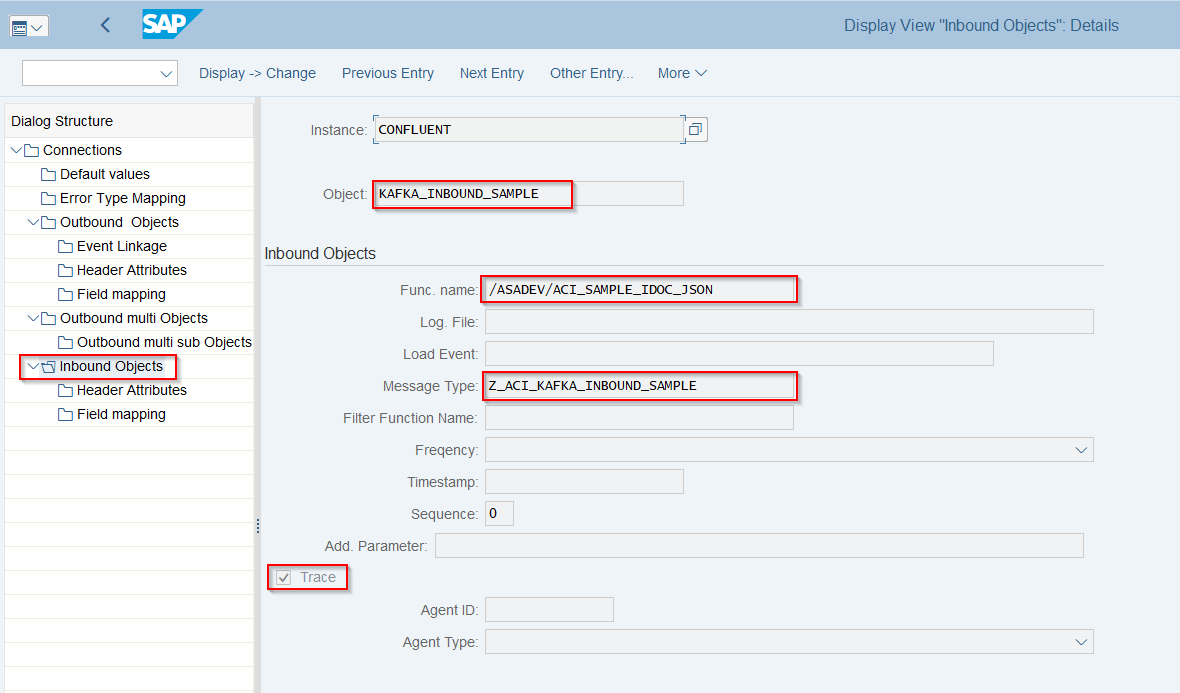
- Transaction: SPRO
- Go to ASAPIO Cloud Integrator – Connection and Replication Object Customizing
- Or go directly to transaction:
/ASADEV/68000202 - Select the created Connection
- Go to section Inbound Objects
- Add New Entry and specify:
- Object: name of the inbound configuration
- Func. Name:
/ASADEV/ACI_SAMPLE_IDOC_JSONor any FM with a correct interface (see Function Modules: Inbound above for options) - Message Type: the created message type
- Trace: activate for testing purposes
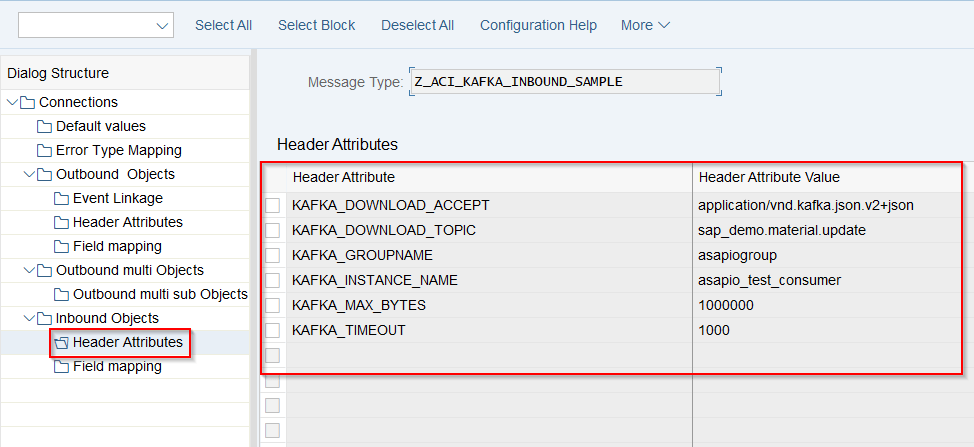
Pull-based inbound offers the following header attributes, which can be maintained to receive new messages: Connections → Inbound Objects → Header Attributes.
| Default Attribute | Example Value | Default |
|---|---|---|
KAFKA_CONTENT_TYPE (mandatory) | For the call payload. This should always be application/vnd.kafka.json.v2+json for the calls to the polling APIs. | application/vnd.kafka.json.v2+json |
KAFKA_DOWNLOAD_TOPIC (optional) | The topic to pull data from, e.g. example.topic | No default |
KAFKA_DOWNLOAD_ACCEPT (optional) | Depending on the consumer format, e.g. application/vnd.kafka.avro.v2+json | application/vnd.kafka.json.v2+json |
KAFKA_GROUPNAME (mandatory) | Name of the consumer group, e.g. exampleconsumer | No default |
KAFKA_INSTANCE_NAME (mandatory) | Name of the consumer instance, e.g. example_matmas_consumer | No default |
KAFKA_MAX_BYTES (optional) | Maximum number of bytes read in one fetch operation | 1000000 (1 MB) |
KAFKA_TIMEOUT (optional) | Maximum amount of milliseconds spent fetching records | 1000 (1 second) |
KAFKA_CONSUMER_FORMAT (optional) | The format of the consumed messages, used to convert the messages into a JSON-compatible form. The REST Proxy performs the conversion, so the SAP system always receives the message as JSON. Valid values: binary, avro, json, jsonschema, protobuf. | json |
KAFKA_CONSUMER_OFFSET_RESET (optional) | Where the consumer group starts if it is newly created (has no impact if the consumer group already exists). Valid values: earliest, latest. | earliest |
KAFKA_CONSUMER_AUTO_COMMIT (optional) | Whether the consumer group commits offsets automatically on fetch, or the ASAPIO add-on commits offsets after handing the data off to the configured processing FM. Valid values: true, false. | false |
Execute Inbound message pull
- Transaction:
/ASADEV/ACI - Select the Connection and hit enter
- Select Replication Object
- Create a variant and set the background job (see Batch Job section above)

Inbound processing
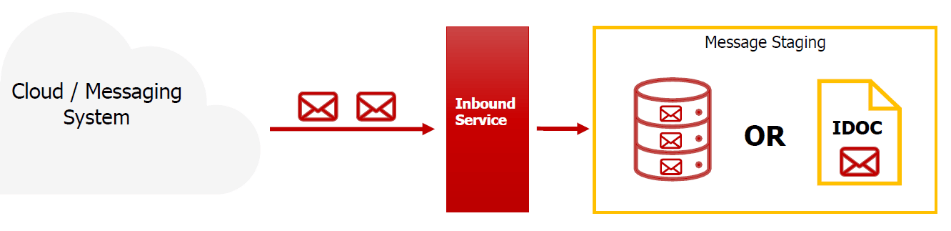
We recommend storing the inbound data first, without any processing logic. That way the HTTP connection can be released quickly, and processing can take place asynchronously in parallel or afterwards.
The ASAPIO-specific generic IDoc type /ASADEV/ACI_GENERIC_IDOC can be used to store the message with its payload.
Note
IDocs have the advantage that they can be processed multi-threaded afterwards.
Example interface for inbound processing function modules
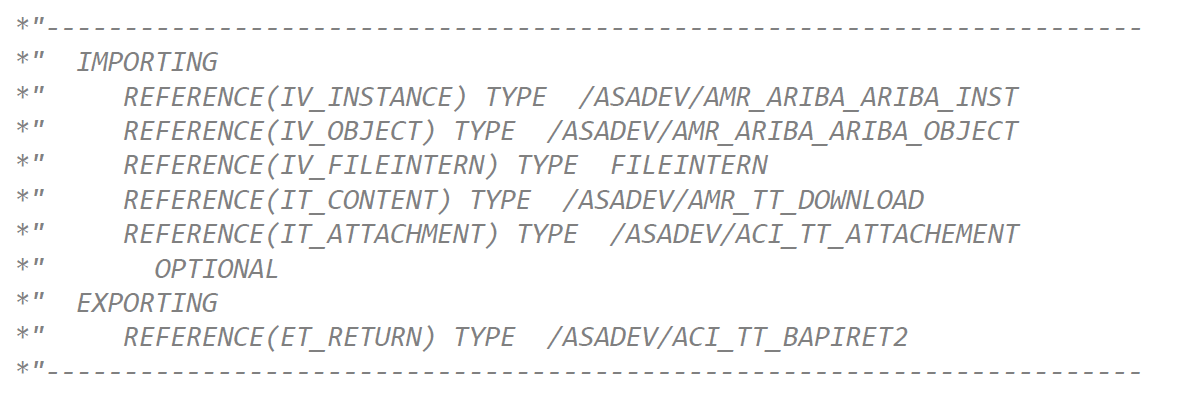
If you don't want to use the delivered function module that creates an IDoc, you can implement a custom function module using the following interface. The payload is received in an importing parameter IT_CONTENT: