Docs / Connectors / Microsoft Fabric
Microsoft Fabric Connector
The ASAPIO Integration Add-on connects SAP systems with Microsoft Fabric — writing SAP business data directly to Fabric Lakehouse, or via Open Mirroring into Fabric mirrored databases.
Overview
You can connect SAP systems with Microsoft Fabric.
Required components of ASAPIO Integration Add-ons:
| Add-on/Component Name | Type |
|---|---|
| ASAPIO Integration Add-on – Framework | Base component (required) |
| ASAPIO Integration Add-on – Connector for Microsoft® Azure® | Additional package |
Pre-requisites for Microsoft® Fabric® Services
Note: The following settings are specific to the connector for Microsoft® Fabric®.
A Microsoft® Fabric® and Azure® account is required, with access to one of the following services:
- Lakehouse
Steps Required to Establish Connectivity
To establish connectivity with the Microsoft Fabric platform, please proceed with the following activities and refer to the specific documentation articles.
- Create RFC destinations to the Microsoft Fabric platform in SAP system settings
- Set up connection instance to the Microsoft Fabric platform in the ASAPIO Integration Add-on
- Endpoint configuration (Lakehouse) – see Authentication options for an overview of supported authentication options for the different endpoints
- See Custom Data Products for a simple example to test the connectivity
Predefined Content or Custom Data Products
You can either use predefined content from the data catalog or create your custom data products. The predefined content can either be used directly or as a template for further customization.
The chapters Create RFC Destination and Set-up Connection Instance are required for all approaches. After completing them, either go through the Predefined Content with Data Catalog or the Custom Data Products chapter.
Authentication Options
The Fabric service offers different authorization options:
- OAuth via Entra ID
- Managed Identities
To learn how to configure the service, see the specific article below.
Create RFC Destinations
Create RFC Destination for Messaging Endpoints
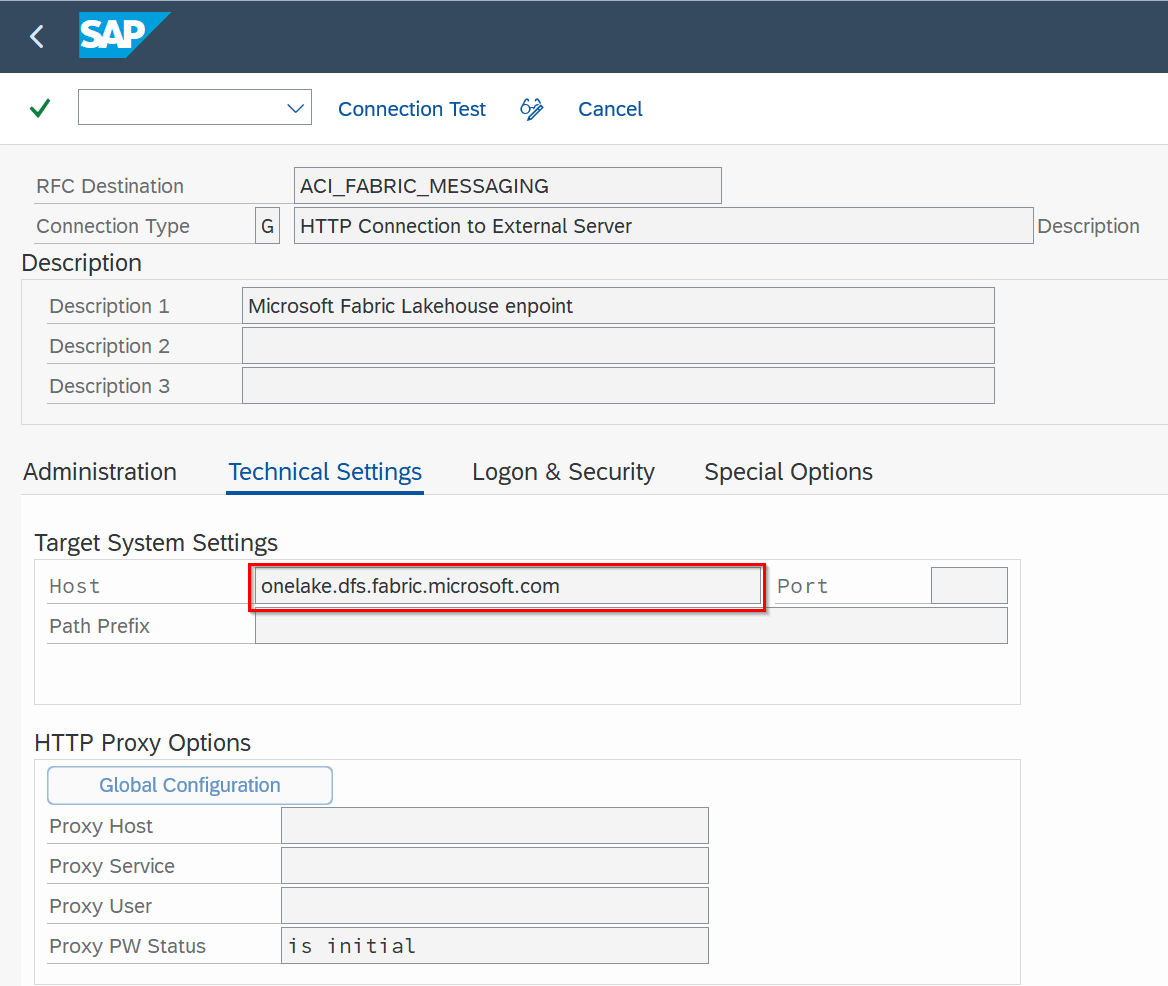
Create a new RFC destination of type “G” (HTTP Connection to External Server).
- Transaction: SM59
- Create new destination of type “G”
- Specify Target Host:
onelake.dfs.fabric.microsoft.com
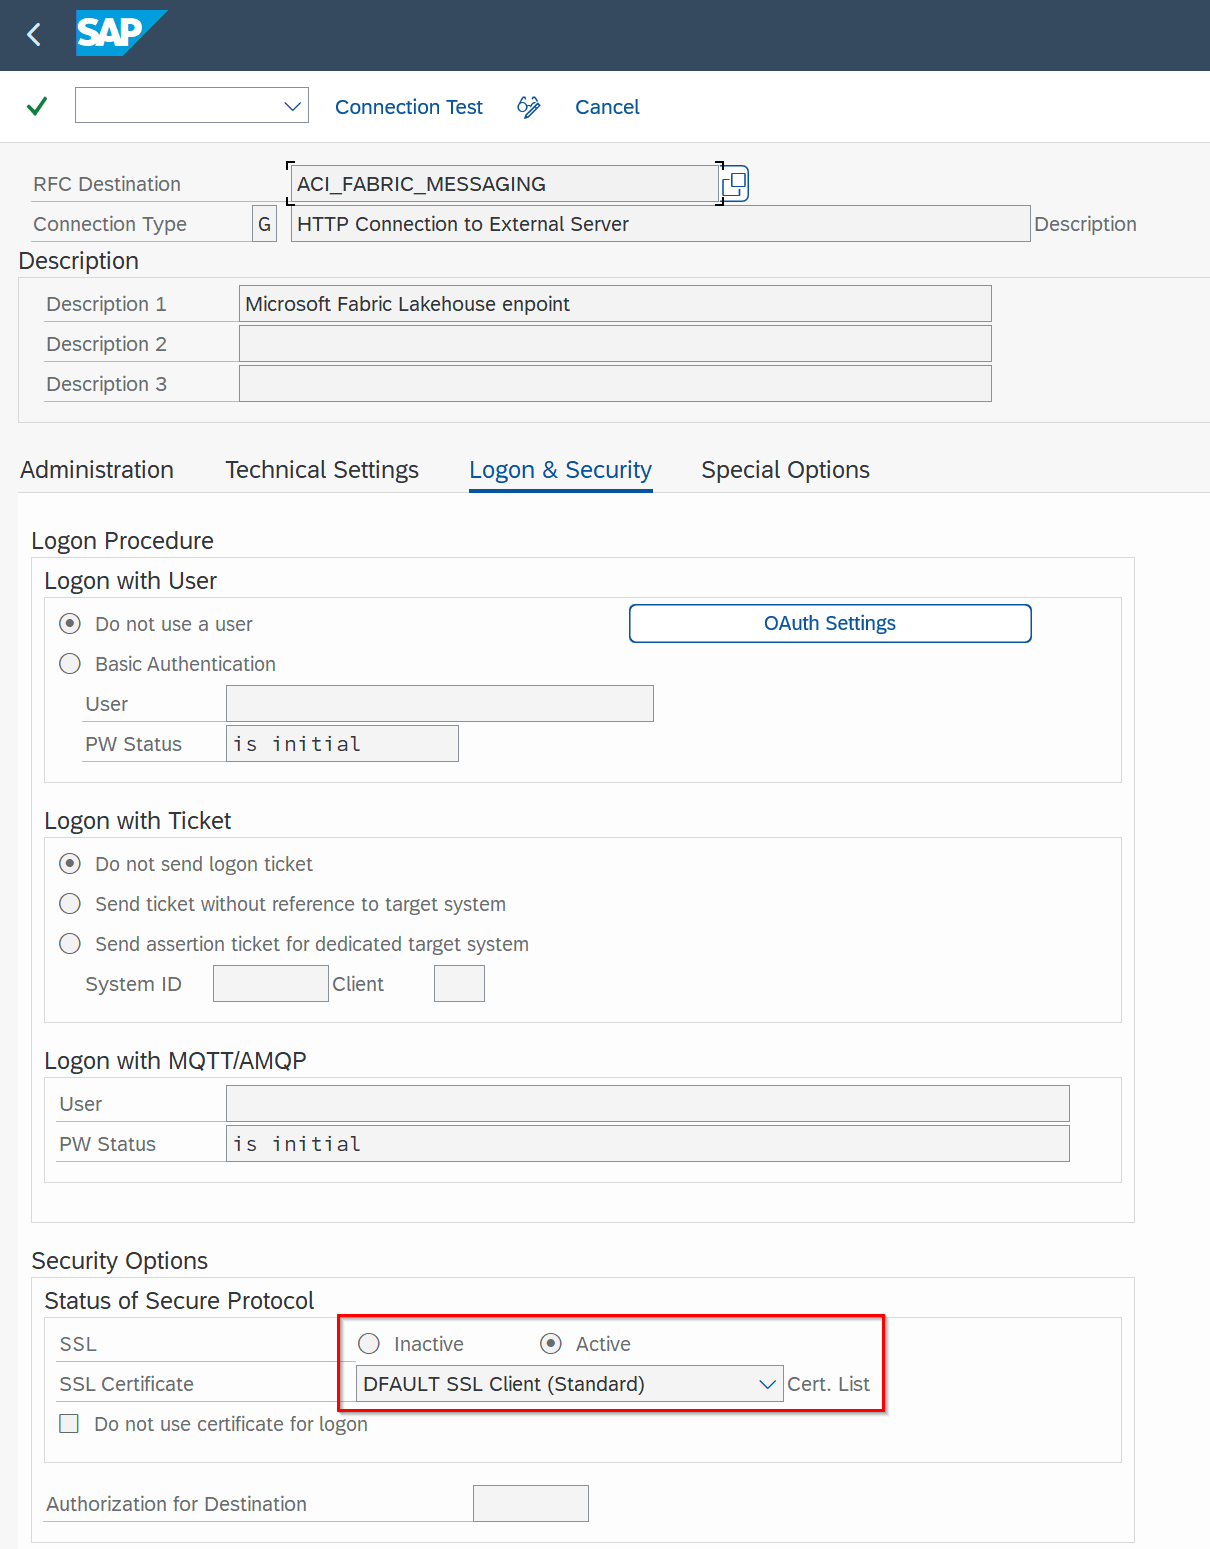
Add the certificates for the created destinations to the certificate list selected in tab Logon & Security:
Create RFC Destination for OAuth Authentication
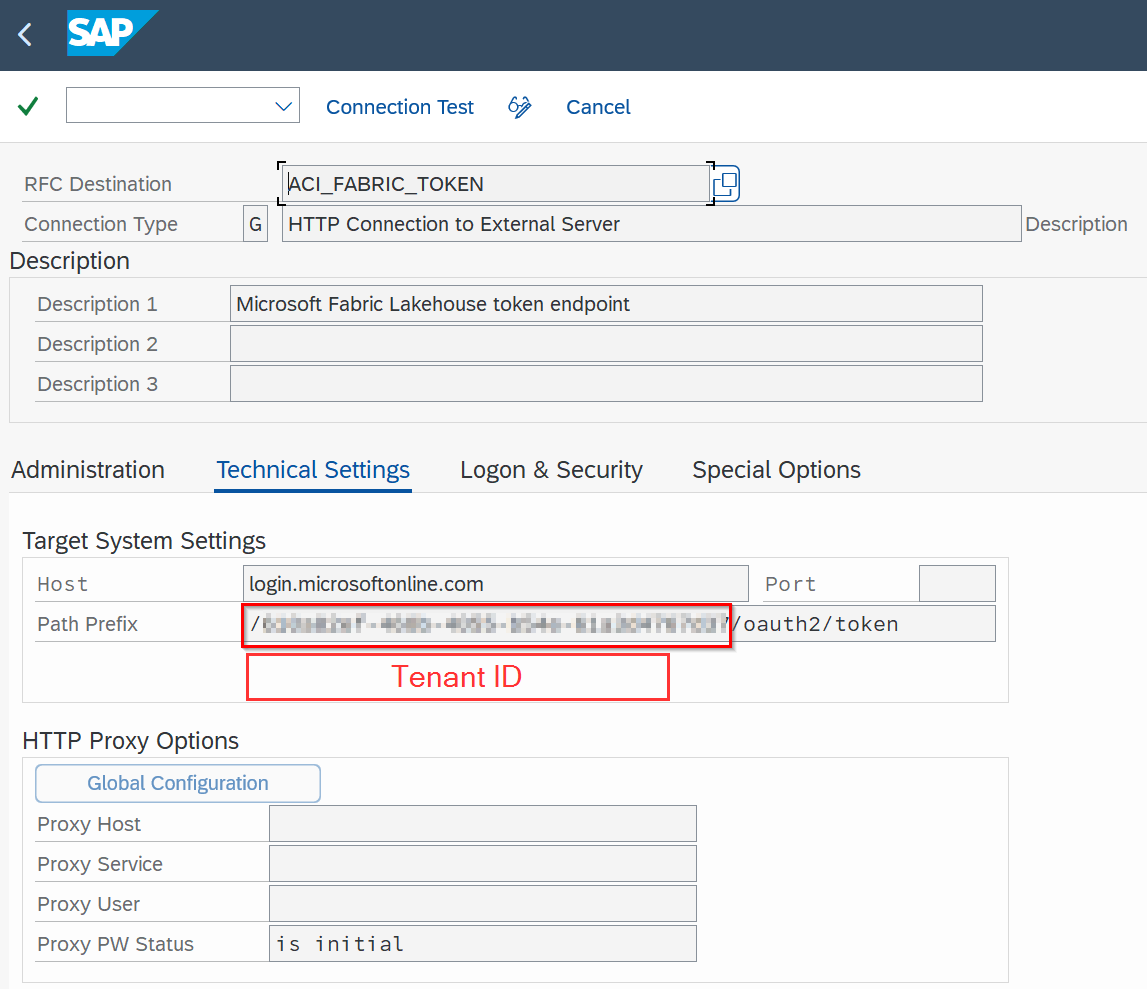
To use OAuth authentication with Entra ID, please configure an RFC destination specifying the OAuth endpoint:
- Transaction: SM59
- Create new destination of type “G”
- Specify Target Host:
login.microsoftonline.com - Specify Path Prefix:
<tenantID>/oauth2/token
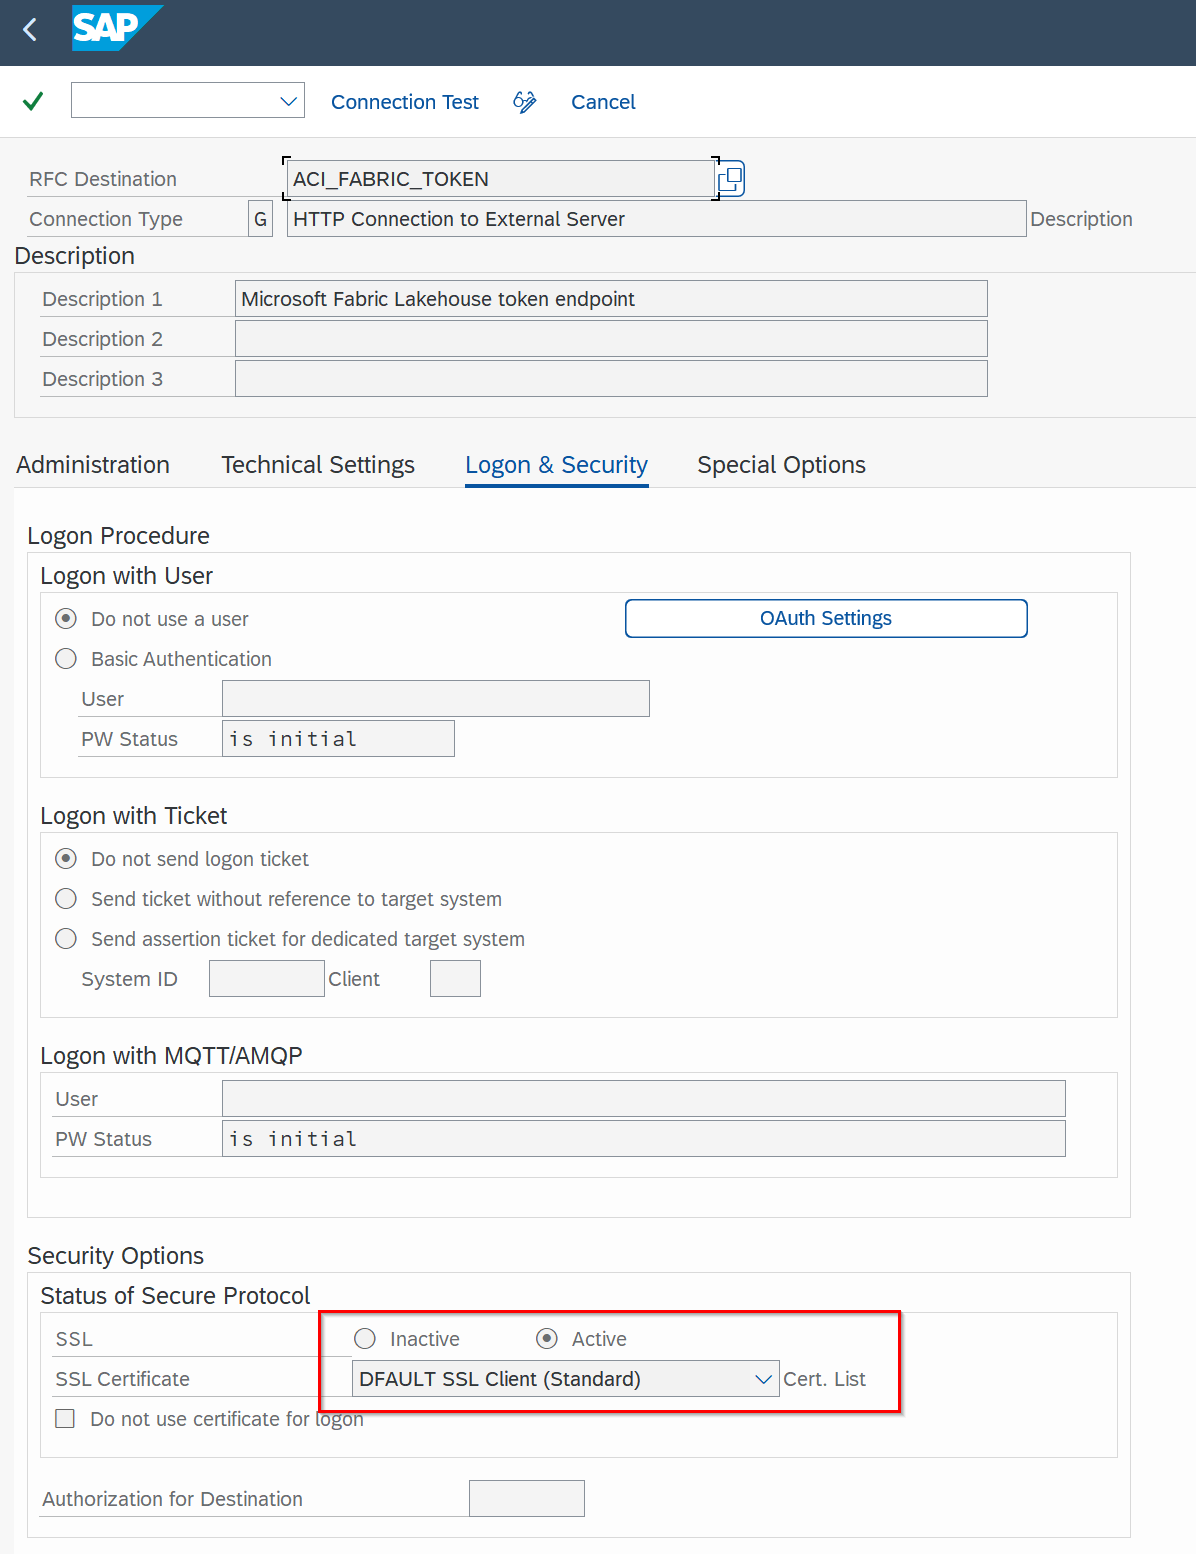
Add the certificates for the created destinations to the certificate list selected in tab Logon & Security:
Add Certificates to Trust Store
- Transaction: STRUST
- Select Certificate List as used in the RFC destination created above
- Click button Import certificate (1)
- Click button Add to Certificate List (2)

Set Up Connection Instance
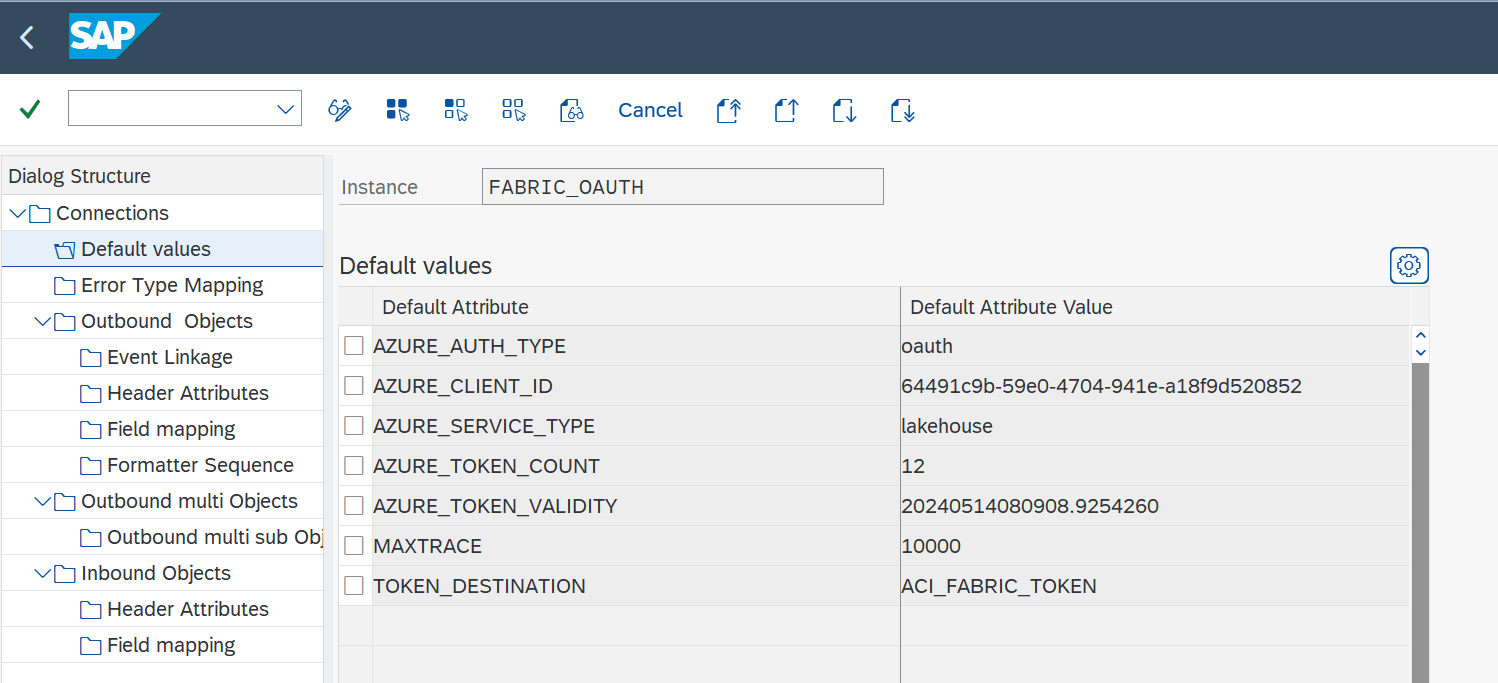
Create the connection instance customizing that ties together the RFC destination created earlier and the cloud connector type:
- Transaction: SPRO
- Go to ASAPIO Cloud Integrator – Connection and Replication Object Customizing
- Or go directly to transaction: /ASADEV/ACI_SETTINGS
- Add New Entry and specify:
- Field Instance: a name for this connection
- Field RFC Dest. (Upload): the RFC destination created for the messaging endpoint (see Create RFC destinations)
- Field ISO Code: the code page to use
- Field Cloud Type:
FABRIC(or the name you chose when adding the connector)
Set Up Error Type Mapping
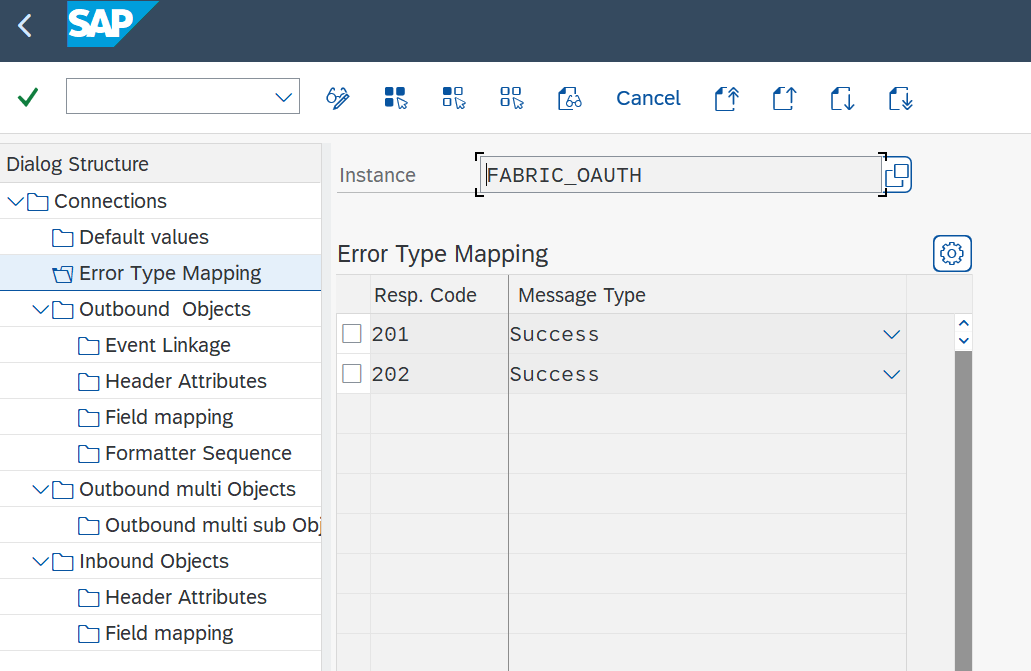
Create an entry in section Error Type Mapping and specify at least the following mapping:
| Resp. Code | Message Type |
|---|---|
| 201 | Success |
| 202 | Success |
Save Secret in SAP Secure Store
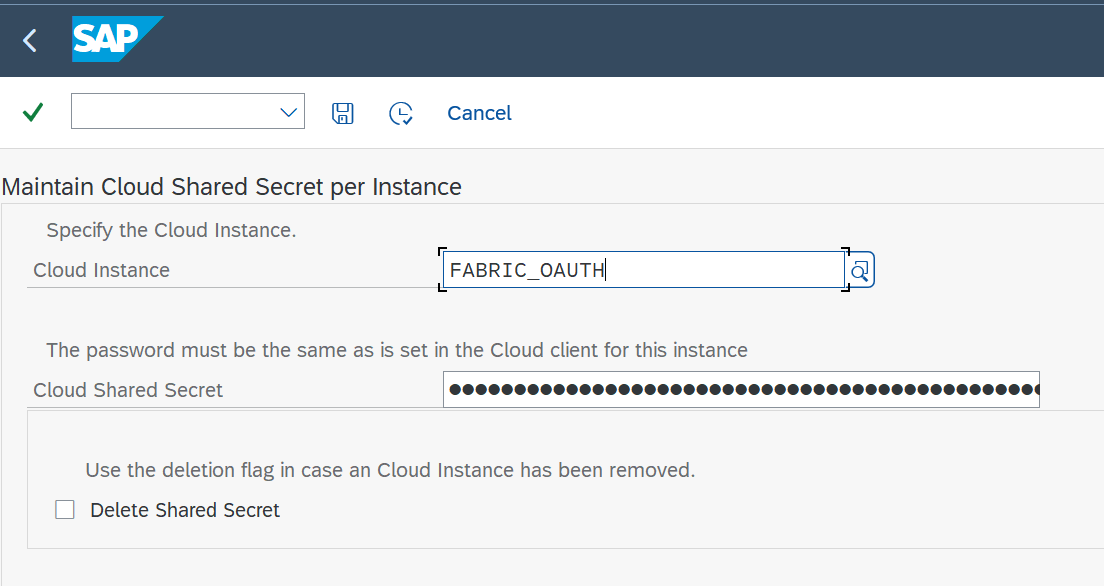
For OAuth authentication, a secret has to be stored in the system’s SAP Secure Store: the Client Secret for OAuth.
Enter the secret in the SAP Secure Store:
- Transaction: SPRO
- Go to ASAPIO Cloud Integrator – Set the cloud connection password
- Or go directly to transaction: /ASADEV/SCI_TPW
- Select the created Cloud Instance
- Enter the client secret in the Cloud Shared Secret field and execute
Fabric Open Mirroring
Mirroring in Fabric is a low-cost, low-latency way to bring data from various systems together into a single analytics platform. You can continuously replicate your existing data estate directly into Fabric’s OneLake from a variety of Azure databases and external data sources. See Microsoft Learn – Fabric Mirroring for more information.
With release 9.32504, the ASAPIO Integration Add-on supports Open Mirroring to bring your SAP data into Fabric.
The prerequisite for configuration in the SAP system is the creation of a mirrored database in Fabric. See Microsoft Learn – Tutorial: Configure Microsoft Fabric open mirrored databases.
Set Up Outbound Object
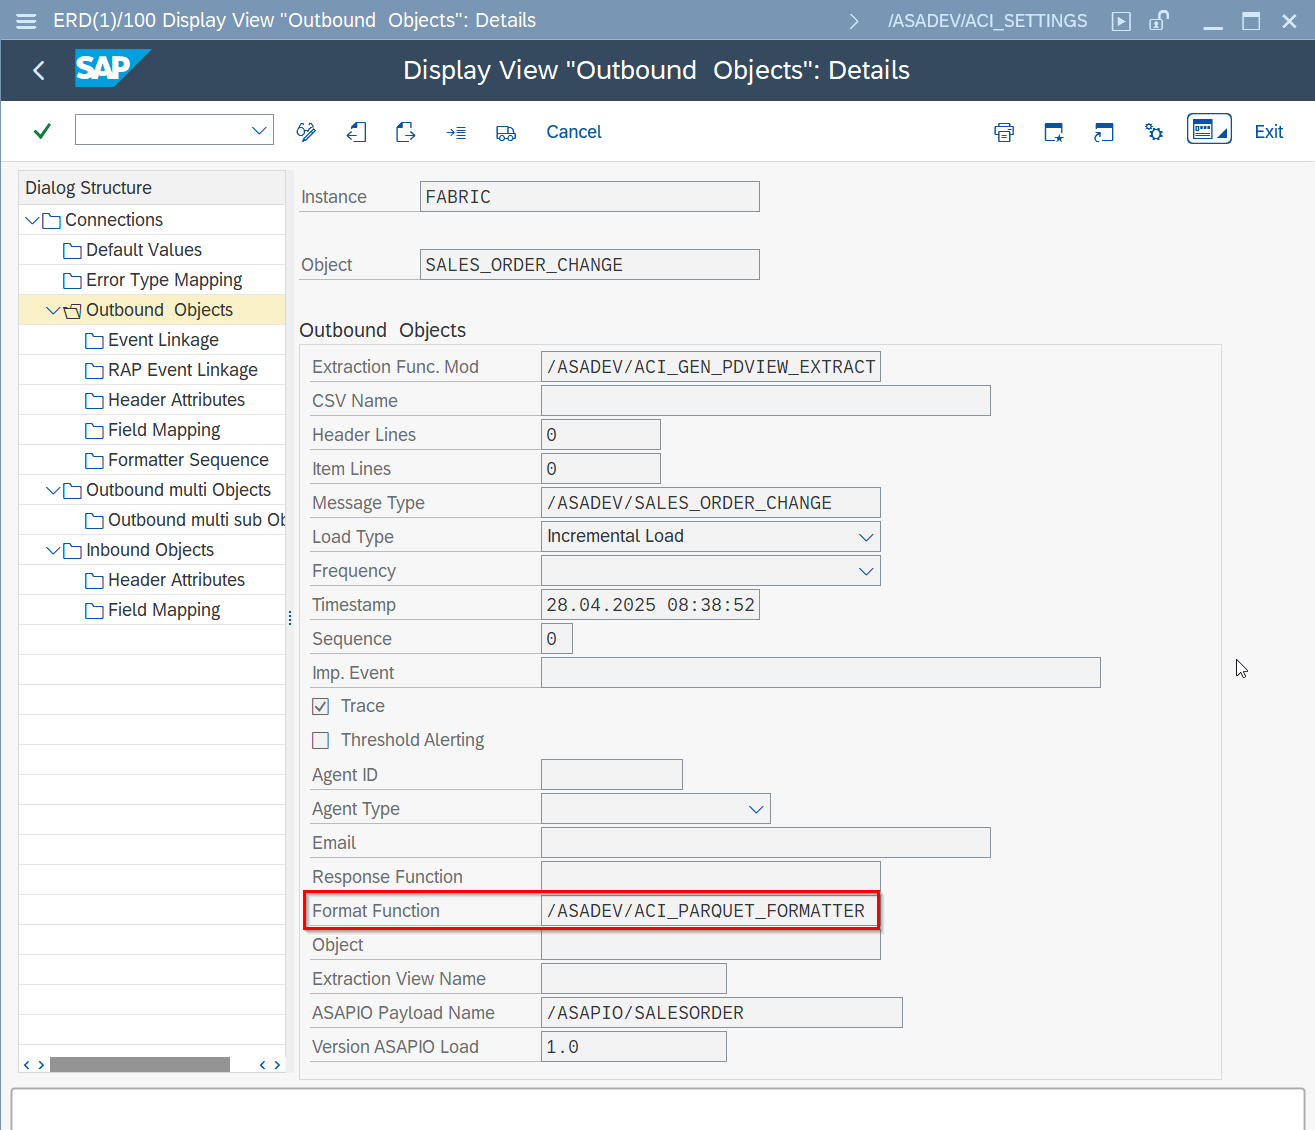
To support mirroring, data must be sent in Parquet format. The formatter to configure for this is /ASADEV/ACI_PARQUET_FORMATTER.
- Transaction: SPRO
- Go to ASAPIO Cloud Integrator – Connection and Replication Object Customizing
- Or go directly to transaction: /ASADEV/ACI_SETTINGS
- Select the created Connection
- Go to section Outbound Objects
- Change the Format Function
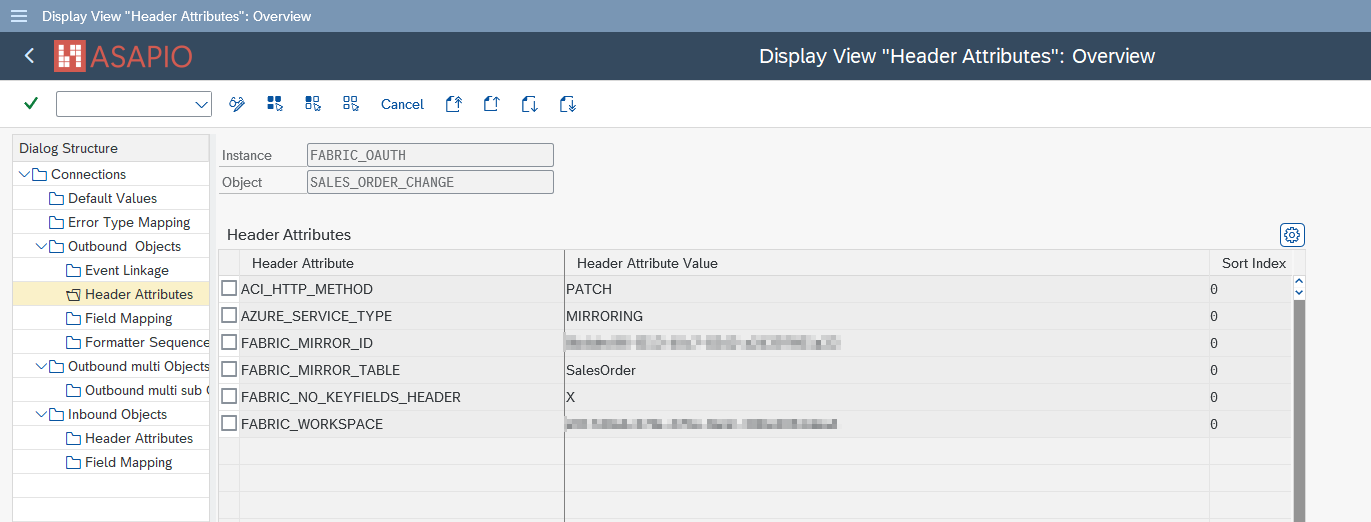
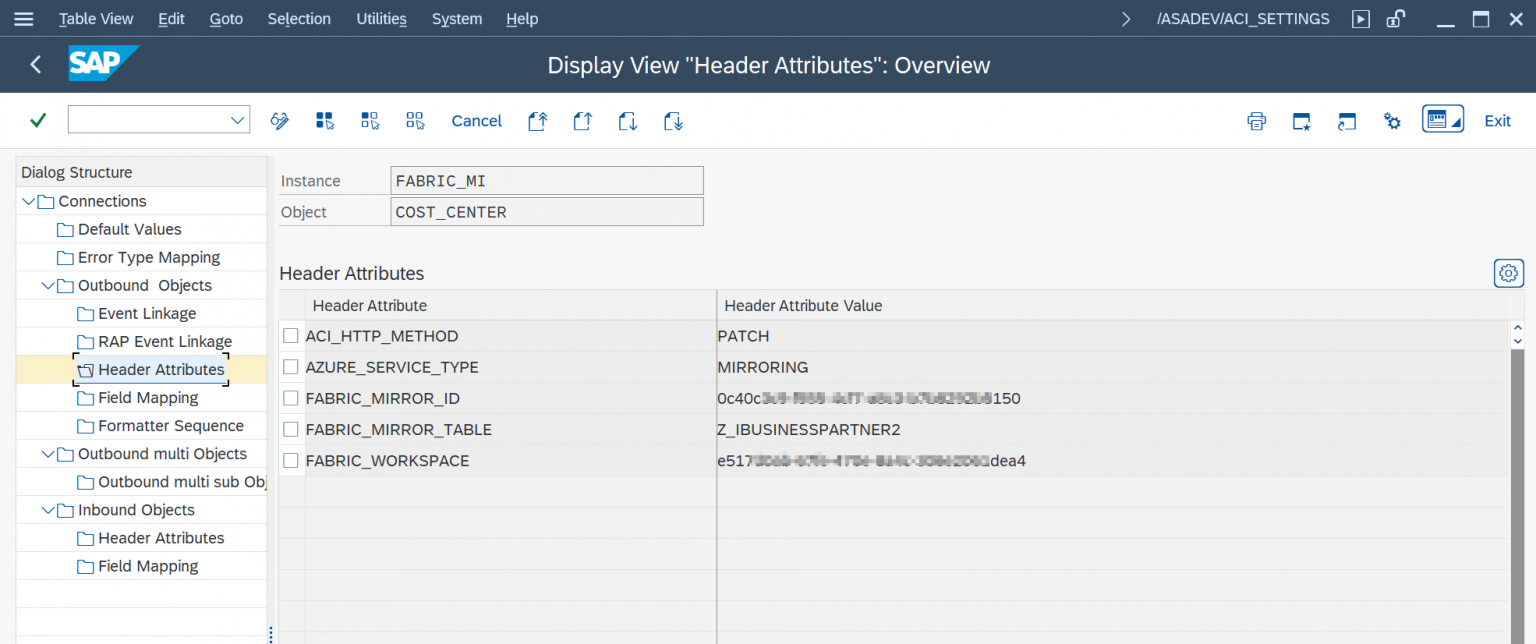
Set Up ‘Header Attributes’
The header attributes must be changed or added.
- Go to section Header Attributes of the outbound object created previously
- Add New Entry and specify the header attributes and values
| Header Attribute | Header Attribute Value |
|---|---|
ACI_HTTP_METHOD | PATCH |
AZURE_SERVICE_TYPE | MIRRORING (can also be set in Default Values on instance level) |
FABRIC_MIRROR_ID | your mirrored database ID specified in Fabric |
FABRIC_MIRROR_TABLE | mirror table name (how the table should be named in Fabric, e.g. SalesOrder) |
FABRIC_WORKSPACE | your workspace ID specified in Fabric (can also be set in Default Values on instance level) |
Managed Identities
Note: authentication based on managed identities only works if your SAP system is also running in the Azure cloud.
Create the RFC destination for the Managed Identities endpoint:
- Transaction: SM59
- Create new destination of type “G”
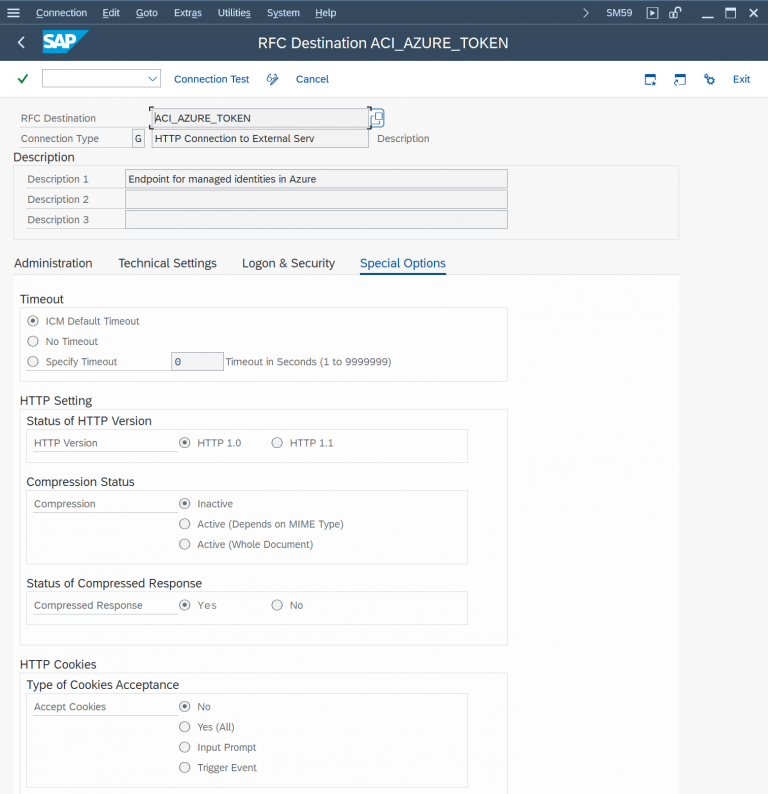
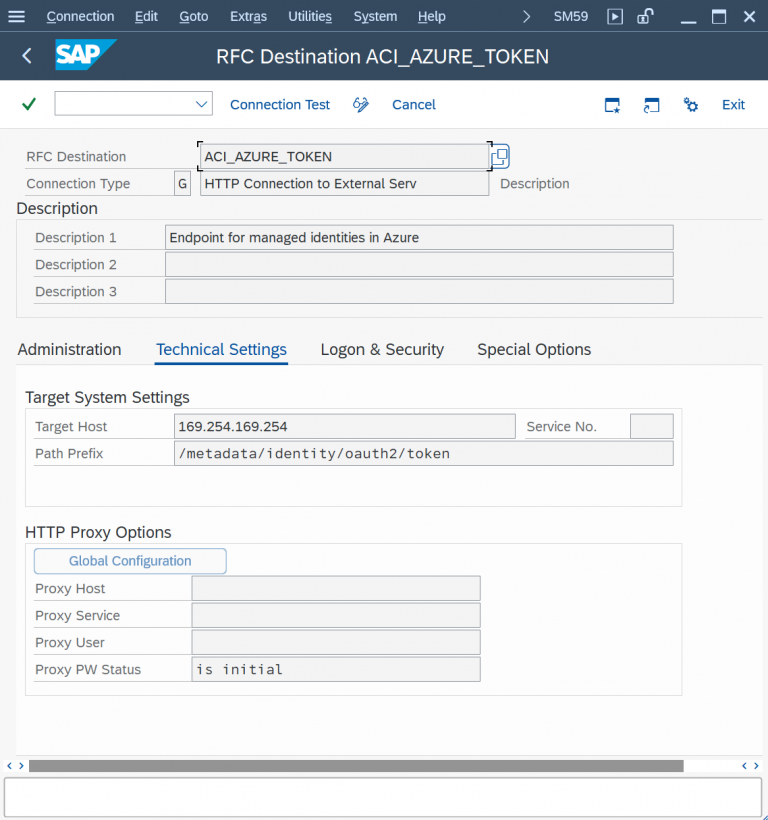
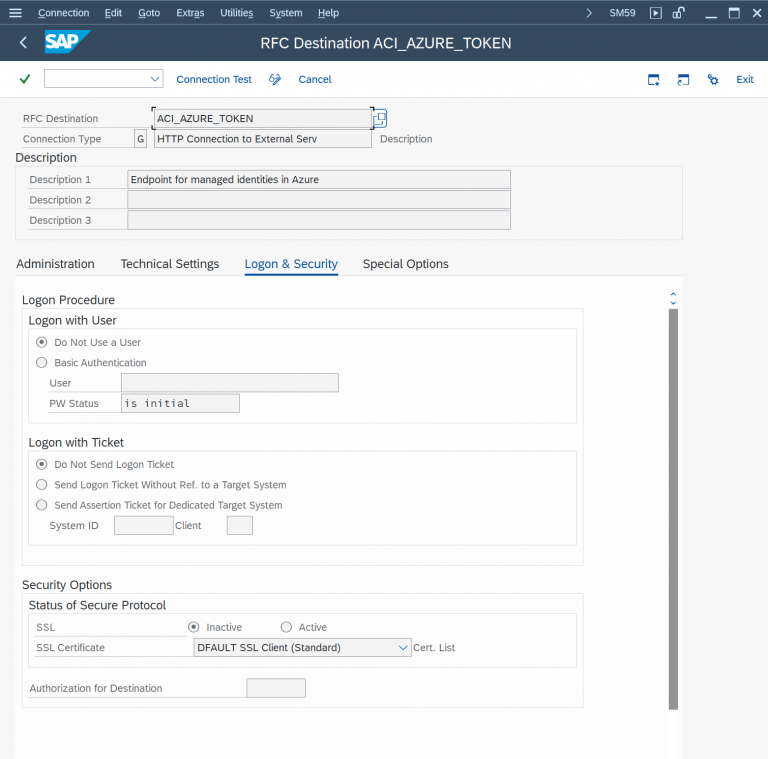
Note: the destination must be configured to use HTTP (not HTTPS!).
For authentication based on Managed Identities, specify the following values:
| Default Attribute | Default Attribute Value |
|---|---|
AZURE_AUTH_TYPE | MANAGED_IDENTITY |
AZURE_SERVICE_TYPE | lakehouse |
TOKEN_DESTINATION | RFC destination for the Managed Identity endpoint |
In the default values for the connection:
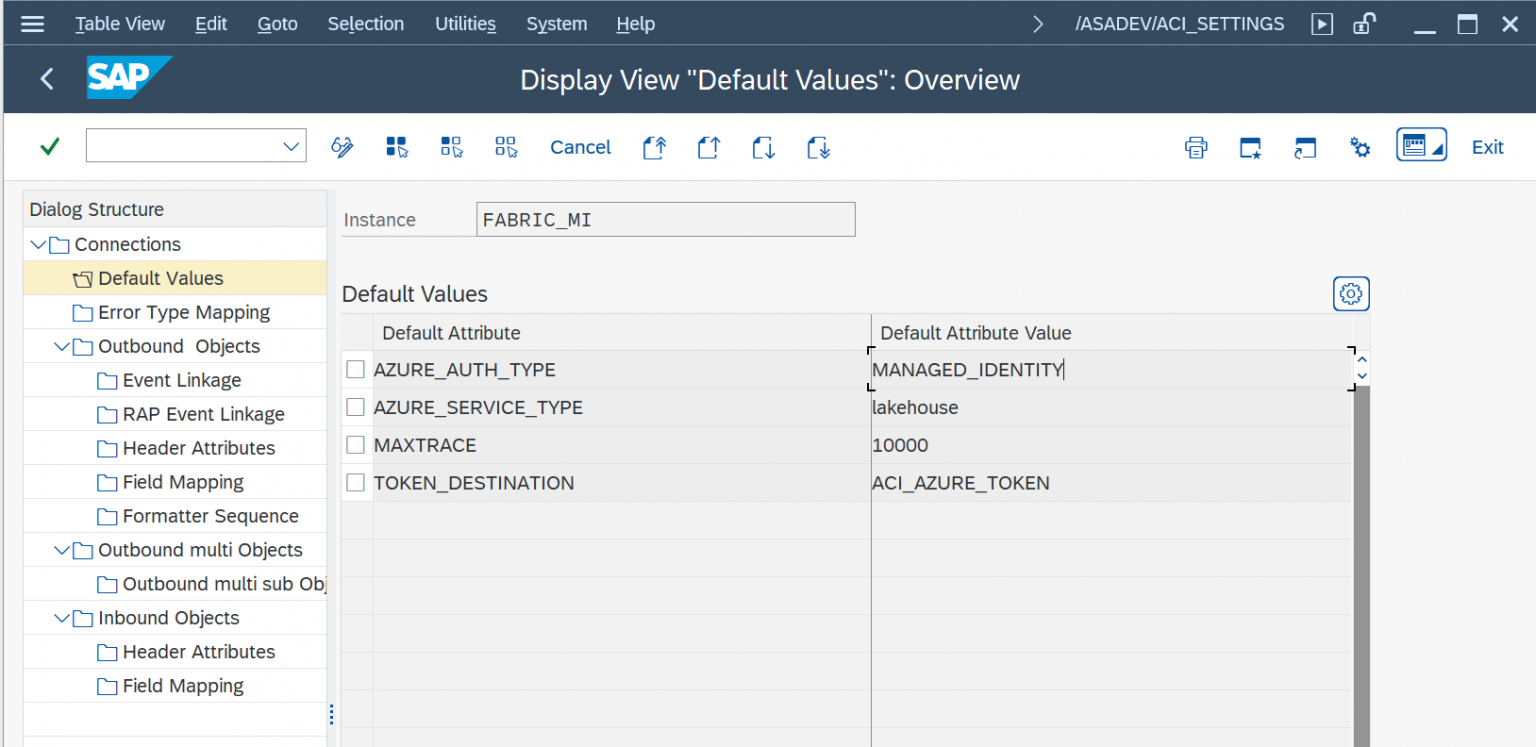
Header Attributes:
Predefined Content with Data Catalog
The Data Catalog for Fabric provides a set of predefined message payloads based on SAP S/4HANA CDS views, as well as preconfigured interfaces for the Integration Add-on. This eliminates the need for users to perform significant configuration tasks, allowing for a rapid start and the execution of tests. This overview details the predefined content included: an instance (FABRIC) comprising several replication objects and the corresponding payload designs.
Predefined interfaces (Objects)
| Description | Replication Object |
|---|---|
| GL Documents | GL_ACCOUNT_ITEM_CHANGE, GL_ACCOUNT_ITEM_INITIAL |
| Operational accounting documents | OP_ACCOUNTING_ITEM_CHANGE, OP_ACCOUNTING_ITEM_INITIAL |
| Sales document items | SALES_ORDER_ITEM_CHANGE, SALES_ORDER_ITEM_INITIAL |
| Billing documents | BILLING_ITEM_CHANGE, BILLING_ITEM_INITIAL |
| Delivery documents | DELIVERY_CHANGE, DELIVERY_INITIAL |
| Delivery document items | DELIVERY_ITEM_CHANGE, DELIVERY_ITEM_INITIAL |
| Purchase requisition | PURCHASE_REQUISITION_CHANGE, PURCHASE_REQUISITION_INITIAL |
| Purchase orders | PURCHASE_ORDER_CHANGE, PURCHASE_ORDER_INITIAL |
| Purchase order items | PURCHASE_ORDER_ITEM_CHANGE, PURCHASE_ORDER_ITEM_INITIAL |
| Production Order | PRODUCTION_ORDER_CHANGE, PRODUCTION_ORDER_INITIAL |
| Customer | CUSTOMER_CHANGE, CUSTOMER_INITIAL |
| Equipment | EQUIPMENT_CHANGE, EQUIPMENT_INITIAL |
| Functional Location | FUNCTIONAL_LOCATION_CHANGE, FUNCTIONAL_LOCATION_INITIAL |
| Notification | NOTIFICATION_CHANGE, NOTIFICATION_INITIAL |
| Product | PRODUCT_CHANGE, PRODUCT_INITIAL |
| Contract | CONTRACT_ITEM_CHANGE, CONTRACT_ITEM_INITIAL |
| Request for Quotation (RFQ) | RFQ_ITEM_CHANGE, RFQ_ITEM_INITIAL |
| Sales Order | SALES_ORDER_CHANGE, SALES_ORDER_INITIAL |
| Incoterms Classification | INCOTERMSCLASSIFICATION_INITIA |
| Language | LANGUAGE_INITIAL |
| Language Text | LANGUAGE_TEXT_INITIAL |
| Plant | PLANT_INITIAL |
| Product Descriptions | PRODUCT_DESCRIPTION_INITIAL |
| Product Group | PRODUCT_GROUP_2_INITIAL |
| Product Group – Text | PRODUCTGROUPTXT2_INITIAL |
| Purchasing Document Type | PURCHASING_DOCUMENT_TYPE_INIT |
| Purchasing Group | PURCHASING_GROUP_INITIAL |
| Purchasing Organization | PURCHASING_ORGANIZATION_INIT |
| Item Category for Purchasing Document | PURGDOCITEMCATEGORY_INITIAL |
Predefined payloads
The following list of predefined objects is currently provided for the Fabric connector only, and is subject to change / extension. Payload design versions 2.0 and higher are based on CDS views and therefore require SAP S/4HANA.
| Description | CDS View | Payload Design | Payload Design Version |
|---|---|---|---|
| GL Documents | I_GLACCOUNTLINEITEMRAWDATA | /ASAPIO/GLACCOUNTITEM | 2.0 |
| Operational accounting documents | I_OPERATIONALACCTGDOCITEM | /ASAPIO/OPACCOUNTINGITEM | 2.0 |
| Sales document items | C_SALESDOCUMENTITEMDEX_1 | /ASAPIO/SALESORDERITEM | 2.0 |
| Billing documents | C_BILLINGDOCITEMBASICDEX_1 | /ASAPIO/BILLINGITEM | 2.0 |
| Delivery documents | I_DELIVERYDOCUMENT | /ASAPIO/DELIVERY | 2.0 |
| Delivery document items | I_DELIVERYDOCUMENTITEM | /ASAPIO/DELIVERYITEM | 2.0 |
| Purchase requisition | C_PURCHASEREQUISITIONITEMDEX | /ASAPIO/PURCHASEREQUISITION | 2.0 |
| Purchase orders | C_PURCHASEORDERDEX | /ASAPIO/PURCHASEORDER | 2.0 |
| Purchase order items | C_PURCHASEORDERITEMDEX | /ASAPIO/PURCHASEORDERITEM | 2.0 |
| Production Order | A_ProductionOrder | /ASAPIO/PRODUCTIONORDER | 2.0 |
| Customer | I_CUSTOMER | /ASAPIO/CUSTOMER | 2.0 |
| Equipment | I_EQUIPMENT | /ASAPIO/EQUIPMENT | 2.0 |
| Functional Location | I_FunctionalLocation | /ASAPIO/FUNCTIONALLOCATION | 2.0 |
| Incoterms Classification | I_INCOTERMSCLASSIFICATION | /ASAPIO/INCOTERMSCLASSIFICATION | 2.0 |
| Language | I_LANGUAGE | /ASAPIO/LANGUAGE | 2.0 |
| Language Text | I_LANGUAGETEXT | /ASAPIO/LANGUAGETEXT | 2.0 |
| Notification | I_Notification | /ASAPIO/NOTIFICATION | 2.0 |
| Plant | I_PLANT | /ASAPIO/PLANT | 2.0 |
| Product | I_PRODUCT | /ASAPIO/PRODUCT | 2.0 |
| Product Description | I_PRODUCTDESCRIPTION | /ASAPIO/PRODUCT_DESCRIPTION | 2.0 |
| Product Group | I_PRODUCTGROUP_2 | /ASAPIO/PRODUCT_GROUP_2 | 2.0 |
| Product Group Text | I_PRODUCTGROUPTEXT_2 | /ASAPIO/PRODUCT_GROUP_TEXT2 | 2.0 |
| Contract | I_PurchaseContractAPI01 | /ASAPIO/CONTRACT | 2.0 |
| Purchasing Document Type | I_PURCHASINGDOCUMENTTYPE | /ASAPIO/PURCHASING_DOCUMENT_TYPE | 2.0 |
| Purchasing Group | I_PURCHASINGGROUP | /ASAPIO/PURCHASING_GROUP | 2.0 |
| Purchasing Organization | I_PURCHASINGORGANIZATION | /ASAPIO/PURCHASING_ORGANIZATION | 2.0 |
| Purchasing Document Item Category | I_PURGDOCUMENTITEMCATEGORY | /ASAPIO/PURGDOCUMENTITEMCATEGORY | 2.0 |
| Request for Quotation | I_Requestforquotation_Api01 | /ASAPIO/REQUESTFORQUOTATION | 2.0 |
| Sales Order | I_SALESDOCUMENT | /ASAPIO/SALESORDER | 2.0 |
Payload Designs for SAP ECC
| Description | Leading Table | Payload Design | Payload Design Version |
|---|---|---|---|
| Sales document items | VBAP | /ASAPIO/SALESORDERITEM | 1.0 |
| Billing documents | VBRP | /ASAPIO/BILLINGITEM | 1.0 |
| Delivery documents | LIKP | /ASAPIO/DELIVERY | 1.0 |
| Delivery document items | LIPS | /ASAPIO/DELIVERYITEM | 1.0 |
| Purchase requisition | EBAN | /ASAPIO/PURCHASEREQUISITION | 1.0 |
| Purchase orders | EKKO | /ASAPIO/PURCHASEORDER | 1.0 |
| Purchase order items | EKPO | /ASAPIO/PURCHASEORDERITEM | 1.0 |
| Production Order | AFKO | /ASAPIO/PRODUCTIONORDER | 1.0 |
| Customer | KNA1 | /ASAPIO/CUSTOMER | 1.0 |
| Equipment | EQUI | /ASAPIO/EQUIPMENT | 1.0 |
| Functional Location | IFLOT | /ASAPIO/FUNCTIONALLOCATION | 1.0 |
| Incoterms Classification | TINC | /ASAPIO/INCOTERMSCLASSIFICATION | 1.0 |
| Language | T002 | /ASAPIO/LANGUAGE | 1.0 |
| Language Text | T002T | /ASAPIO/LANGUAGETEXT | 1.0 |
| Notification | QMEL | /ASAPIO/NOTIFICATION | 1.0 |
| Plant | T001W | /ASAPIO/PLANT | 1.0 |
| Product | MARA | /ASAPIO/PRODUCT | 1.0 |
| Product Description | MAKT | /ASAPIO/PRODUCT_DESCRIPTION | 1.0 |
| Product Group | T023 | /ASAPIO/PRODUCT_GROUP_2 | 1.0 |
| Product Group Text | T023T | /ASAPIO/PRODUCT_GROUP_TEXT2 | 1.0 |
| Contract | EKKO | /ASAPIO/CONTRACT | 1.0 |
| Purchasing Document Type | T161 | /ASAPIO/PURCHASING_DOCUMENT_TYPE | 1.0 |
| Purchasing Group | T024 | /ASAPIO/PURCHASING_GROUP | 1.0 |
| Purchasing Organization | T024E | /ASAPIO/PURCHASING_ORGANIZATION | 1.0 |
| Purchasing Document Item Category | T163 | /ASAPIO/PURGDOCUMENTITEMCATEGORY | 1.0 |
| Request for Quotation | EKKO | /ASAPIO/REQUESTFORQUOTATION | 1.0 |
| Sales Order | VBAK | /ASAPIO/SALESORDER | 1.0 |
Custom Data Products
Send Outbound Message
Create Message Type
Example: in the example below, we use the Material Change event. Please choose any other suitable example if required.
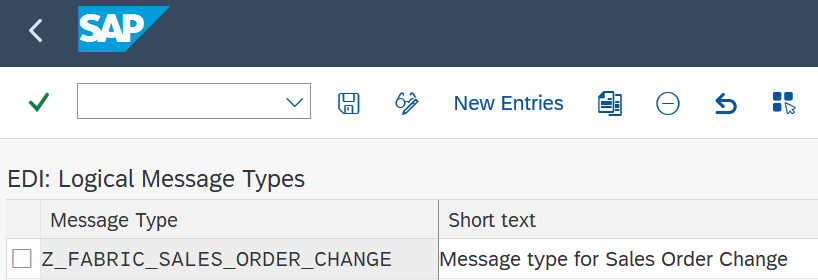
For each object to be sent via ACI you have to create a message type:
- Transaction: WE81
- Add New Entry and specify:
- Message Type: unique name for the integration
Description: description of the purpose
Activate Message Type
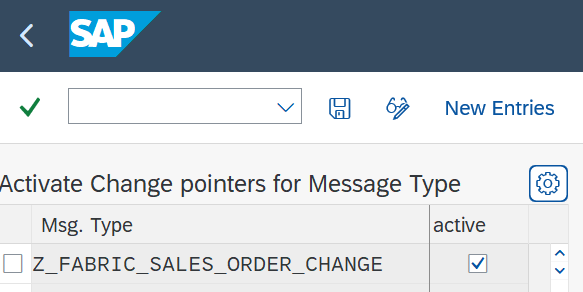
The created message type has to be activated:
- Transaction: BD50
- Add New Entry and specify:
- Message Type: the created message type
- Active: tick the checkbox
Create Payload Design
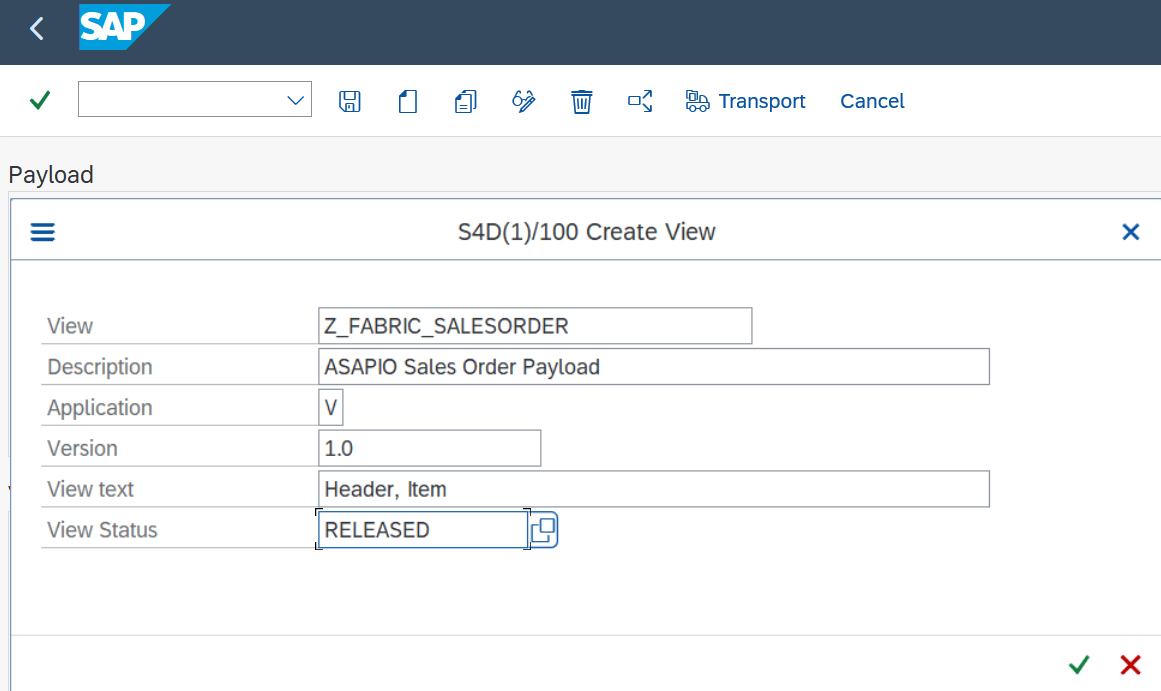
Go to the ASAPIO Payload Designer with transaction /ASADEV/DESIGN. There you can create a new payload using Create payload (Shift+F4).
Now create a payload with the following criteria:
- View: payload name
- Application: data model application
- Version: version of payload
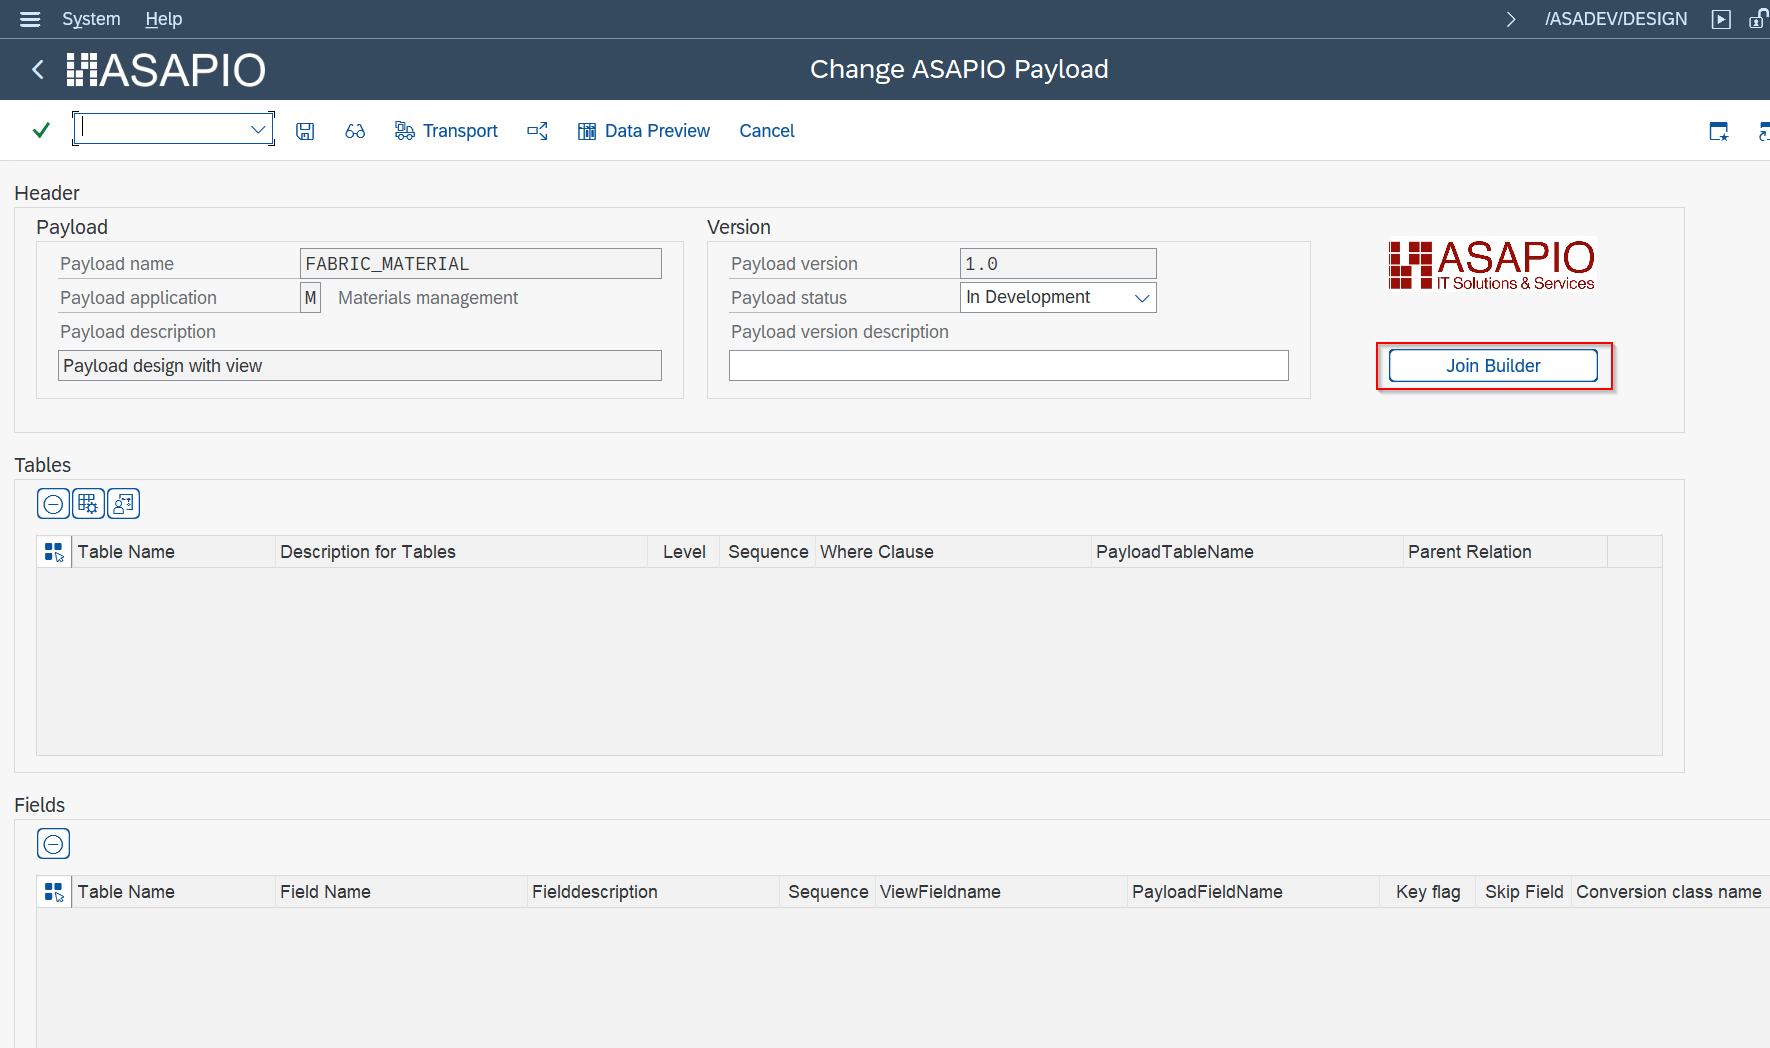
Push the join builder button to add your table, DB view or CDS view:
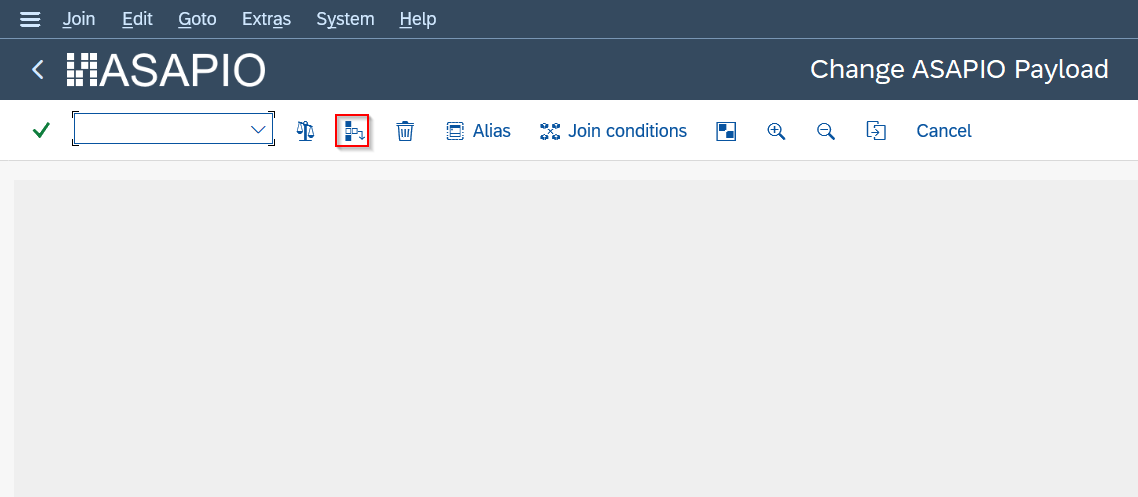
Use the button Insert table (Shift+F1).
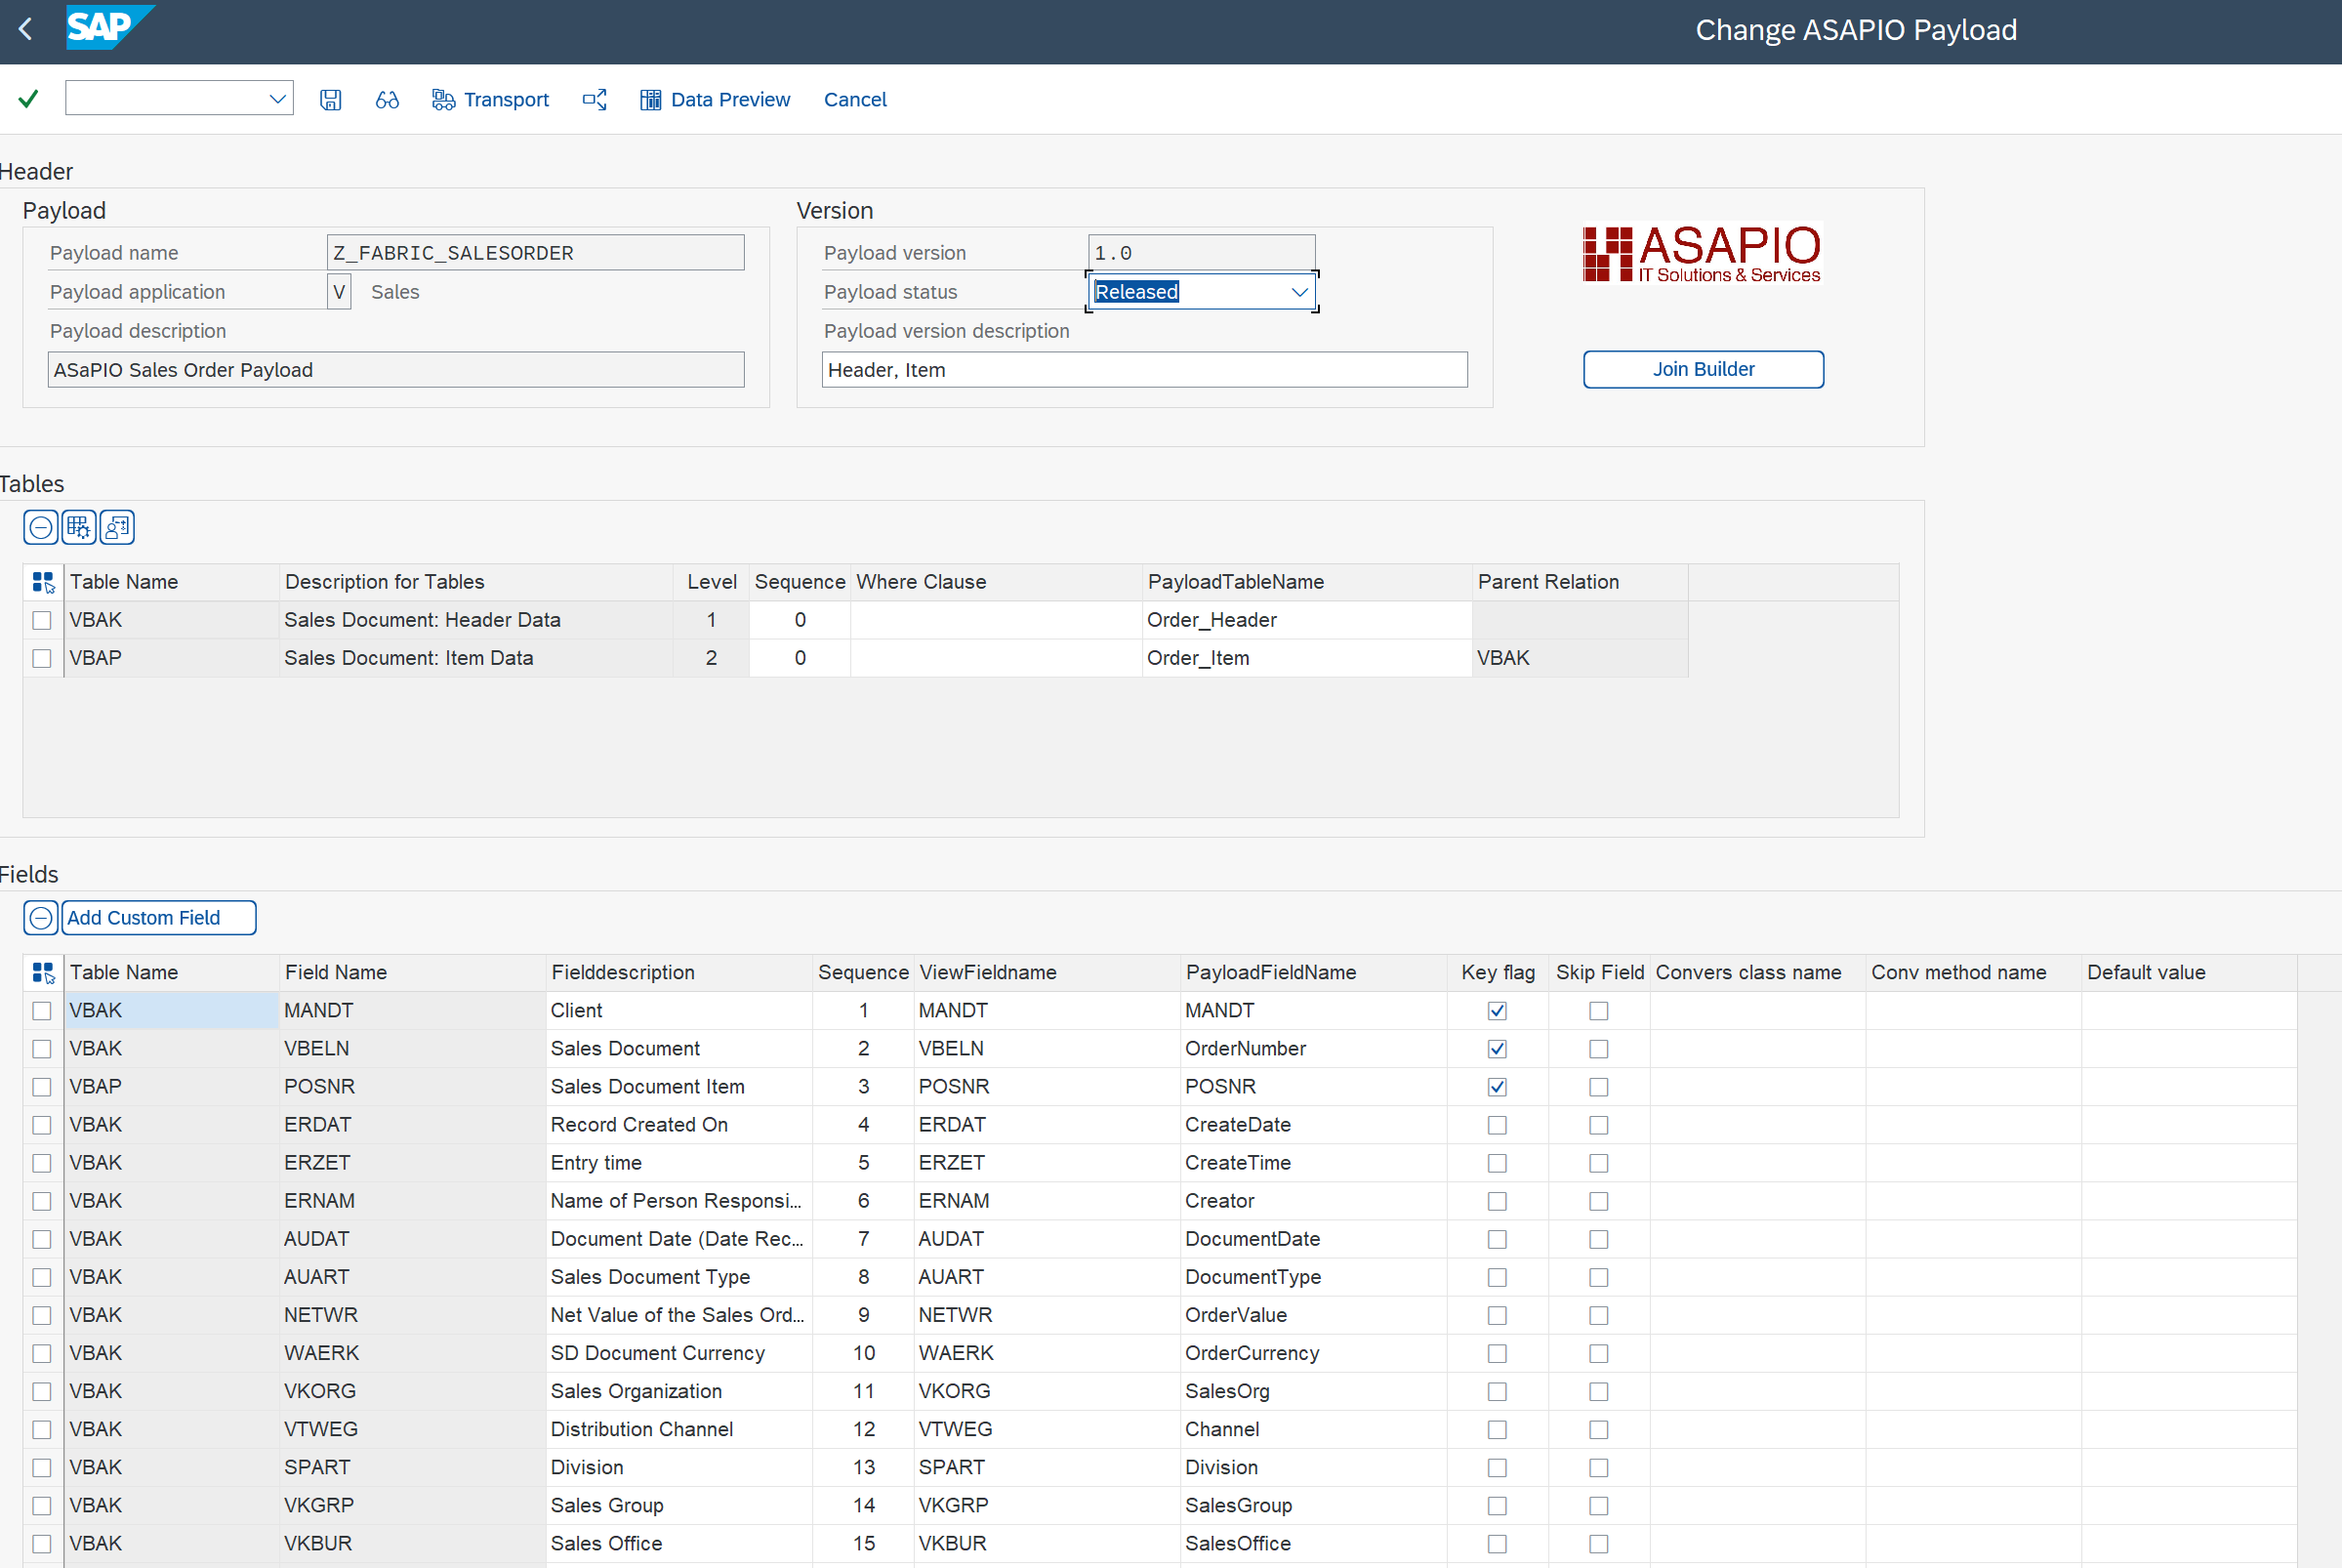
Go back and save.
Create Outbound Object Configuration
For the setup using Fabric Open Mirroring, see the Open Mirroring section above.
- Transaction: SPRO
- Go to ASAPIO Cloud Integrator – Connection and Replication Object Customizing
- Or go directly to transaction: /ASADEV/68000202
- Select the created Connection
- Go to section Outbound Objects
- Add New Entry and specify:
- Object: name of the outbound configuration
- Extraction Func. Module:
/ASADEV/ACI_GEN_PDVIEW_EXTRACT - File Name: name with file format
- Message Type: the created message type
- Load Type: Incremental Load
- Trace: activate for testing purposes
- Payload View Name: name of payload design
- Payload View Version: version of payload design
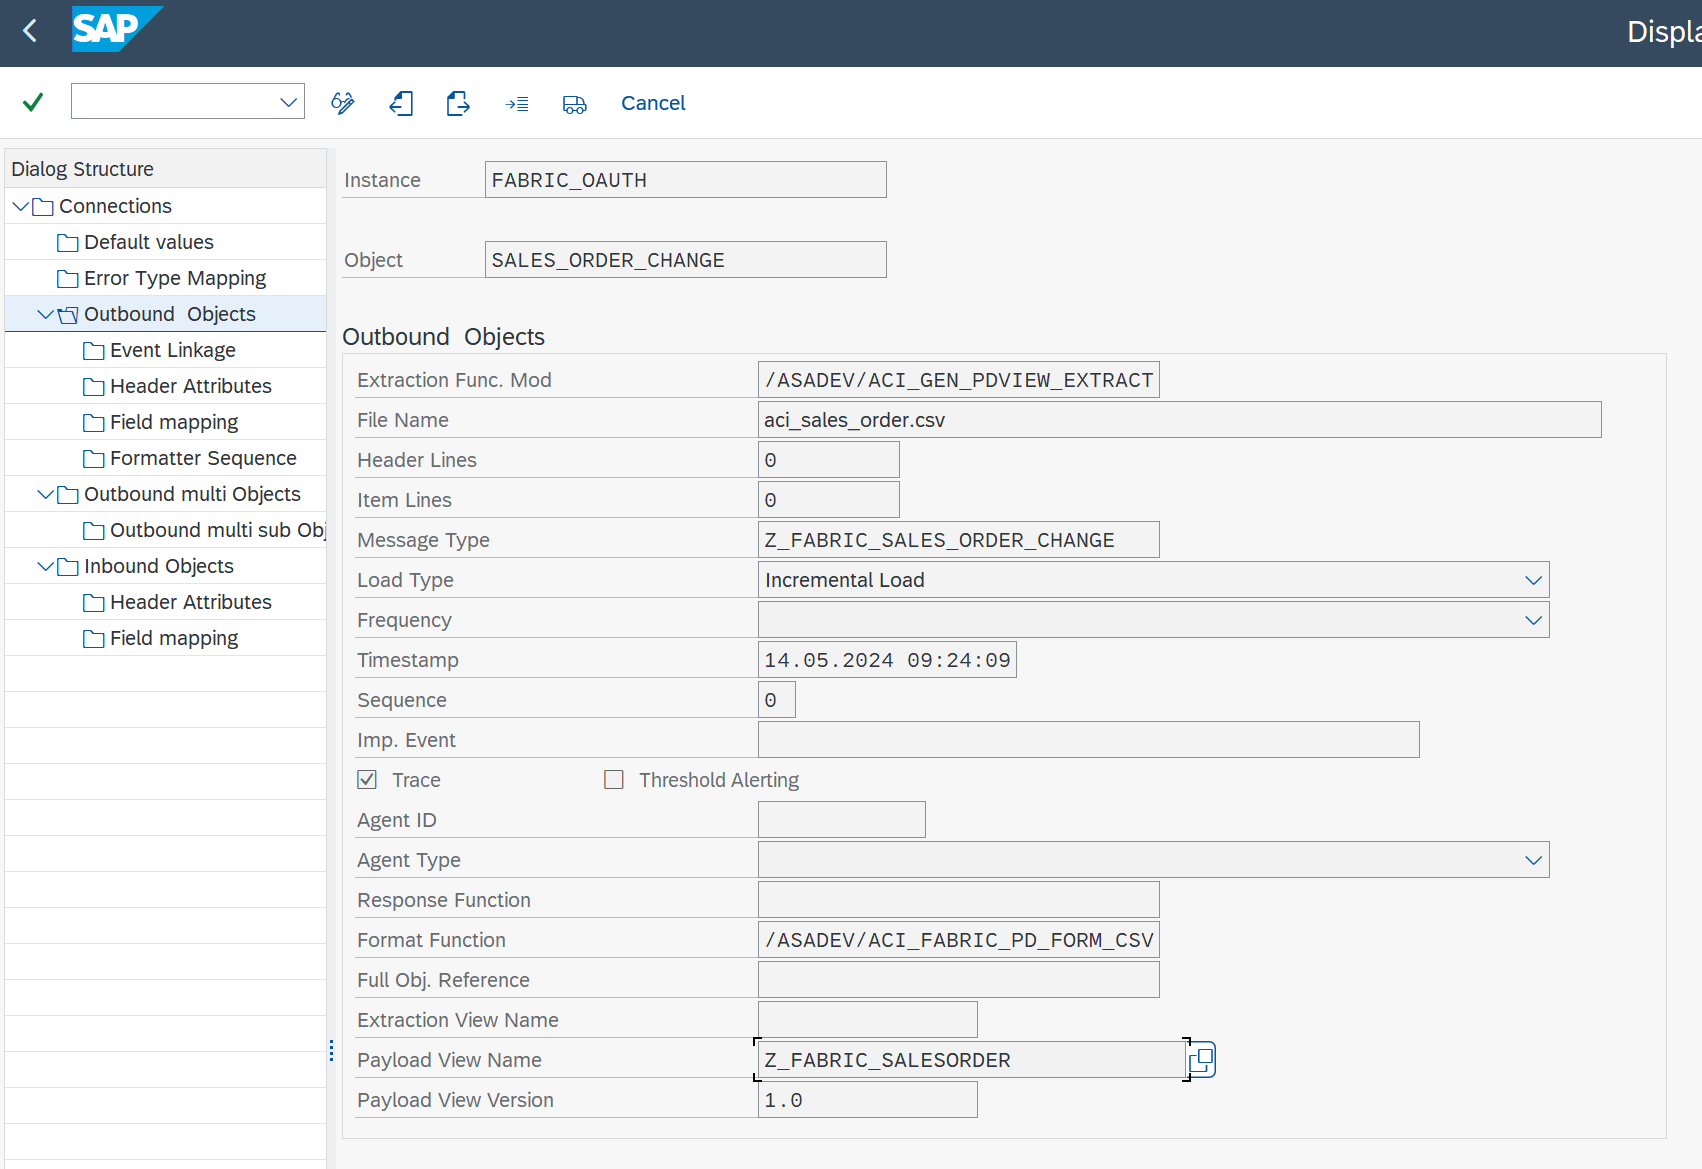
Set Up ‘Business Object Event Linkage’
Link the configuration of the outbound object to a Business Object event:
- Transaction: SWE2 (or go to Event Linkage on the left side)
- Add New Entry and specify:
- Object Category: BO BOR Object Type
- Object Type: Business Object Type sending the event
- Event: the event to react to
- Receiver Type: the message type of the outbound object (the link to the Add-on configuration)
- Receiver Call: Function Module
- Receiver Function Module:
/ASADEV/ACI_EVENTS_TRIGGER - Linkage Activated: tick the checkbox
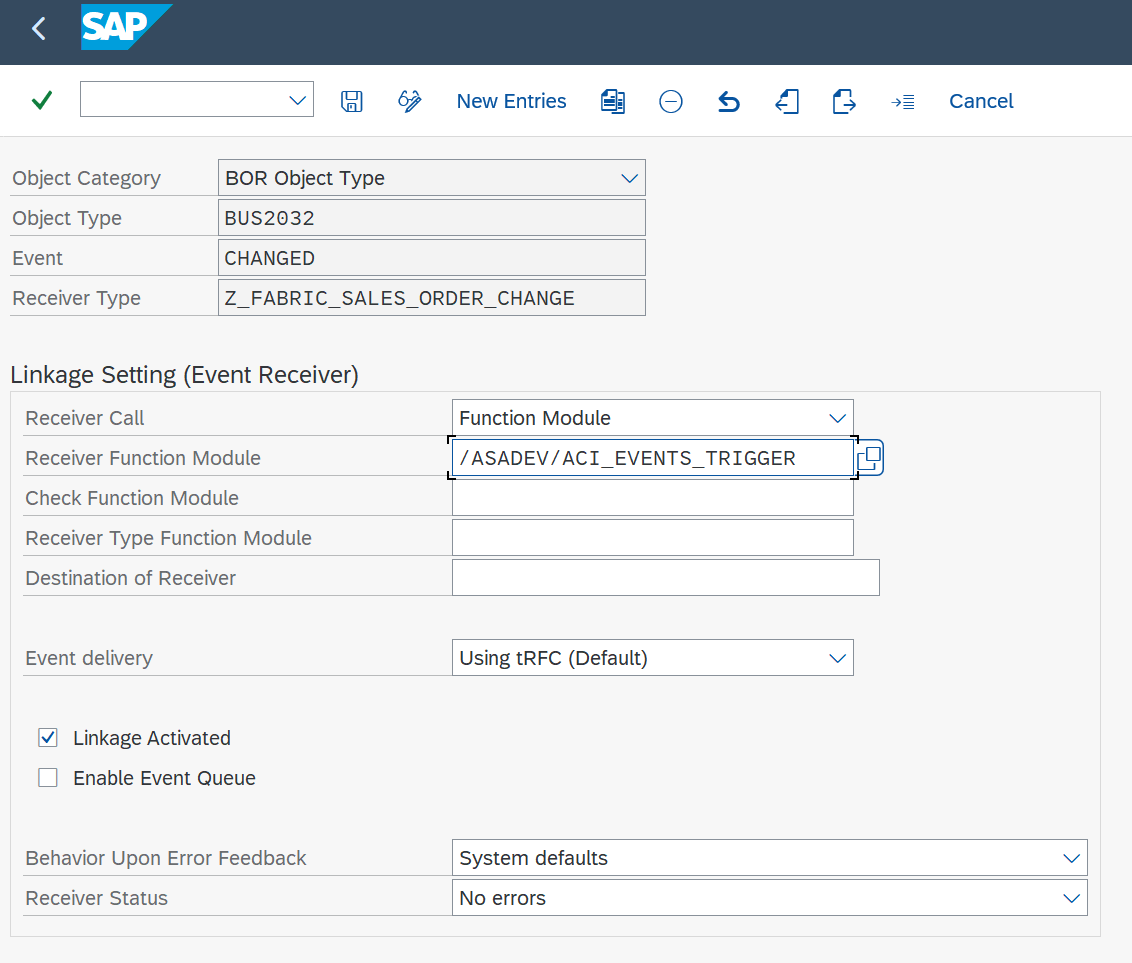
Set Up Target Endpoint in ‘Header Attributes’
Configure the Lakehouse endpoint:
- Go to section Header Attributes
- Add New Entry and specify:
| Header Attribute | Header Attribute Value |
|---|---|
ACI_HTTP_METHOD | PATCH |
FABRIC_FILE_PATH | your path to file folder, e.g. “/Files” |
FABRIC_LAKEHOUSE | your Lakehouse ID specified in Fabric |
FABRIC_WORKSPACE | your workspace ID specified in Fabric |
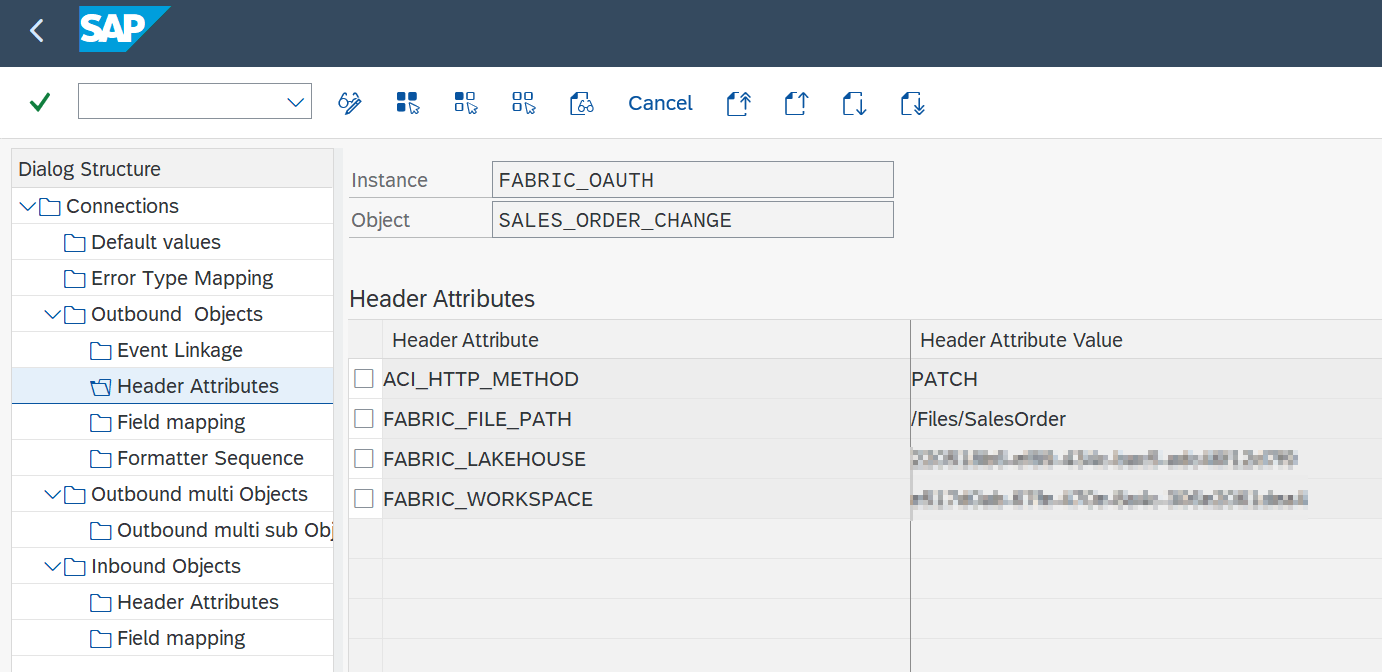
Activating the Change Pointer Information with Header Attribute (Optional)
Configure the change pointer info:
- Go to section Header Attributes
- Add New Entry and specify:
| Header Attribute | Header Attribute Value |
|---|---|
ACI_HTTP_METHOD | PATCH |
ACI_CP_INFO | X |
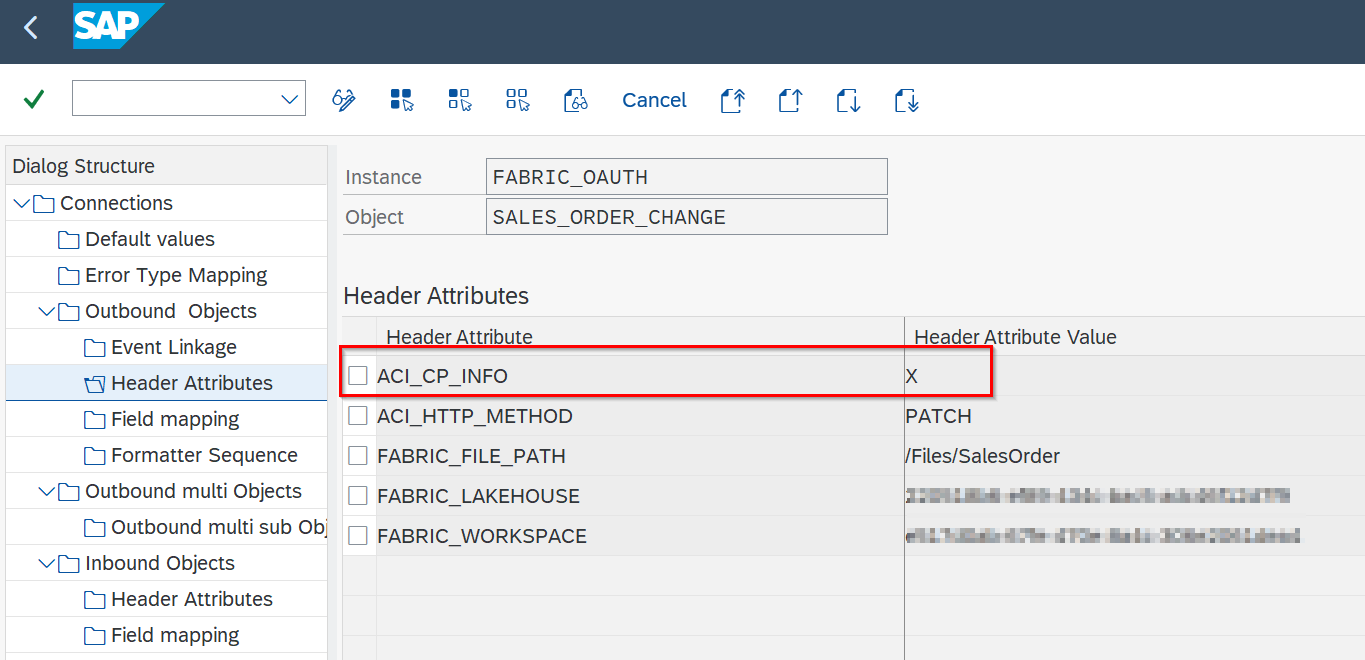
Information can be transferred from the change pointer to the payload. The following information can be used:
| Information Field | Description |
|---|---|
ACICPIDENT | Change pointer ID |
ACITABNAME | Table name (Event Object Type) |
ACITABKEY | Composed of: Event Type, Mandt, Entry Key |
ACICRETIME | Creation time |
ACIACTTIME | Activation time |
ACICDCHGID | Change Indicator |
Customize the Change Pointer Information
Fields can be renamed or omitted:
- Go to section Field Mapping
- Add New Entry and specify:
| Target Structure | Target Field | Default Value |
|---|---|---|
FIELD_RENAME | ACICDCHGID | ChangeIndicator |
SKIP_FIELD | ACITABKEY | – |
Test the Outbound Event Creation
In the example above, please pick any test sales order in transaction /nVA02 and force a change event, e.g. by changing the requested delivery date on header level.
Set Up Packed Load / Initial Load (Split Large Data)
Create Payload
Note: e.g. payload design created in transaction /ASADEV/DESIGN.
Create Outbound Object Configuration
- Transaction: SPRO
- Go to ASAPIO Cloud Integrator – Connection and Replication Object Customizing
- Or go directly to transaction: /ASADEV/ACI_SETTINGS
- Select the created Connection
- Go to section Outbound Objects
- Add New Entry and specify:
- Object: name of the outbound configuration
- Extraction Func. Module:
/ASADEV/ACI_GEN_PDVIEW_EXTRACT - File Name: name with file format
- Message Type: the created message type (optional)
- Load Type: Packed Load
- Trace: activate for testing purposes
- Format Function:
/ASADEV/ACI_PARQUET_FORMATTER - Payload View Name: name of payload design
- Payload View Version: version of payload design
Set Up ‘Header Attributes’
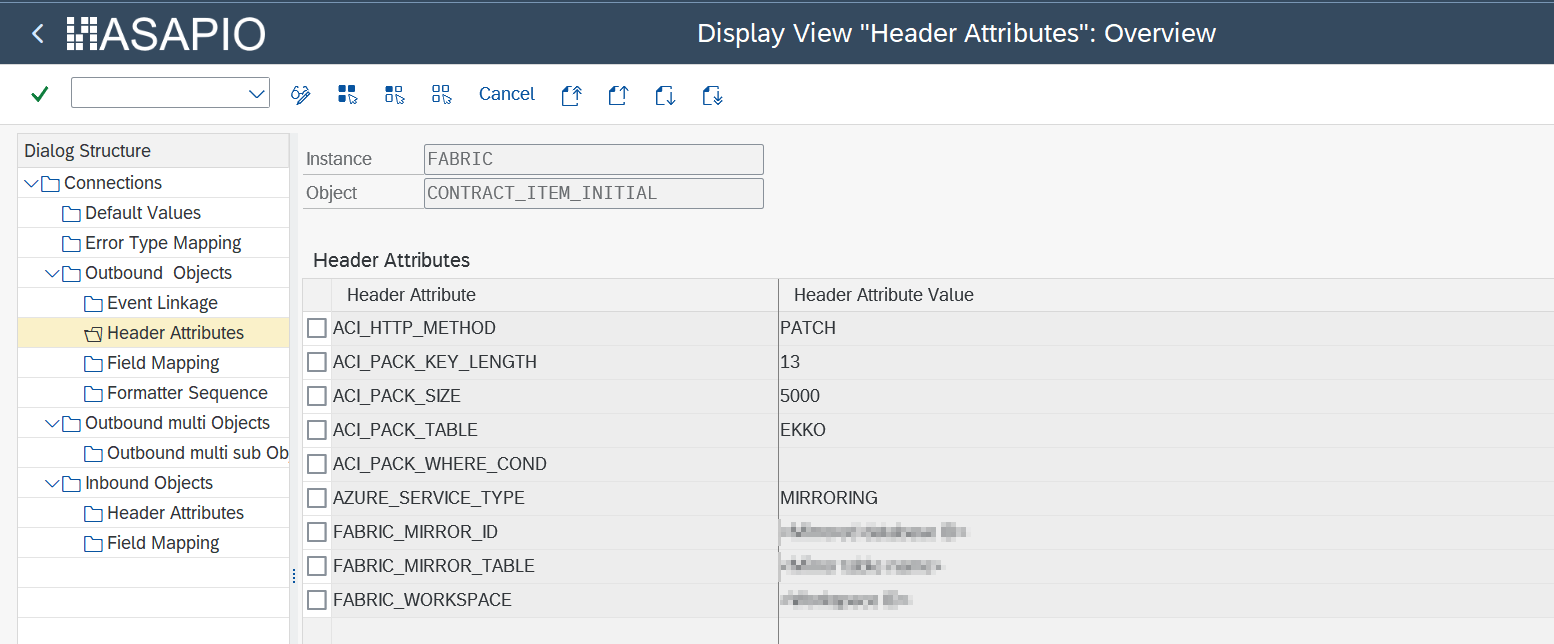
| Header Attribute | Header Attribute Value | Example |
|---|---|---|
ACI_PACK_BDCP_COMMIT | Flag for change pointer creation. If set, change pointers will be generated for every entry. If this flag is set, a message type has to be maintained in the outbound object. Caution: this may heavily impact performance. | X |
ACI_PACK_TABLE | Name of the table to take the key fields from. This is typically different from the DB view specified in ACI_VIEW, as we only want to build packages based on the header object and the DB view typically contains sub-objects as well. | VBAK |
ACI_PACK_RETRY_TIME | Time in seconds. The duration in which the framework will attempt to get a new resource from the server group. | 60 |
ACI_PACK_WHERE_COND | Condition that is applied to the table defined in ACI_PACK_TABLE. | – |
ACI_PACK_SIZE | Number of entries to send. | 500 |
ACI_PACK_KEY_LENGTH | Length of the key to use from the ACI_PACK_TABLE (e.g. MANDT + MATNR). | 13 |
Execute the Initial Load
Warning: depending on the amount of data, this can stress the SAP system servers immensely. Please always consult with your basis team for the correct server group to use.
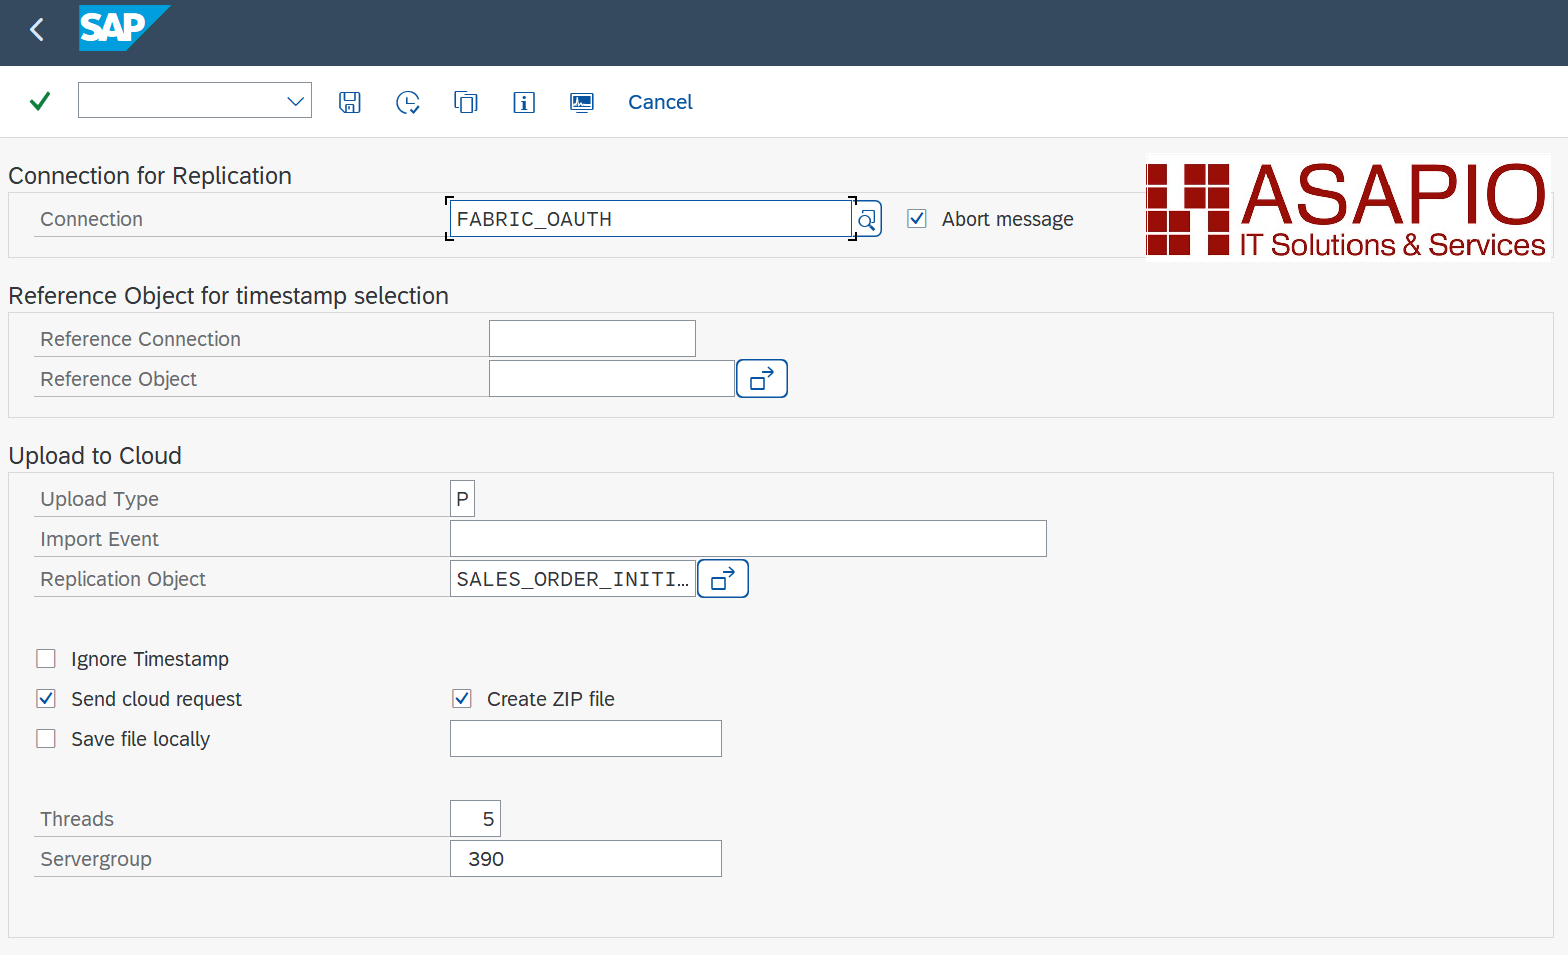
- Transaction: /ASADEV/ACI
- Select the Connection and hit enter
- Select Upload Type: P
- Select Replication Object
- Select a Server group (this is mandatory)
Monitoring, Traces and Logs
ASAPIO Integration Add-on Monitor allows for monitoring all outbound and inbound messages of the Add-on, with the following features:
- View statistical and graphical analysis of data volume, times, and errors
- Logging of HTTP return codes and messages
- Logging of requests (RAW data) can be switched on/off in application customizing (IMG)
- Retransmission control through SAP change pointers (to ensure event delivery) if errors occur
- Notification and/or escalation to system administrators (or through SAP Workflow) if errors occur
See the Monitoring documentation for details.
Import CSV Files into Lakehouse
A generic Fabric Notebook can be used to automate the import of CSV files into a Lakehouse database.
Create a Fabric Notebook
Create a new notebook in your Lakehouse and use the example code below.
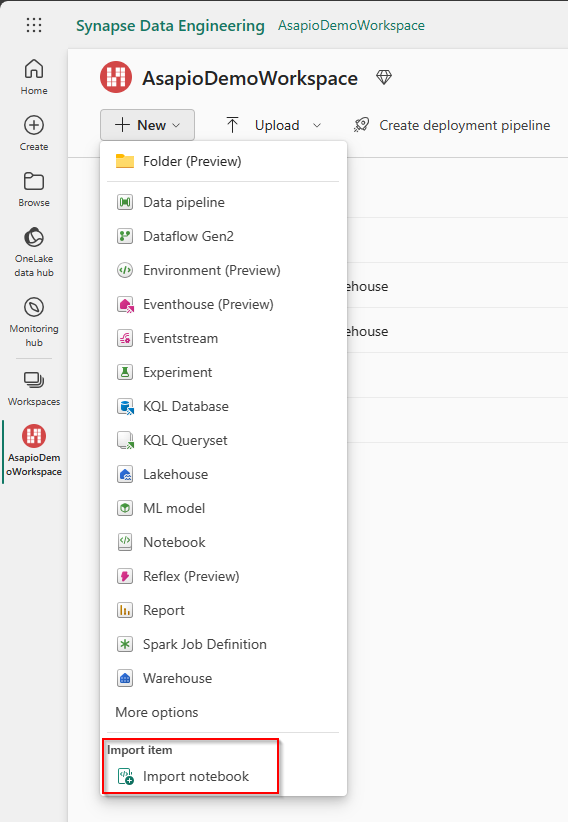
- Go to your Fabric Workspace
- Use New and Import notebook
- Upload the ASAPIO Notebook file
Configure the Notebook
To use the notebook, first personalize the file name, the path to the files, and the path to the database.
| Variable | Description |
|---|---|
path_to_csv_files | Path of the CSV file folder |
path_to_delta_table | Path of the database |
pattern | The regular expression pattern of the CSV file name; must be modified to align with the configured file name in SAP. Only the marked part needs to be changed. |
pattern_with_groups | The regular expression pattern of the CSV file name with named capture groups; must be modified to align with the configured file name in SAP. Only the marked part needs to be changed. |

Schedule the Notebook as a Job
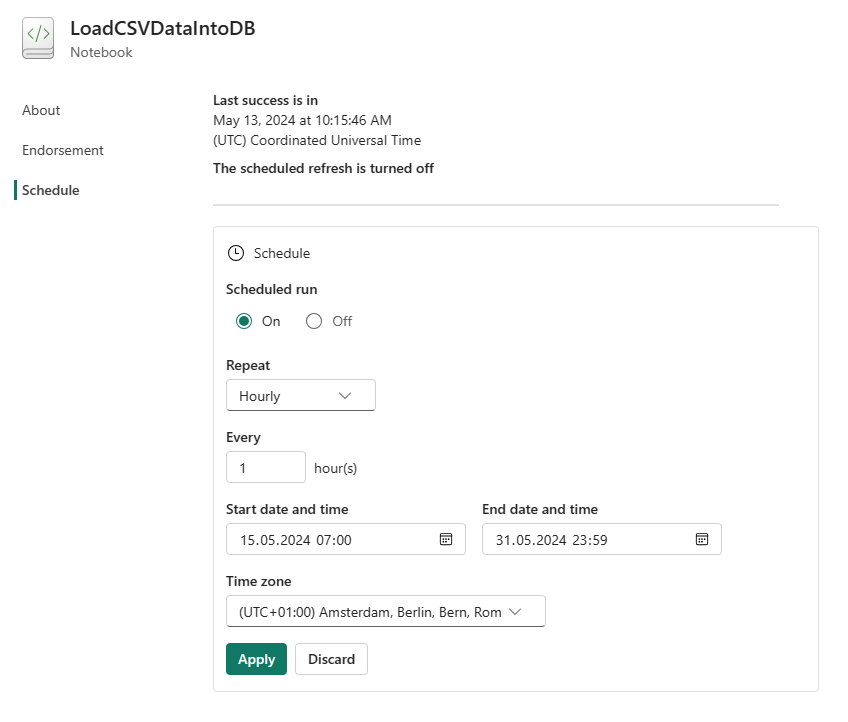
You can schedule the notebook as a job, e.g. hourly.
- Go to tab Run and use Schedule
- Configure to your plan and use Apply
Example code:
from pyspark.sql import SparkSession
from delta.tables import DeltaTable
import re

# Initialize a SparkSession with Hive support enabled.
spark = SparkSession.builder.appName("LakehouseUpdater").enableHiveSupport().getOrCreate()

# Specify the path to the CSV files.
path_to_csv_files = "abfss://AsapioDemoWorkspace@onelake.dfs.fabric.microsoft.com/AsapioDemoLakehouse.Lakehouse/Files/SalesOrder"

# Specify the path to the Delta table.
path_to_delta_table = "abfss://AsapioDemoWorkspace@onelake.dfs.fabric.microsoft.com/AsapioDemoLakehouse.Lakehouse/Tables/aci_sales_order"

# Compile a regex pattern to filter the file names.
pattern = re.compile(r'aci_sales_order_\d{8}_\d{6}_[a-f0-9]{6}\.csv')

# Define the pattern with groups for sorting based on date and time.
pattern_with_groups = re.compile(r'aci_sales_order_(\d{8})_(\d{6})_([a-f0-9]{6})\.csv')

# Retrieve a list of file names.
files = mssparkutils.fs.ls(path_to_csv_files)

# Initialize a list to hold filtered file names.
filtered_files = []

# Iterate through the file list and add names that match the pattern to the list.
for file in files:
    if pattern.match(file.name):
        filtered_files.append(file.name)

# Sort the file list based on the defined pattern.
filtered_files.sort(key=lambda x: pattern_with_groups.match(x).groups())

# Create a DeltaTable object for the specified Delta table.
delta_table = DeltaTable.forPath(spark, path_to_delta_table)

# Loop over each file in the filtered list.
for file in files:

    # Load the content of the file into an RDD.
    rdd = spark.sparkContext.textFile(file.path)
    # Retrieve the first line which contains field names.
    first_line = rdd.first()

    # Extract field names from the first line.
    _, field_names_str = first_line.split("=")
    field_names = field_names_str.split(",")

    # Construct a condition format for merging data based on field names.
    condition_format = " AND ".join([f"old_data.{field} = new_data.{field}" for field in field_names])

    # Create a new RDD without the first line.
    rdd_without_first_line = rdd.filter(lambda line: line != first_line)

    # Convert the RDD to a DataFrame, now that the non-CSV compliant first line is removed.
    df = spark.read.csv(rdd_without_first_line, header=True, inferSchema=True)

    # Perform a merge operation between the existing Delta table and the new data,
    # updating existing records and inserting new ones as necessary.
    (delta_table
        .alias("old_data")
        .merge(df.alias("new_data"), condition_format)
        .whenMatchedUpdateAll()
        .whenNotMatchedInsertAll()
        .execute()
    )

    # Remove the processed file.
    mssparkutils.fs.rm(file.path, True)
Optimized Incremental Load Handling with Packed Reprocessing
Due to the incrementing mechanism used for Parquet file numbers in Fabric, it is more efficient not to send data in real time. Instead, data should be processed and transferred in batch intervals, for example every 5 minutes or every minute.
For this purpose, use Packed Reprocessing (see the Outbound Messaging documentation).
The first Outbound Object (used for incremental load) writes the Change Pointers but does not send any data.
The second Outbound Object then collects the previously written Change Pointers and sends them in packages, triggered by a background job that runs every 5 minutes or every minute.
In the monitor, you may see “500 lock object could not be set”. This indicates that another process is currently accessing the same object, which is expected behavior when Change Pointers are being processed in parallel. The packed reprocessing job will prevent the lock.