Docs / Connectors / SAP Advanced Event Mesh
SAP Advanced Event Mesh Connector
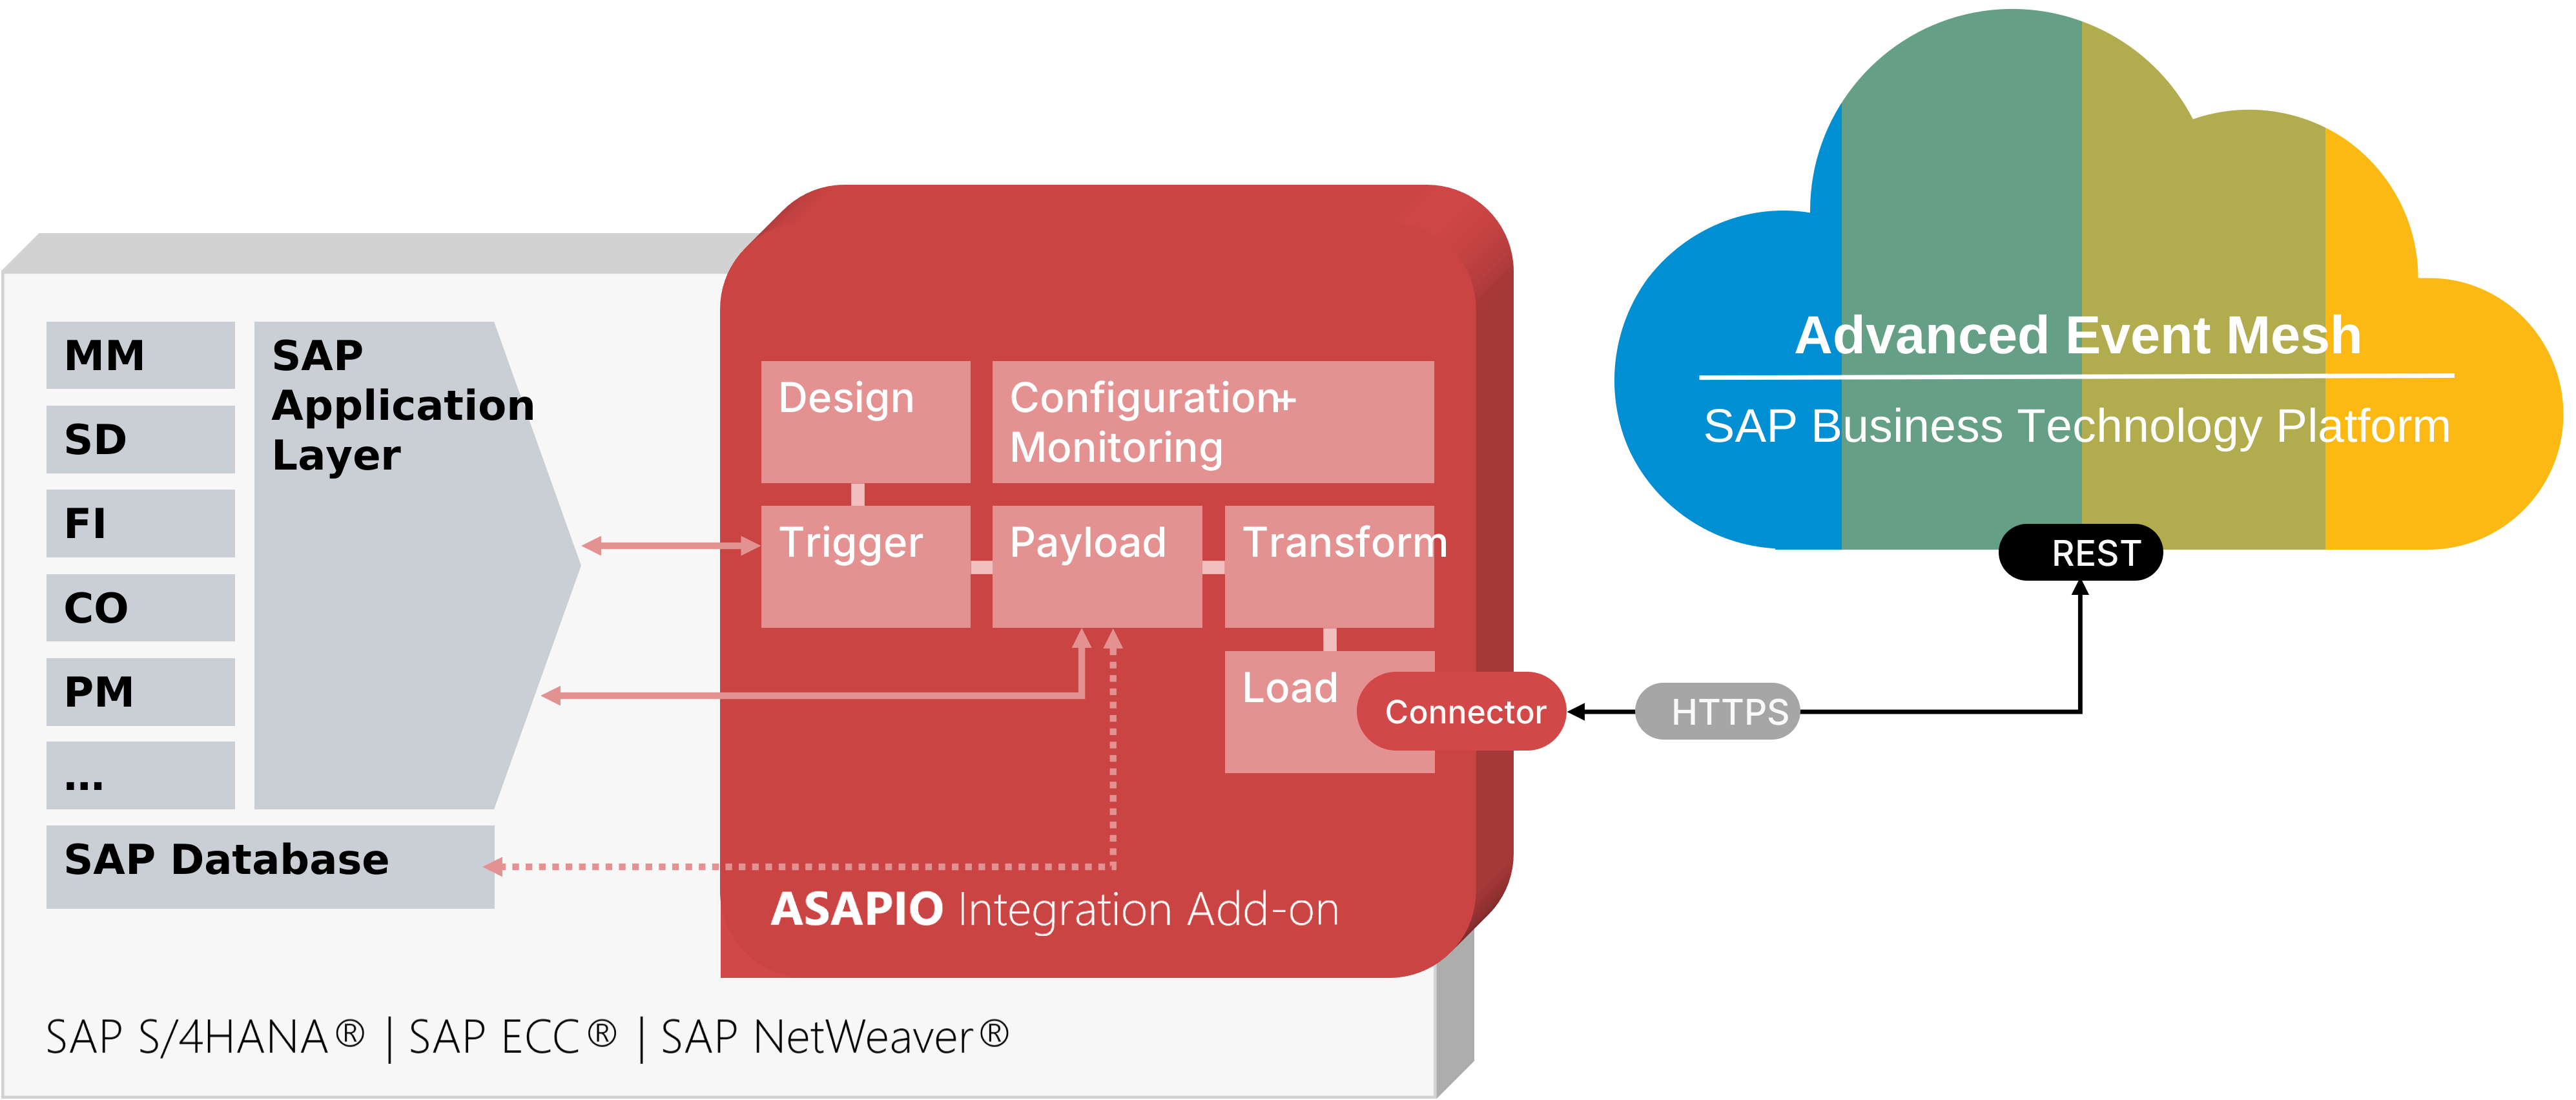
Connect SAP S/4HANA and SAP ERP Central Component (ECC) with SAP Integration Suite, Advanced Event Mesh (AEM) — SAP's enterprise event broker for asynchronous, real-time communication across hybrid, multi-cloud, and edge environments. Because AEM is based on Solace PubSub+, many settings are similar — you may find configuration values named "Solace" within this guide.
The ASAPIO Event Add-on for ERP bridges SAP systems with AEM without requiring additional middleware infrastructure. Payloads are code-less and extensible via CDS views, classic tables, or the Payload Designer. Both outbound event streaming and inbound data receipt are supported.
Getting Started via SAP BTP Discovery Center
The fastest way to jump-start the configuration is through the SAP BTP Discovery Center:
- Obtain Connections entitlements via the SAP Discovery Center (multiple commercial models available).
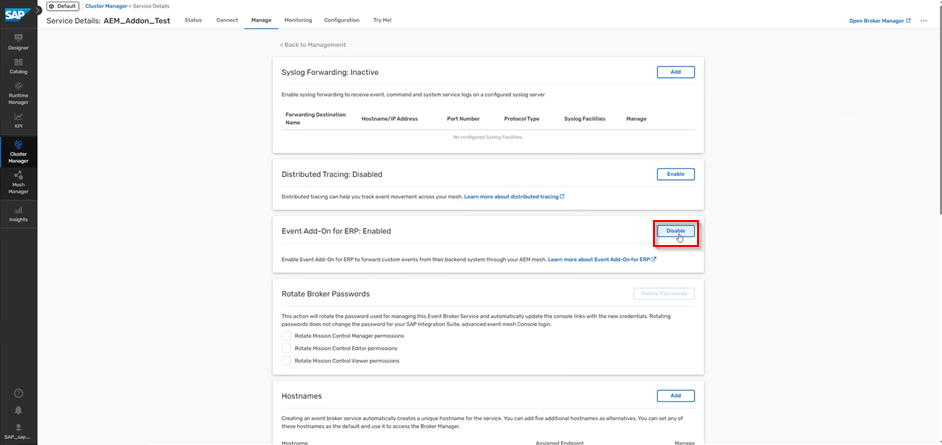
- Enable the Event Add-on flag on your active broker in the SAP BTP Cluster Manager.
- Install the ASAAEMEE component on top of ASANWEE in your SAP system.
- Configure the broker as an SM59 endpoint and complete the add-on configuration below.
Overview
The following add-on components are required for the SAP AEM connector:
| Add-on / Component | Type |
|---|---|
| Netweaver Event Enablement Add-on (ASANWEE) | Base component (required) |
| SAP Integration Suite, Advanced Event Mesh – Event Add-on for ERP (ASAAEMEE) | Connector package |
| SAP AEM ERP Add-on (AEMERP) | S/4HANA-specific event enablement content |
Key capabilities of this connector:
- Supports SAP NetWeaver-based systems (ERP and S/4HANA)
- Out-of-the-box connectivity to the SAP AEM broker
- Supported direction: Outbound, push-based
- High-availability scenarios with fallback broker support
- Dynamic topics
- User properties and message headers (from release 2610)
- Mass-data capable
- Event-driven or batch mode switching
- Batch mode multi-threading with multiple work processes
Prerequisites
An instance of SAP Advanced Event Mesh is required, which is part of SAP Integration Suite on BTP.
The necessary configuration steps are:
- RFC destination for the Validation service endpoint
- RFC destination for the token endpoint (Validation service)
- Add-on instance for the Validation service
- RFC destination for the AEM messaging endpoint
- Add-on instance for AEM
Important: To use the add-on with your broker instance, it must be activated in the Cluster Manager.
Create an outbound interface (Event Studio)
Select a data object in the Data Catalog with an AEM-compatible load type, click Deploy, and choose the SAP AEM connection. Configure the required header attributes (see Header Attributes below) and deploy. Dynamic topic segments can be configured in the Field Mapping section of the interface.
Header Attributes
The following header attributes apply to both Event Studio and SAP GUI configuration.
| Header Attribute | Value | Description |
|---|---|---|
SOLACE_CALL_METHOD | POST | Mandatory — HTTP method |
SOLACE_CONT_TYPE | application/json | Mandatory — content type |
SOLACE_DELIV_MODE | Persistent | Mandatory — delivery mode |
SOLACE_DMQ_ELIGIBLE | true | Optional — activate Dead Message Queue eligibility |
SOLACE_TIME_TO_LIVE | 2000 | Optional — message lifetime in milliseconds |
Create an outbound interface (SAP Gui)
AEM-Specific Default Values (Instance Level)
| Default Value Name | Default Value | Description |
|---|---|---|
AUTH_INSTANCE | <cloud instance> | Validation service instance; checks add-on activation |
ACI_CLIENT_ID | <client id> | Client identifier |
ACI_TOKEN_DESTINATION | <token rfc destination> | RFC destination for the OAuth token endpoint |
AUTH_TYPE | CERTIFICATE or OAUTH | Authorization method |
Extraction and Format Functions
| Function Name | Type | Payload Design | Notes |
|---|---|---|---|
/ASADEV/ACI_GEN_PDVIEW_EXTRACT | Extraction | Yes | Recommended extractor for Payload Design interfaces |
/ASADEV/ACI_GEN_VIEW_FORM_CB | Format | Yes | Recommended standard formatter |
/ASADEV/ACI_IDOC_FORMATTER_AEM | Format | No | IDoc conversion formatter |
/ASADEV/ACI_GEN_FORM_CE_CB_AEM | Format | Yes | Standard formatter with CloudEvents wrapping |
/ASADEV/ACI_GEN_VIEWEXT_AEM | Extraction | No | DB view-based extractor |
/ASADEV/ACI_GEN_NOTIFY_AEM | Extraction/Format | No | Notification events processor |
/ASADEV/ACI_GEN_META_AEM | Extraction | No | Example extractor |
/ASADEV/ACI_GEN_DATA_AEM | Extraction | No | Example extractor |
/ASADEV/ACI_GEN_CHANGES_AEM | Extraction | No | Example extractor |
/ASADEV/ACI_GEN_VIEWFRM_AEM | Format | Yes | Deprecated — use /ASADEV/ACI_GEN_VIEW_FORM_CB |
Response handler: /ASADEV/ACI_GEN_RH_AEM
Set Up Instance for Validation Service
Two authentication options are available: OAuth 2.0 with ClientID/ClientSecret, or OAuth 2.0 with a client certificate.
Create RFC Destinations (SM59)
Validation Endpoint
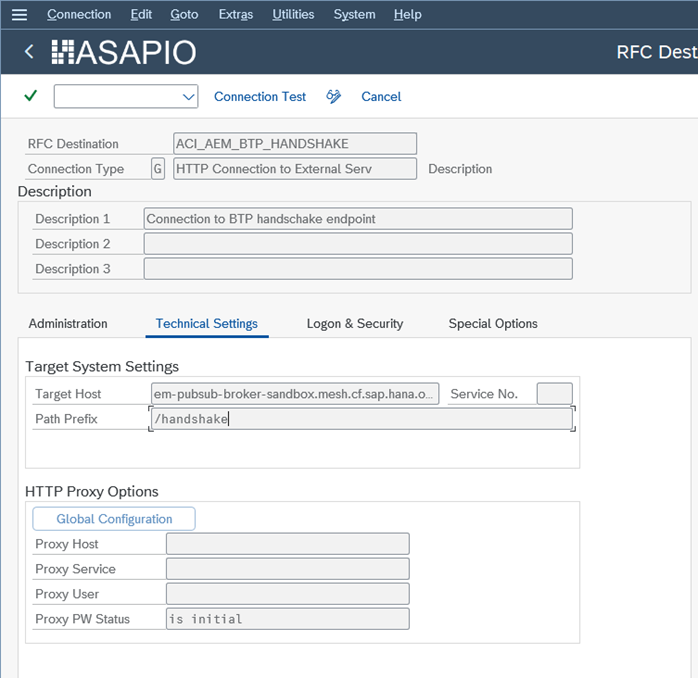
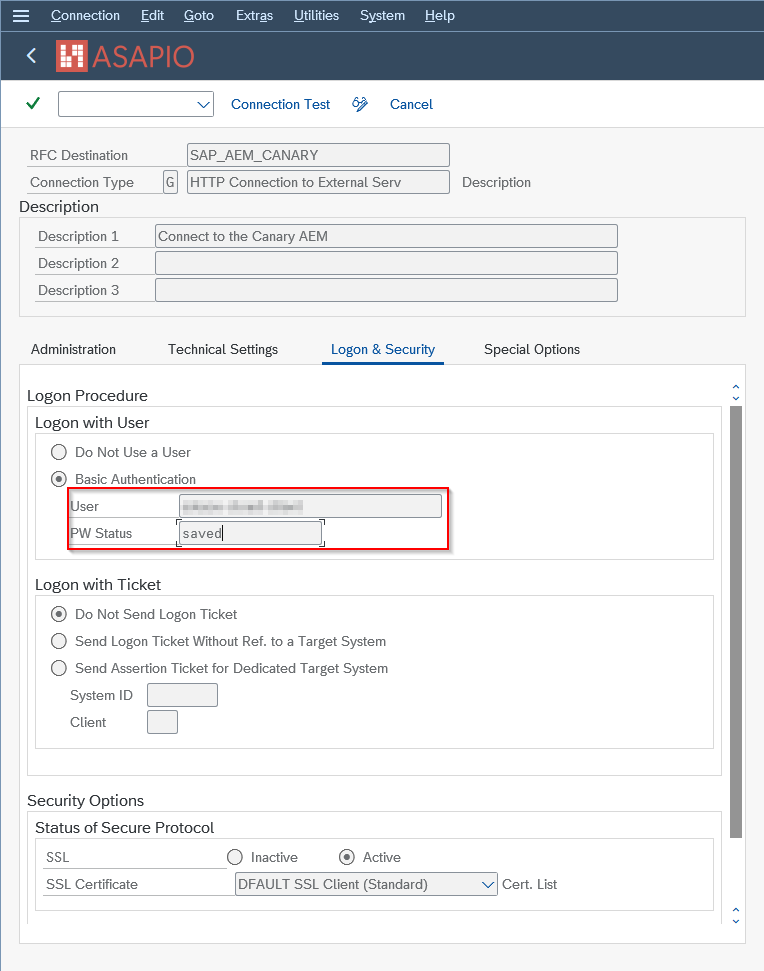
In transaction SM59, create an RFC destination of type G (HTTP Connection to External Server). Specify the target host and port for the validation endpoint.
OAuth Token Endpoint
In transaction SM59, create a second type G RFC destination for the OAuth token endpoint.
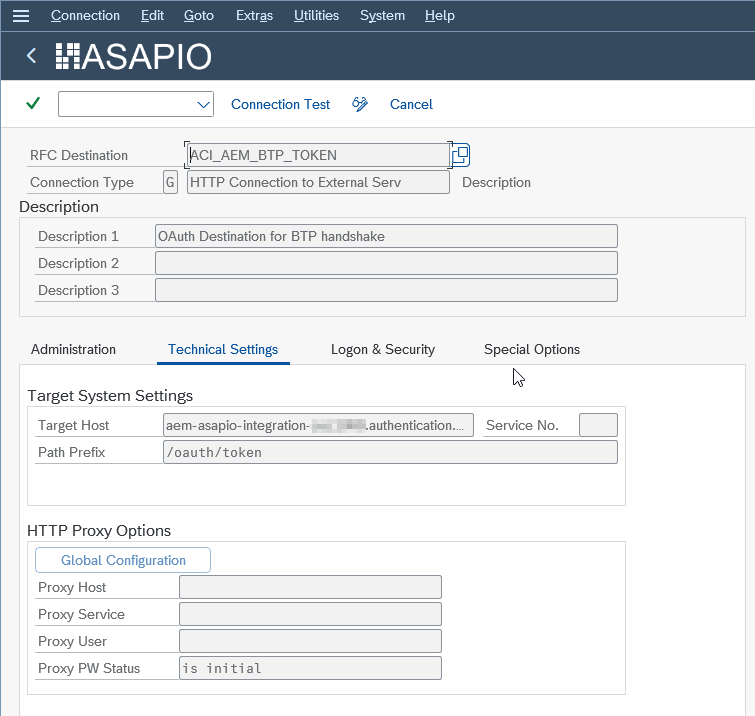
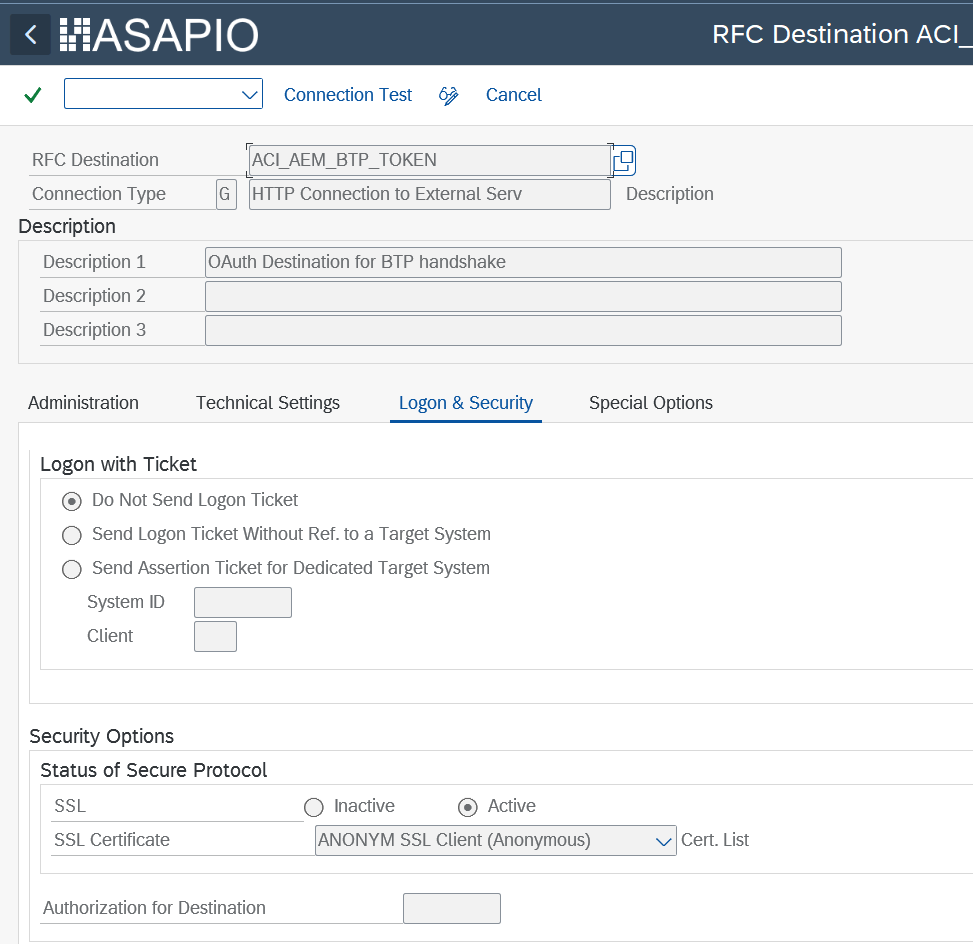
On the Logon & Security tab, specify the default anonymous certificate store.
Create Token Certificate (Certificate-Based Auth Only)
This section is only required when using certificate-based authentication.
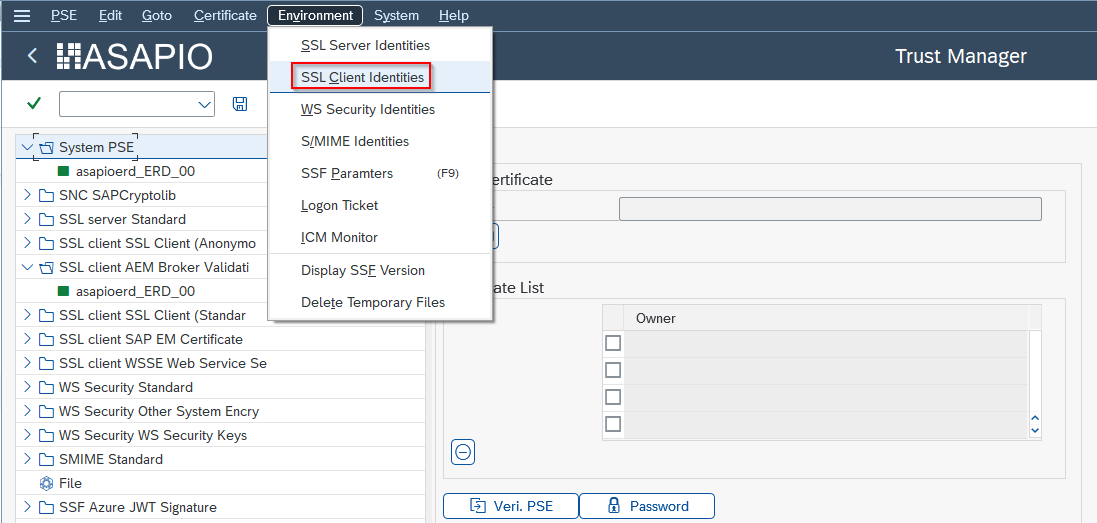
Create an SSL Client Identity (STRUST)
In transaction STRUST, navigate to Environment > SSL Client Identities.
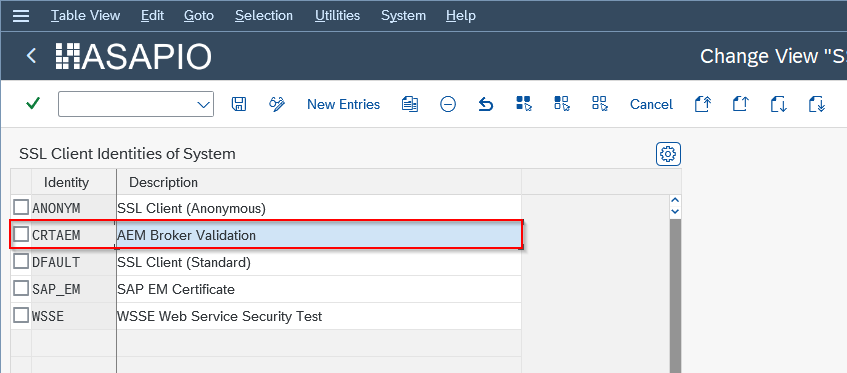
Create a new entry.
Import the Certificate — Newer ECC / S/4 Releases
- In STRUST, enter edit mode.
- Go to PSE > Import and import the
.p12file.
Note: if importing the .p12 file is not possible, use the command line to convert it to a .pse file first. - Go to PSE > Save as.
- Select SSL Client and the client identity created earlier.
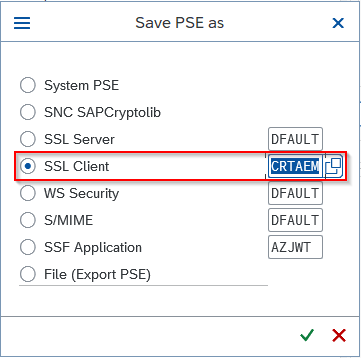
Import the Certificate — Older Releases (No P12 Support)
- Copy the P12 key to:
<drive>:\usr\exe - Open a command window in the executables directory.
- Run
sapgenpse import_p12:
Example:sapgenpse import_p12 -p <drive>:\usr\<SSF_Profile> <key_name>.p12sapgenpse import_p12 -p D:\usr\SAP\JWT_S2100.pse project-messaging-339506-323631149f29.p12 - In STRUST, go to PSE > Import and import the generated
.psefile.
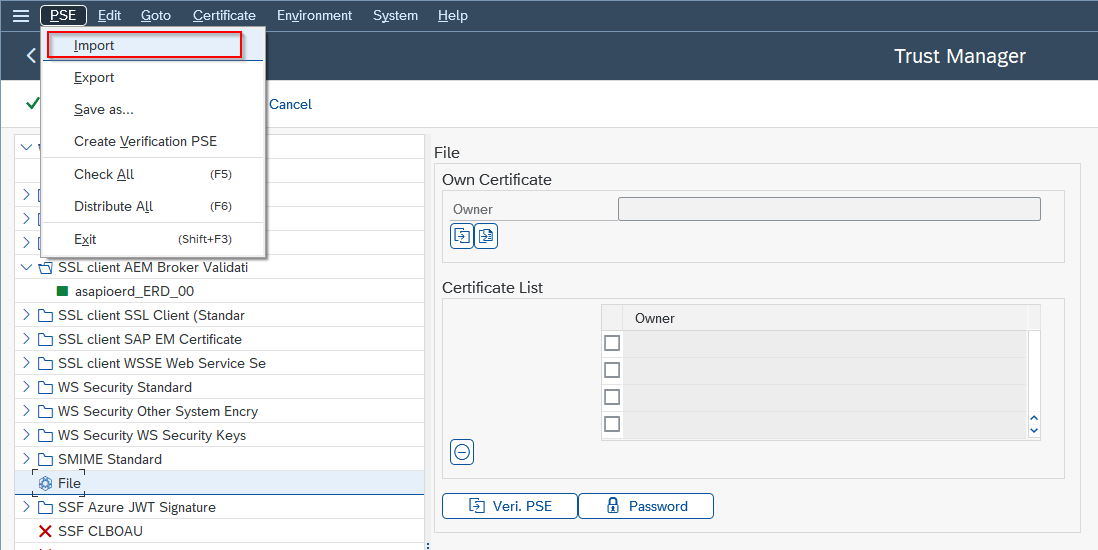
- Go to PSE > Save as, select SSL Client and the client identity, then confirm and save.
Update OAuth Destination with Certificate
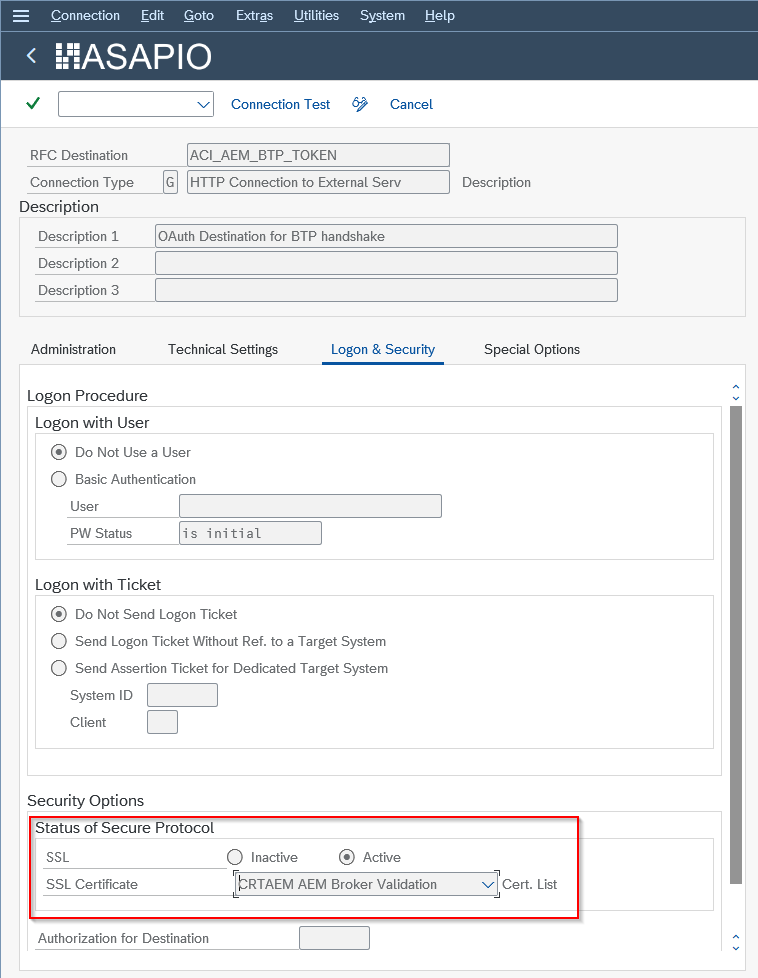
On the Logon & Security tab of the OAuth token RFC destination, specify the SSL certificate.
Create Validation Service Instance
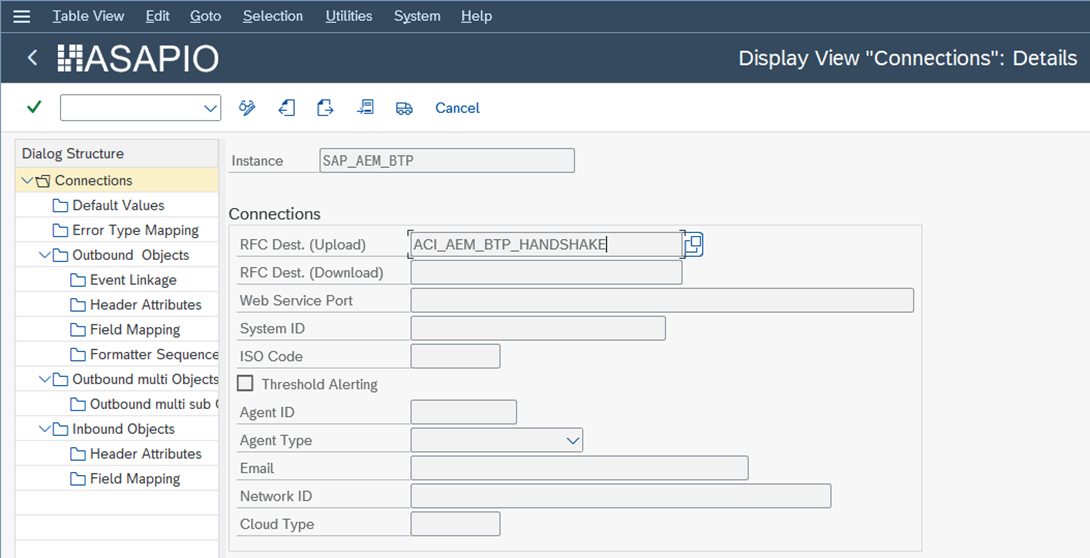
In transaction SPRO or /ASADEV/ACI_SETTINGS, navigate to ASAPIO Integration Add-on – Connection and Replication Object Customizing. Add a new entry specifying the instance name and the RFC destination for the validation endpoint.
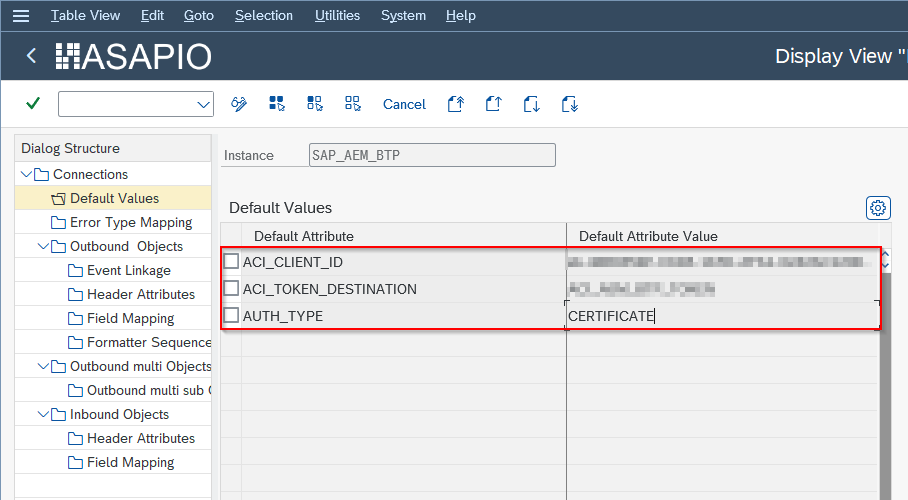
Configure Default Values
Add the following required default values to the instance:
| Default Attribute | Value |
|---|---|
ACI_CLIENT_ID | <client id> |
ACI_TOKEN_DESTINATION | <token rfc destination> |
AUTH_TYPE | CERTIFICATE or OAUTH |
Configure Client Secret (OAuth Only)
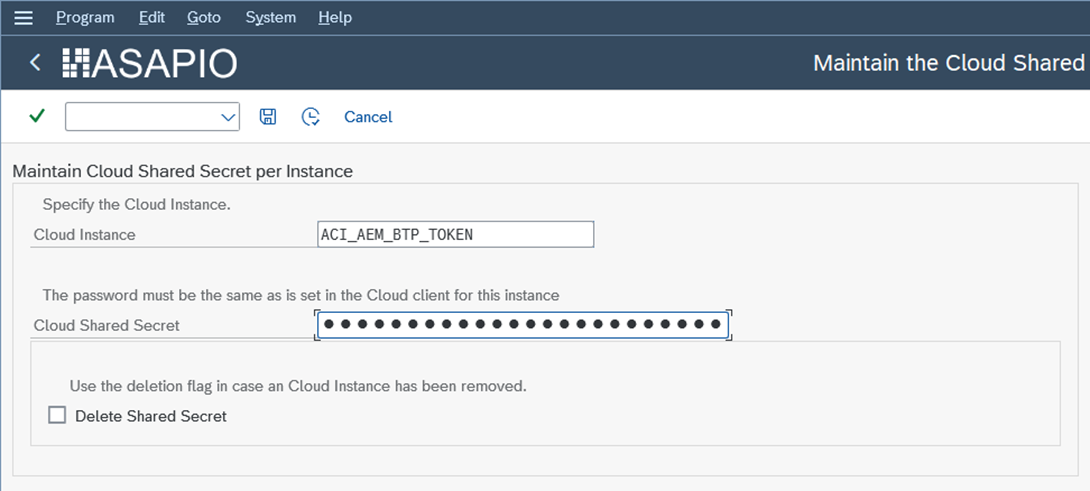
Required only for OAuth 2.0 with ClientID/ClientSecret — not required for certificate-based authentication.
In transaction SPRO or /ASADEV/SCI_TPW, navigate to ASAPIO Integration Add-on – Set the cloud connection password. Select the created cloud instance, enter the client secret in the Cloud Shared Secret field, and execute.
Set Up Instance for AEM Service
This is performed after the Validation service configuration.
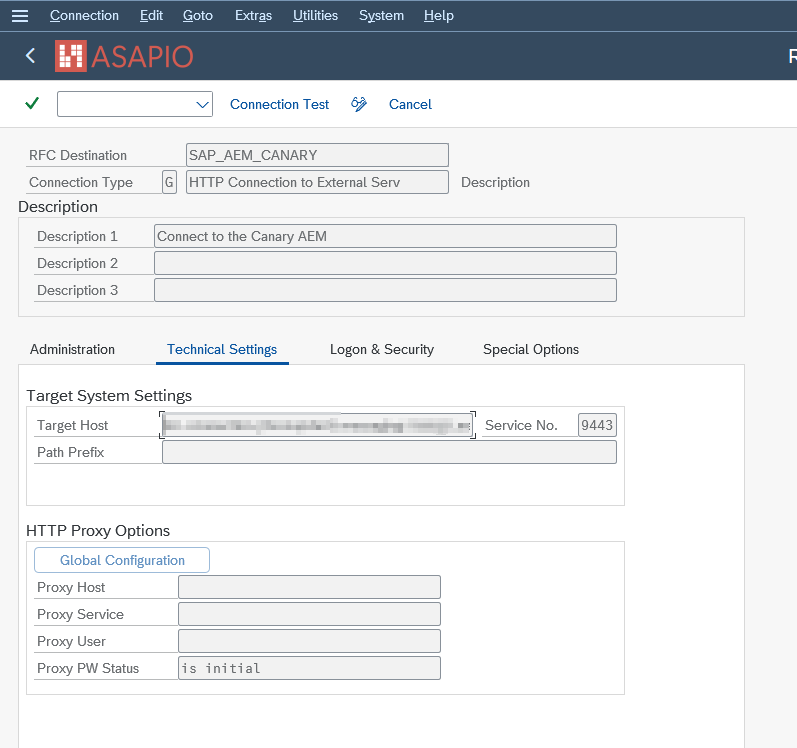
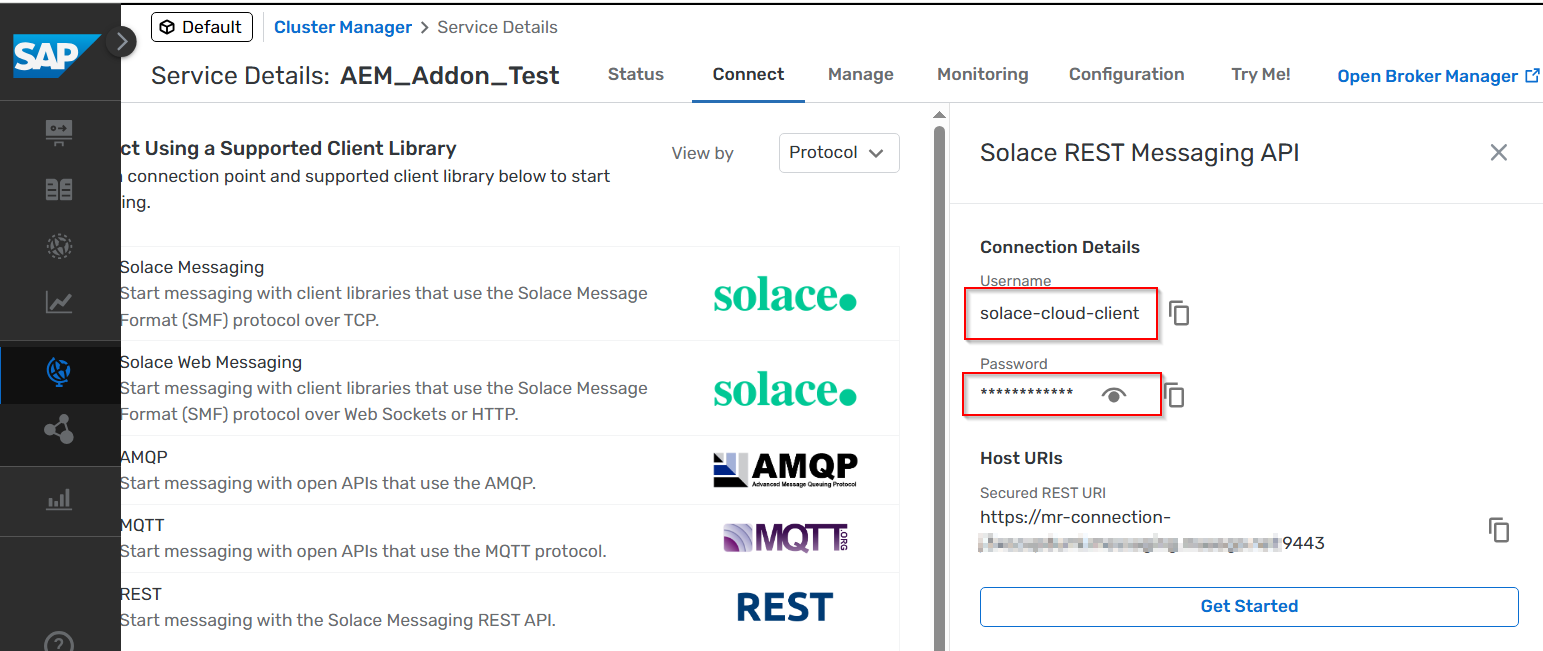
Create RFC Destination (SM59)
In transaction SM59, create a type G RFC destination for the AEM messaging endpoint. Obtain the target host and credentials from the Advanced Event Mesh Cluster Manager under Service Details > Connect tab.
Create AEM Service Instance
In transaction SPRO or /ASADEV/ACI_SETTINGS, navigate to ASAPIO Cloud Integrator – Connection and Replication Object Customizing. Add a new entry with:
- Instance name
- RFC Dest. (Upload) — the RFC destination for the messaging endpoint
- ISO Code — code page to use
- Cloud Type —
SAP_AEM(or the configured connector name)

Configure Default Values
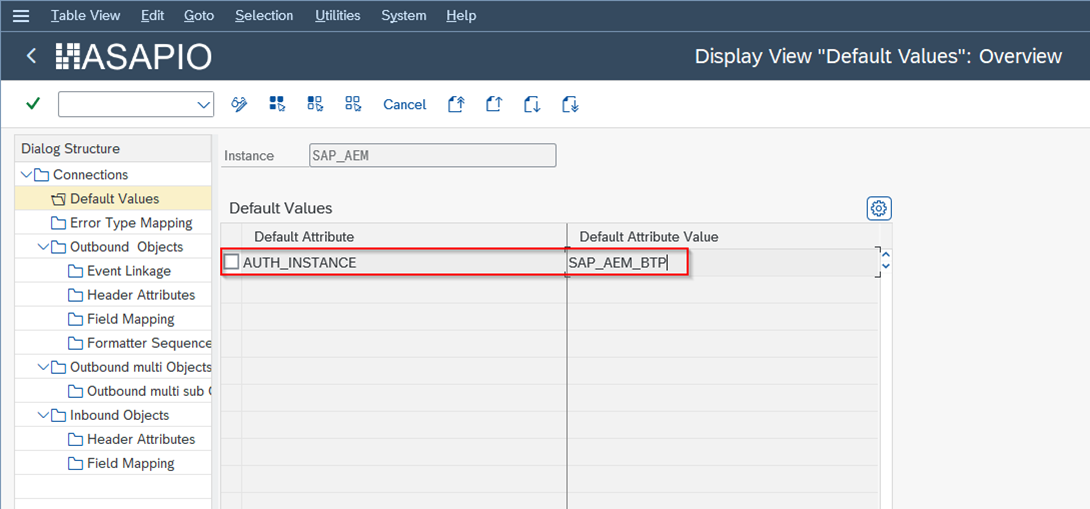
In the instance, navigate to Default Values and add:
| Default Attribute | Value |
|---|---|
AUTH_INSTANCE | <validation instance> |
Setting up the outbound interfaces is described in Outbound Messaging.
Set Up Dynamic Topics
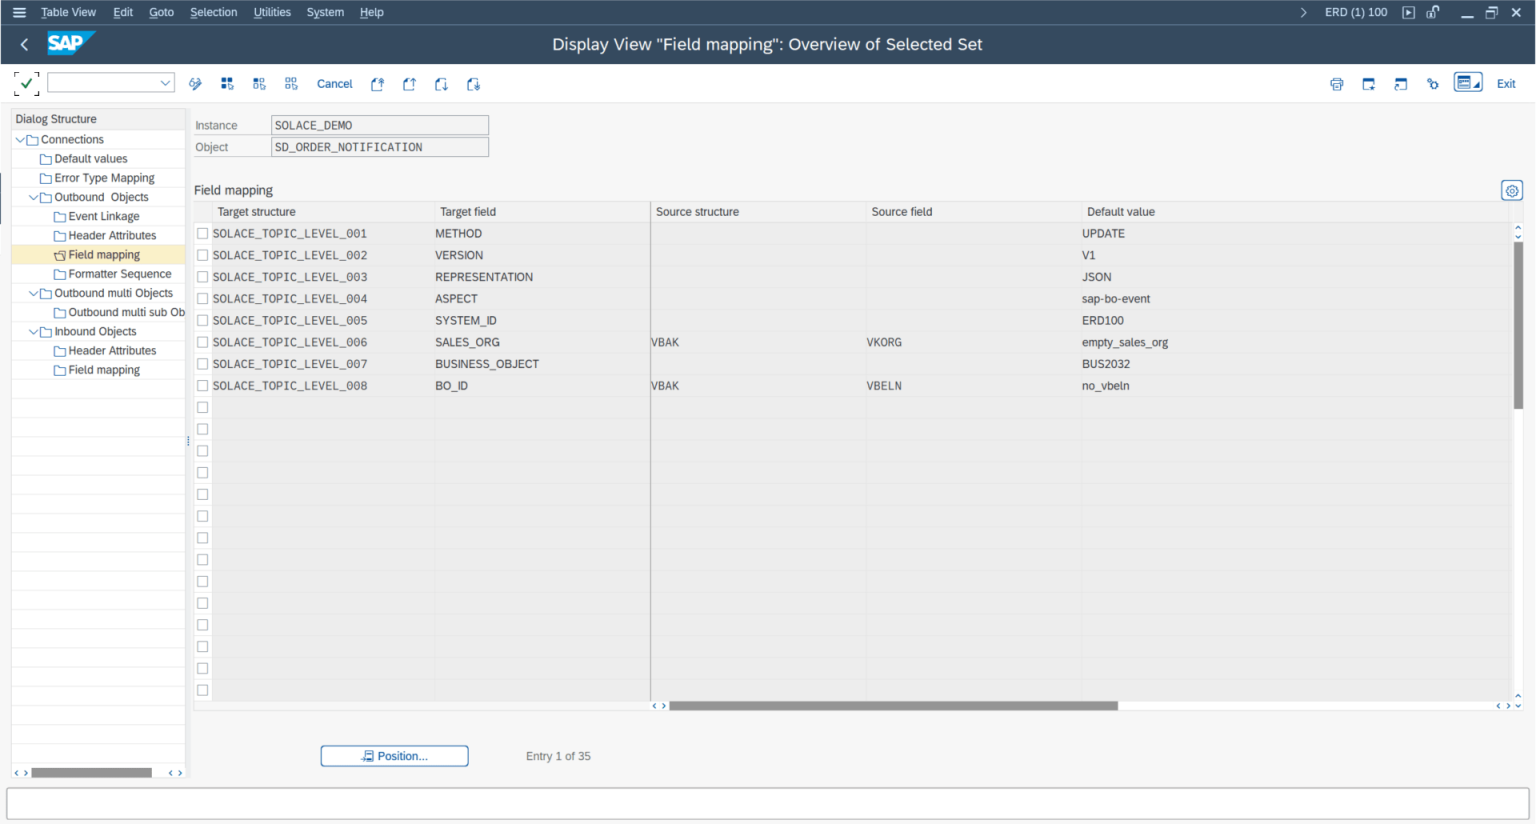
Dynamic topics let you generate topic names using payload values as fixed or variable segments.
Field Mapping Configuration
In the instance, navigate to the Field Mapping section and add a new entry specifying:
- Target structure: URL segment
- Target field: description
- Source structure: table for the dynamic field
- Source field: dynamic value for the URL segment
- Default value: static value for the URL segment
Conversion Methods (from Release 2504 / 9.32504)
You can specify a conversion class/method to transform the value of a topic level — for example, to translate SAP-specific values to more commonly used terms, or to derive a new value such as a region from the data.

Monitor Display
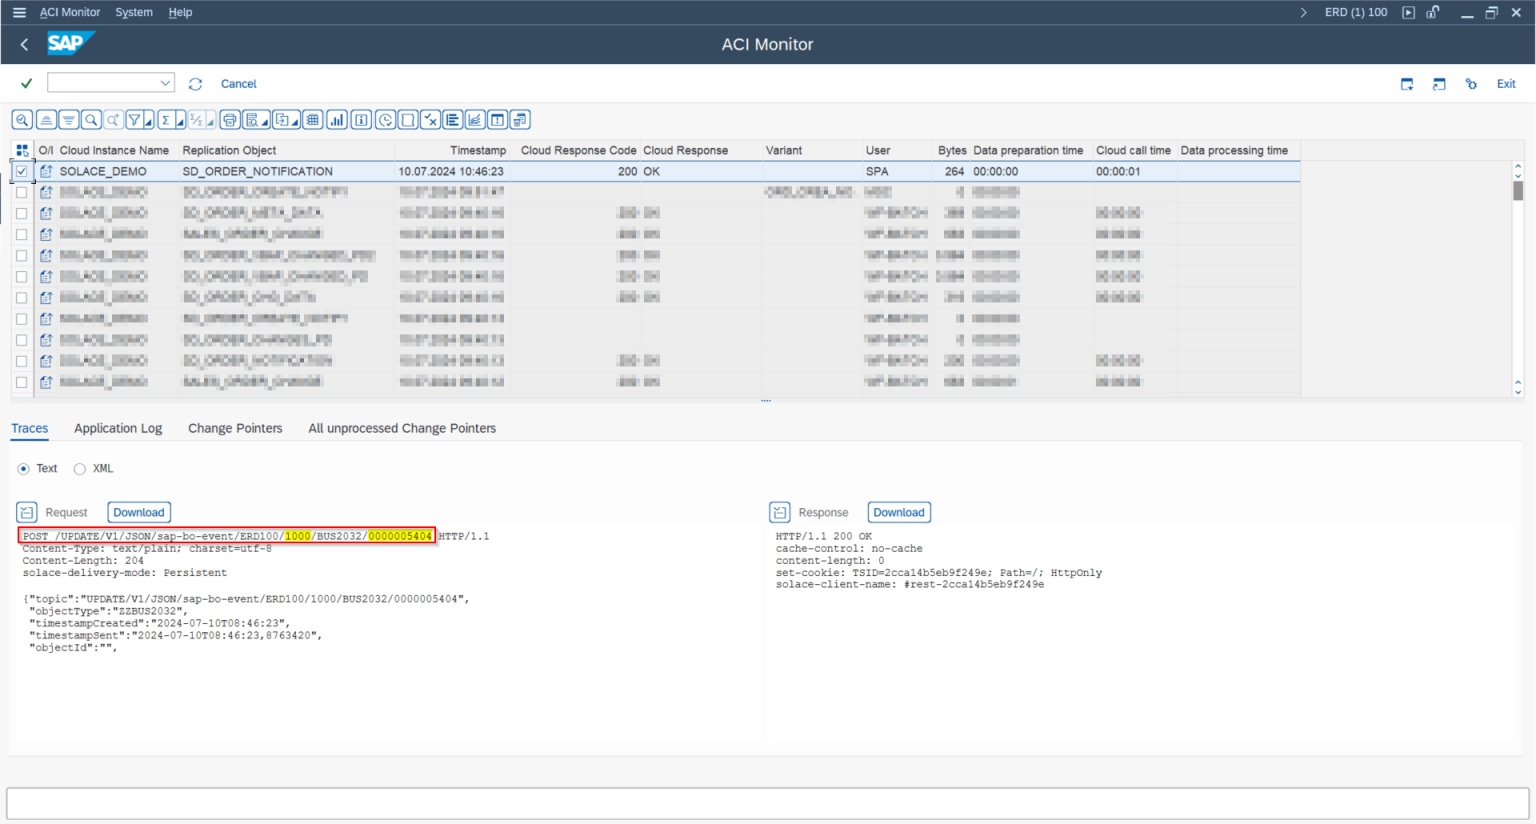
Dynamic and static URL segments are highlighted in the monitor view.
Set Up User Properties and Message Headers
New option with release 2610 (9.32610): you can send custom user properties and dedicated message headers with every outbound message. They are configured in the same Field Mapping as dynamic topics, using the target structures SOLACE_USER_PROPERTY_### (user properties) and SOLACE_HEADER_### (message headers). Because AEM is based on Solace PubSub+, the functionality is identical to the Solace connector.
The feature is available for REST-based connectivity. AMQP-based connectivity is not yet supported.
For the full configuration, value determination rules, examples, and message sequencing behavior, see Set-Up User Properties and Message Headers in the Solace Platform connector guide.
Demo
The following demo shows SAP sales orders with inbound and outbound messaging, including dynamic topics features.