Docs / Connectors / n8n
n8n Connector
The ASAPIO Integration Add-on sends SAP events to n8n workflows over a standard REST connection. On the n8n side, the ASAPIO community node @asapio/n8n-nodes-asapio receives these events as a workflow trigger. Every request is signed with HMAC-SHA256, so your workflow only processes messages that really come from your SAP system and have not been altered.
Availability
The n8n connector requires ASAPIO Integration Add-on Release 9.32610 or higher. It is not available in the SAP OEM editions of the ASAPIO Integration Add-on.
Overview
- A business event in SAP S/4HANA or SAP ECC triggers an outbound interface in the ASAPIO Integration Add-on.
- The REST connection posts the payload to the webhook URL of your n8n workflow. It signs each request with a shared secret and adds the headers
X-ASAPIO-SignatureandX-ASAPIO-Timestamp. - The ASAPIO Event Trigger node in n8n recalculates the signature with the same secret, checks the timestamp, and starts the workflow with the verified payload.
Prerequisites
- SAP S/4HANA or SAP ECC as the source system
- ASAPIO Integration Add-on – Framework, Release 9.32610 or higher (not available in the SAP OEM editions)
- ASAPIO Integration Add-on – REST Connector
- An n8n instance on which you can install community nodes (see the n8n community nodes documentation)
- Network access from the SAP application server to the n8n webhook URL
- A shared secret (signing secret), agreed between the SAP and the n8n administrators
Security
With HMAC authentication, the SAP system never sends a password or API key. For each outbound message, it calculates a cryptographic signature from the shared secret and sends only that signature. The receiver recalculates it and accepts the request only if both match. Because the timestamp is part of the signed message, captured requests cannot be replayed later.
HMAC signing is sufficient on its own
HMAC signing is considered sufficient security for the n8n connection. If your security policy requires more, you can add the other authentication schemes of the REST connector on top, for example basic authentication or a client certificate on the RFC destination. The one exception is OAuth bearer-token authentication: it cannot be active on the same connection as HMAC signing (see FAQ).
Install and use the community node
Step 1: Install the node in n8n
Install the package @asapio/n8n-nodes-asapio as described in the n8n community nodes installation guide:
- In the n8n editor: go to Settings → Community Nodes → Install, enter
@asapio/n8n-nodes-asapioas the package name, and confirm. - Manual installation (for example for queue mode or custom Docker images): install the package into your n8n custom nodes directory.
npm install @asapio/n8n-nodes-asapioThe package adds the ASAPIO Event Trigger node and the ASAPIO API credential type.
Step 2: Create the ASAPIO API credential
Create a new credential of type ASAPIO API and enter the shared secret as Signing Secret. It must be exactly the same value that you store for the connection in SAP.
The Test button doesn't check the secret
The node is a passive webhook receiver: SAP calls n8n, not the other way around. Test in the credential dialog only checks that your n8n instance can reach asapio.com. The signing secret is checked on every incoming event.
Step 3: Add the ASAPIO Event Trigger node
Create a workflow, add the ASAPIO Event Trigger node, and select your ASAPIO API credential. Configure the parameters:
| Parameter | Description |
|---|---|
| Path | Last segment of the webhook URL, freely chosen (for example asapio-events). n8n then shows the full Test and Production URLs. |
| Timestamp Tolerance (Seconds) | Maximum age of the X-ASAPIO-Timestamp header before an event counts as stale (replay protection). Default: 300. |
| Reject Invalid Signatures | When on, requests with a missing, invalid, or stale signature get HTTP 401 and never start the workflow. When off (default), the workflow always starts and the result is attached to the output (see below). |
| Response Code | HTTP status code returned to SAP on successful receipt. Default: 200. SAP uses it to mark the event as delivered. |
| Response Body | Body returned on successful receipt. Default: { "received": true }. Leave empty to send no body. |
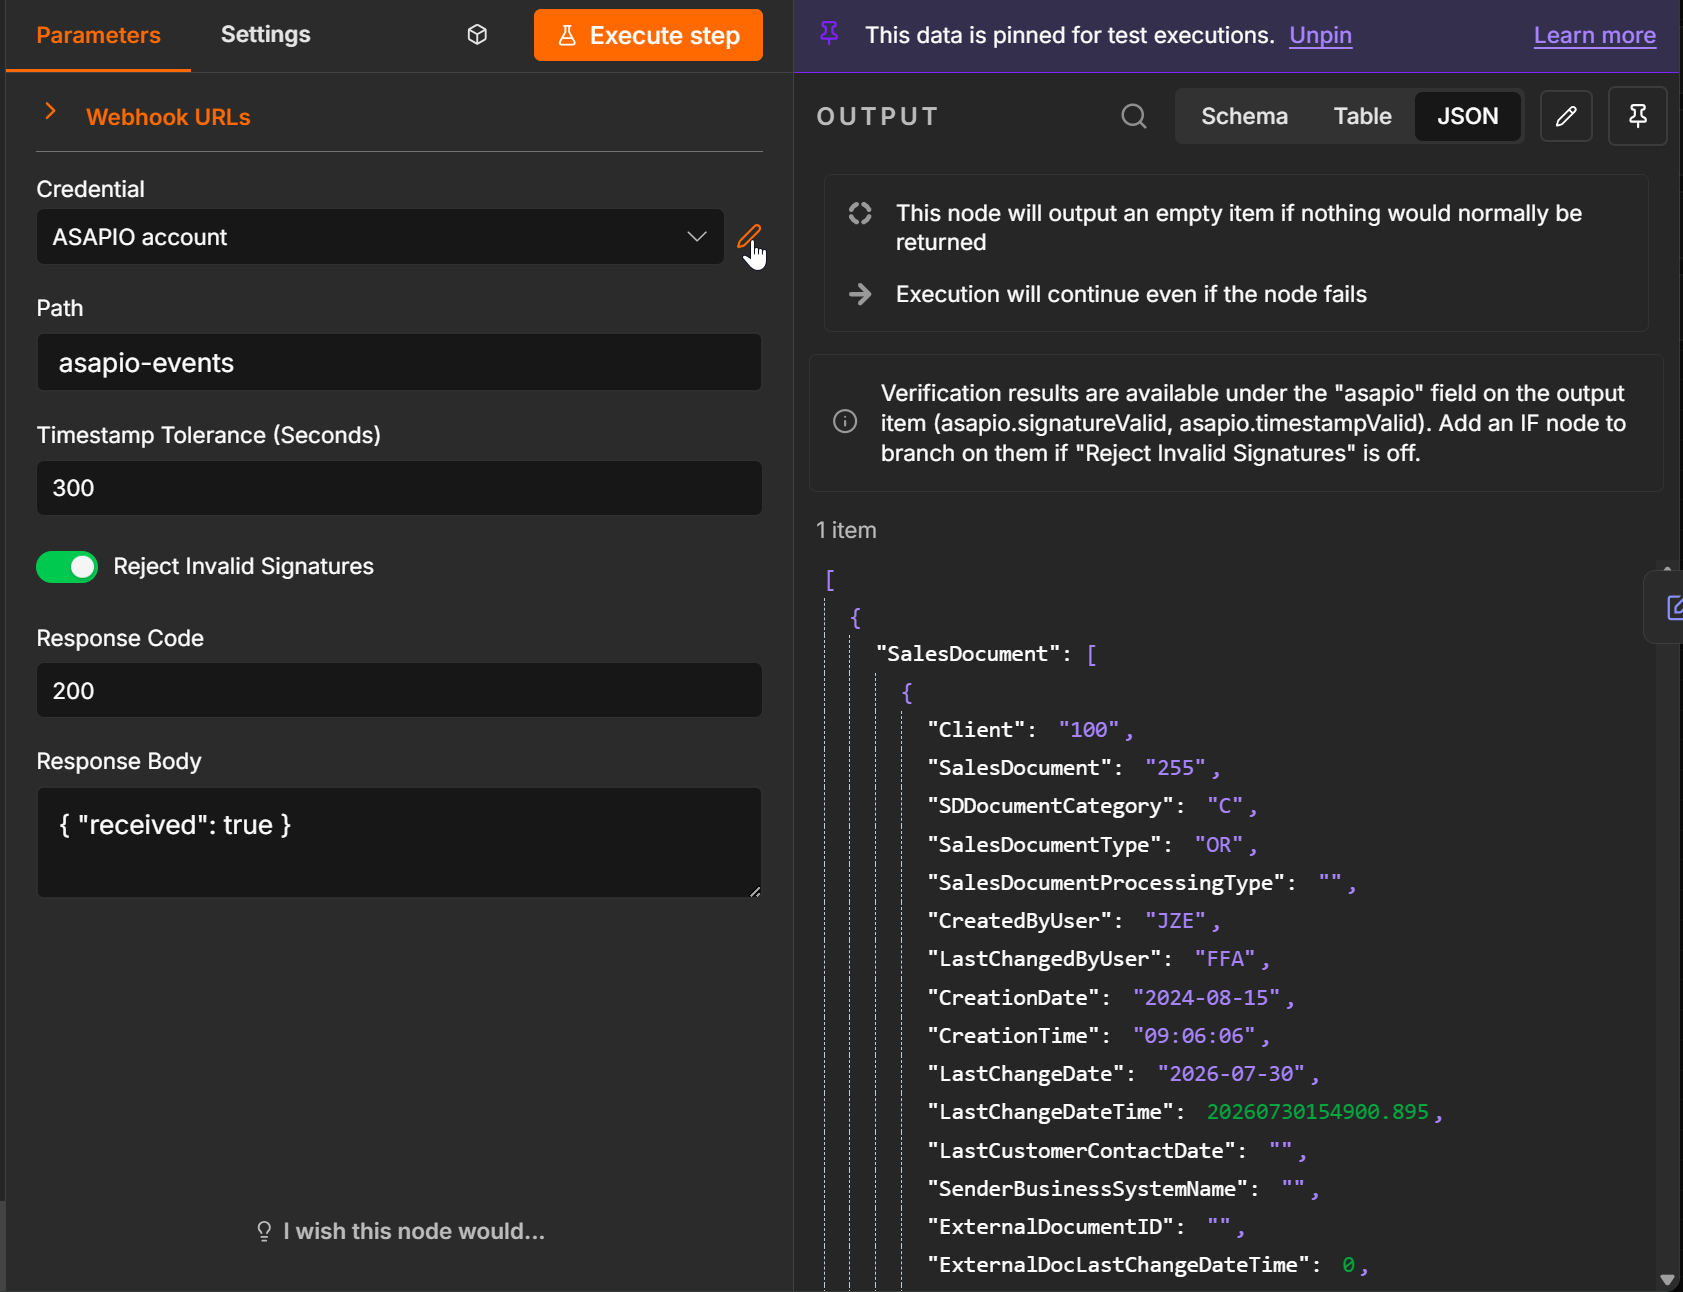
Activate the workflow. The Production URL only receives events while the workflow is active.
Step 4: Copy the full production URL
The Path parameter (for example asapio-events) is only the last segment of the webhook address. n8n combines it with your instance's base URL into the full Production URL, and that full URL — not just the Path value — is what goes into the SAP connection.
Right-click the ASAPIO Event Trigger node and choose Copy production url from the context menu. n8n copies the complete URL, including the asapio-events path segment, to your clipboard.
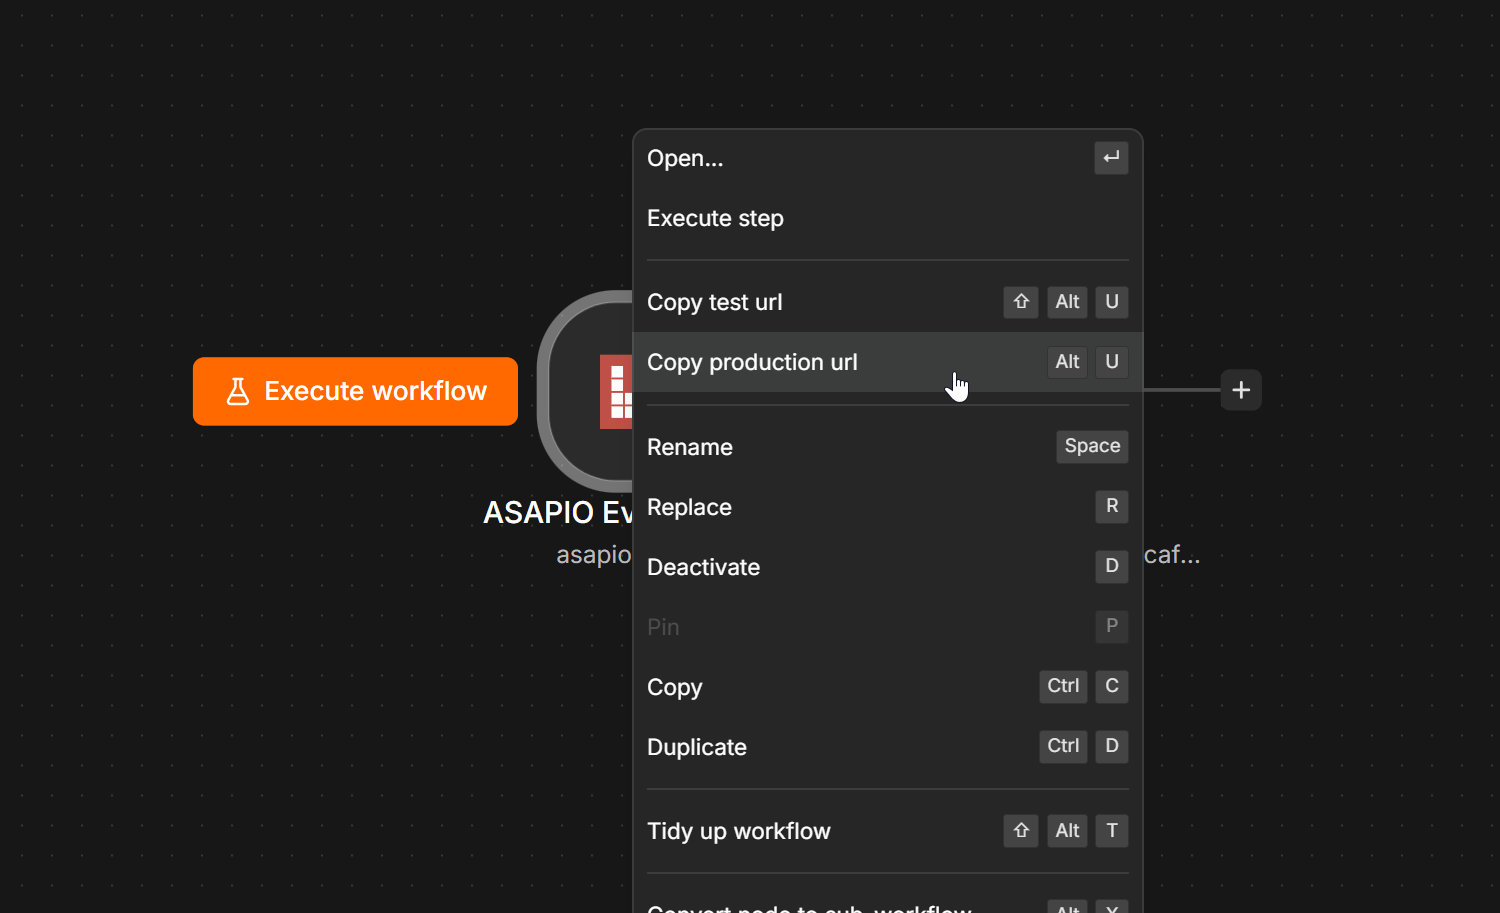
Test URL vs. Production URL
n8n also offers Copy test url, which only works while you actively listen for a test event in the editor and is not signature-verified in the same way. Always use Copy production url for the SAP connection.
Paste this full URL as the target URL of the RFC destination (transaction SM59, type G, HTTP Connection to External Server) that the REST connection uses — not just the host, and not just the Path segment on its own. In Event Studio, paste it directly into the connection's endpoint field (see Configure the connection below); the RFC destination is maintained behind the scenes either way.
Step 5: Use the verified payload
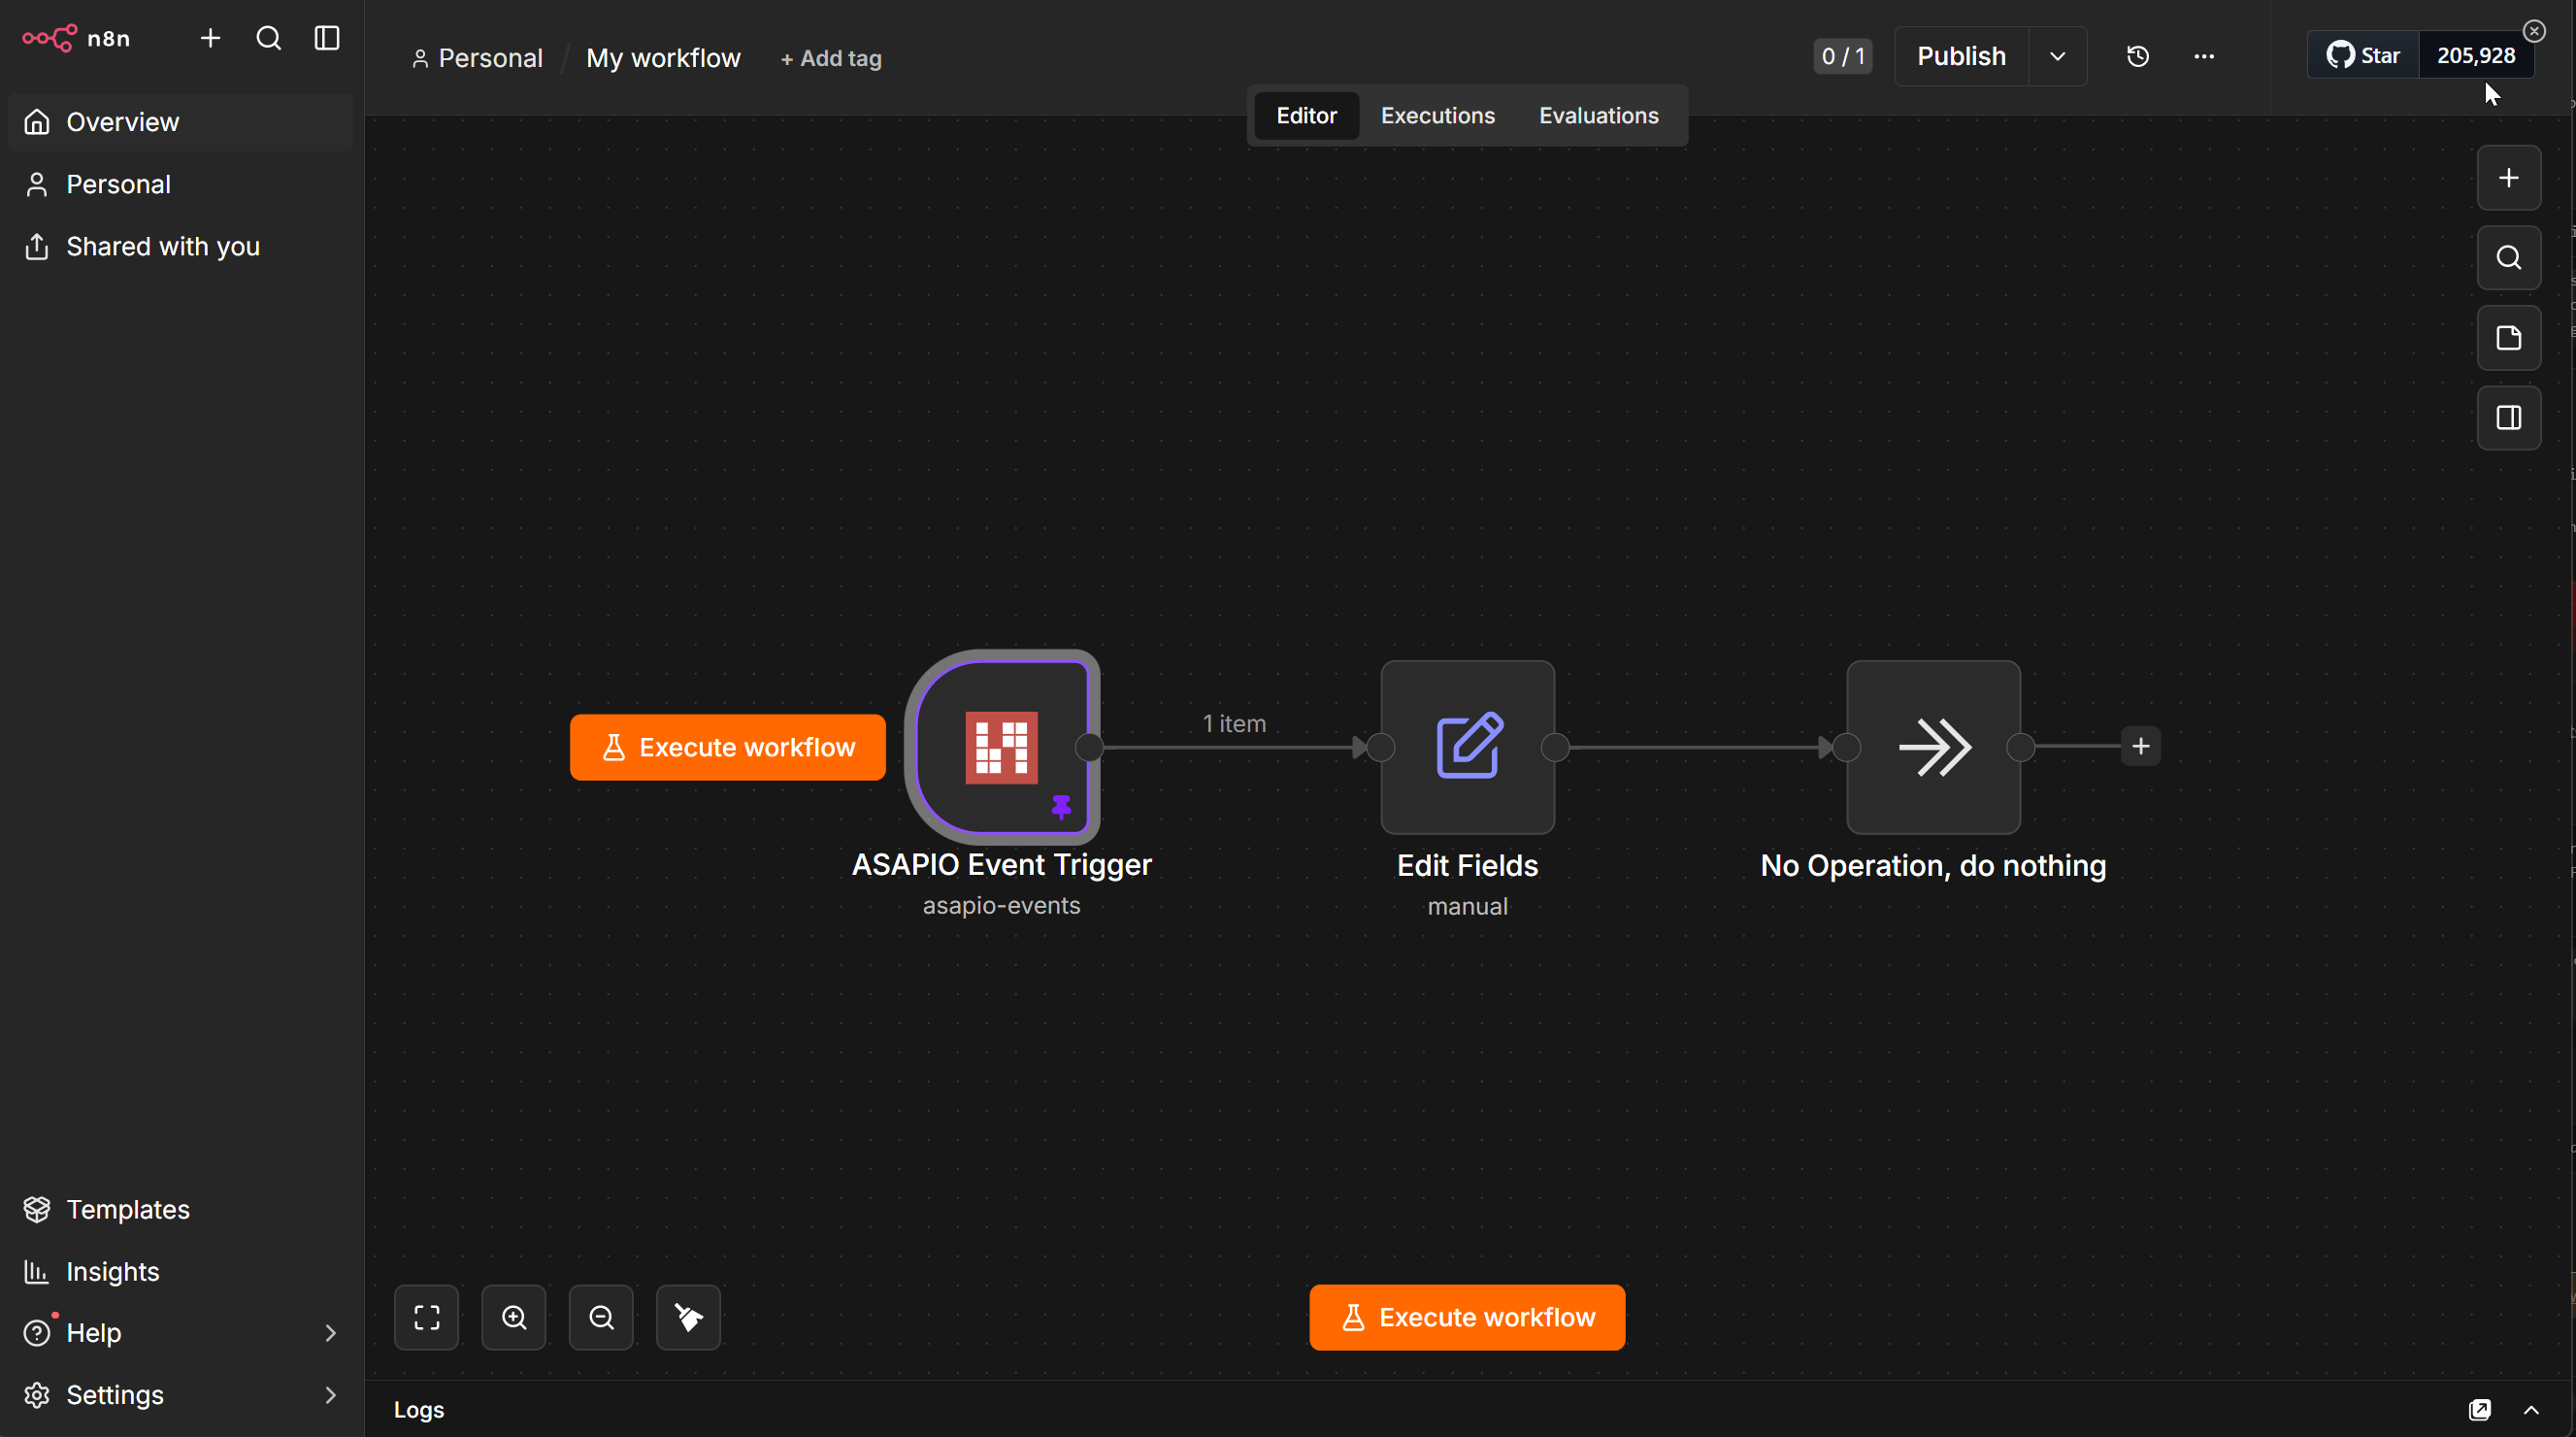
The node outputs the event payload together with an asapio object containing the verification result: asapio.signatureValid, asapio.timestampValid, and asapio.timestampAgeSeconds.
We recommend turning Reject Invalid Signatures on for production workflows. If you leave it off, for example while testing, add an IF node right after the trigger that only continues when {{ $json.asapio.signatureValid }} is true.
Configure the connection (Event Studio)
In Event Studio, the n8n connection is a standard REST connection:
- Create a new REST connection.
- Enter the n8n Production URL from the ASAPIO Event Trigger node as the endpoint.
- Activate HMAC signing and enter the shared secret. Use the same value as the Signing Secret in n8n.
- Save the connection and use it as the target when you deploy an interface from the Data Catalog.
Configure the connection (SAP GUI)
Alternatively, configure an existing REST connection instance directly in SAP GUI.
Step 1: Store the shared secret
- Go to SPRO → ASAPIO Cloud Integrator → Set the cloud connection password.
- Select your connection instance and enter the shared secret as the password. This is the same screen used for Azure SAS keys and OAuth client secrets.
- The secret can be at most 109 characters long. You can store one secret per connection instance.
Step 2: Activate HMAC signing
Set the header attribute HMAC_ACTIVE to X for the connection:
| Scope | Transaction | Entry |
|---|---|---|
| All objects on this connection (recommended default) | /ASADEV/ACI_DEFA (Maintain def. attr. per cloud inst.) | Your instance, attribute HMAC_ACTIVE, value X |
| One specific object only (override) | /ASADEV/ACI_HATT (ACI: Header attributes per object) | Your instance and object, attribute HMAC_ACTIVE, value X |
A per-object entry always takes precedence over the connection-level default.
Value must be exactly X
Values such as true, yes, or blank do not activate signing.
No other customizing is required, and you don't need to register a special Cloud Type. HMAC signing works on a standard REST connection.
Verify
Trigger a test message on the connection and check the trace using the usual monitoring and trace tools:
- The outbound request trace shows a line starting with
*** ASAPIO HMAC .... It contains the byte count and hash of the signed body, plus the timestamp and signature that were sent. - The response returns the Response Code configured in the n8n node (default 200) instead of an authentication error.
- In n8n, the workflow execution shows
asapio.signatureValid: trueandasapio.timestampValid: true.
Signature contract
The ASAPIO Event Trigger node verifies these headers automatically. If you build your own receiver instead, it must verify the same contract:
| Header | Content |
|---|---|
X-ASAPIO-Timestamp | Unix epoch seconds (UTC), decimal string |
X-ASAPIO-Signature | sha256=<lowercase hex digest> |
The signed message is the timestamp, a dot, and the raw request body:
<X-ASAPIO-Timestamp>.<raw request body bytes>Compute the HMAC over the raw body bytes before JSON parsing, because re-serialized JSON breaks the signature. Compare signatures with a constant-time comparison.
Troubleshooting
| Symptom | Likely cause |
|---|---|
HTTP error / response code 902 in the trace | No shared secret stored for this connection instance. Repeat storing the shared secret. |
HTTP error / response code 901 in the trace | Internal signature calculation error. Contact ASAPIO support and include the trace. |
HTTP 401 from n8n, or asapio.signatureValid: false | The shared secret differs between SAP and the ASAPIO API credential in n8n. Re-confirm the secret on both sides. |
asapio.timestampValid: false | The clocks of SAP and n8n are out of sync by more than the Timestamp Tolerance. Synchronize both systems via NTP. |
| HTTP 404 from n8n | The workflow is not active, or the endpoint uses the Test URL instead of the Production URL. |
Request still shows Authorization: Bearer ... | HMAC_ACTIVE is not set to X for this connection or object. Recheck activating HMAC signing: per-object entries in /ASADEV/ACI_HATT override the connection default. |
FAQ
Can I use HMAC and OAuth bearer-token authentication on the same connection?
No. When HMAC_ACTIVE = X, OAuth token retrieval is skipped entirely for that connection. The shared secret is only used for signing and is never sent as a bearer token. Other authentication schemes of the REST connector can be combined with HMAC signing (see Security).
Do I need a different Cloud Type?
No. HMAC signing works on the standard REST connection type.
Is the community node free?
Yes. @asapio/n8n-nodes-asapio is published under the MIT license. The source code is available on GitHub.