Docs / Connectors / Solace Platform
Solace Platform Connector
The ASAPIO Integration Add-on facilitates the integration of supported SAP NetWeaver® systems with Solace® PubSub+®. For connectivity to SAP Advanced Event Mesh, see the SAP Advanced Event Mesh connector.
Overview
Required components of ASAPIO Integration Add-ons:
| Add-on/Component Name | Type |
|---|---|
| ASAPIO Integration Add-on – Framework | Base component (required) |
| ASAPIO Integration Add-on – Connector for Solace® | Additional package |
Key features:
- Supports a wide range of SAP NetWeaver® based systems, including SAP ERP, S/4HANA, BW, HCM and many more
- Out-of-the-box connectivity to Solace® PubSub+® brokers
- REST-based outbound and inbound communication
- Supported communication direction: Outbound/Inbound, Push
- Support for HA broker setups
- Support for dynamic topics
- Support for user properties and message headers (from release 2610)
- Switch between event-driven (single events) or batch mode (job-driven) calls
- Lightweight and fast
- Certified by SAP
- Batch mode allows multi-threading with multiple SAP work processes
Block Architecture:
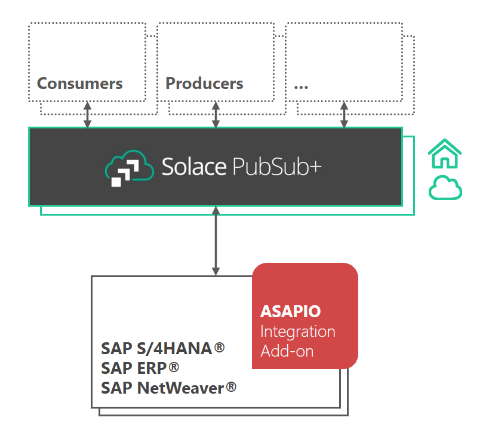
Prerequisites
Pre-Requisites for Solace® PubSub+® Services
A Solace® PubSub+® broker (on-premise or in the cloud) is required.
REST-Based Connectivity
Create RFC Destinations
Note: in case you have a HA setup with 2 Solace brokers, create one destination for each.
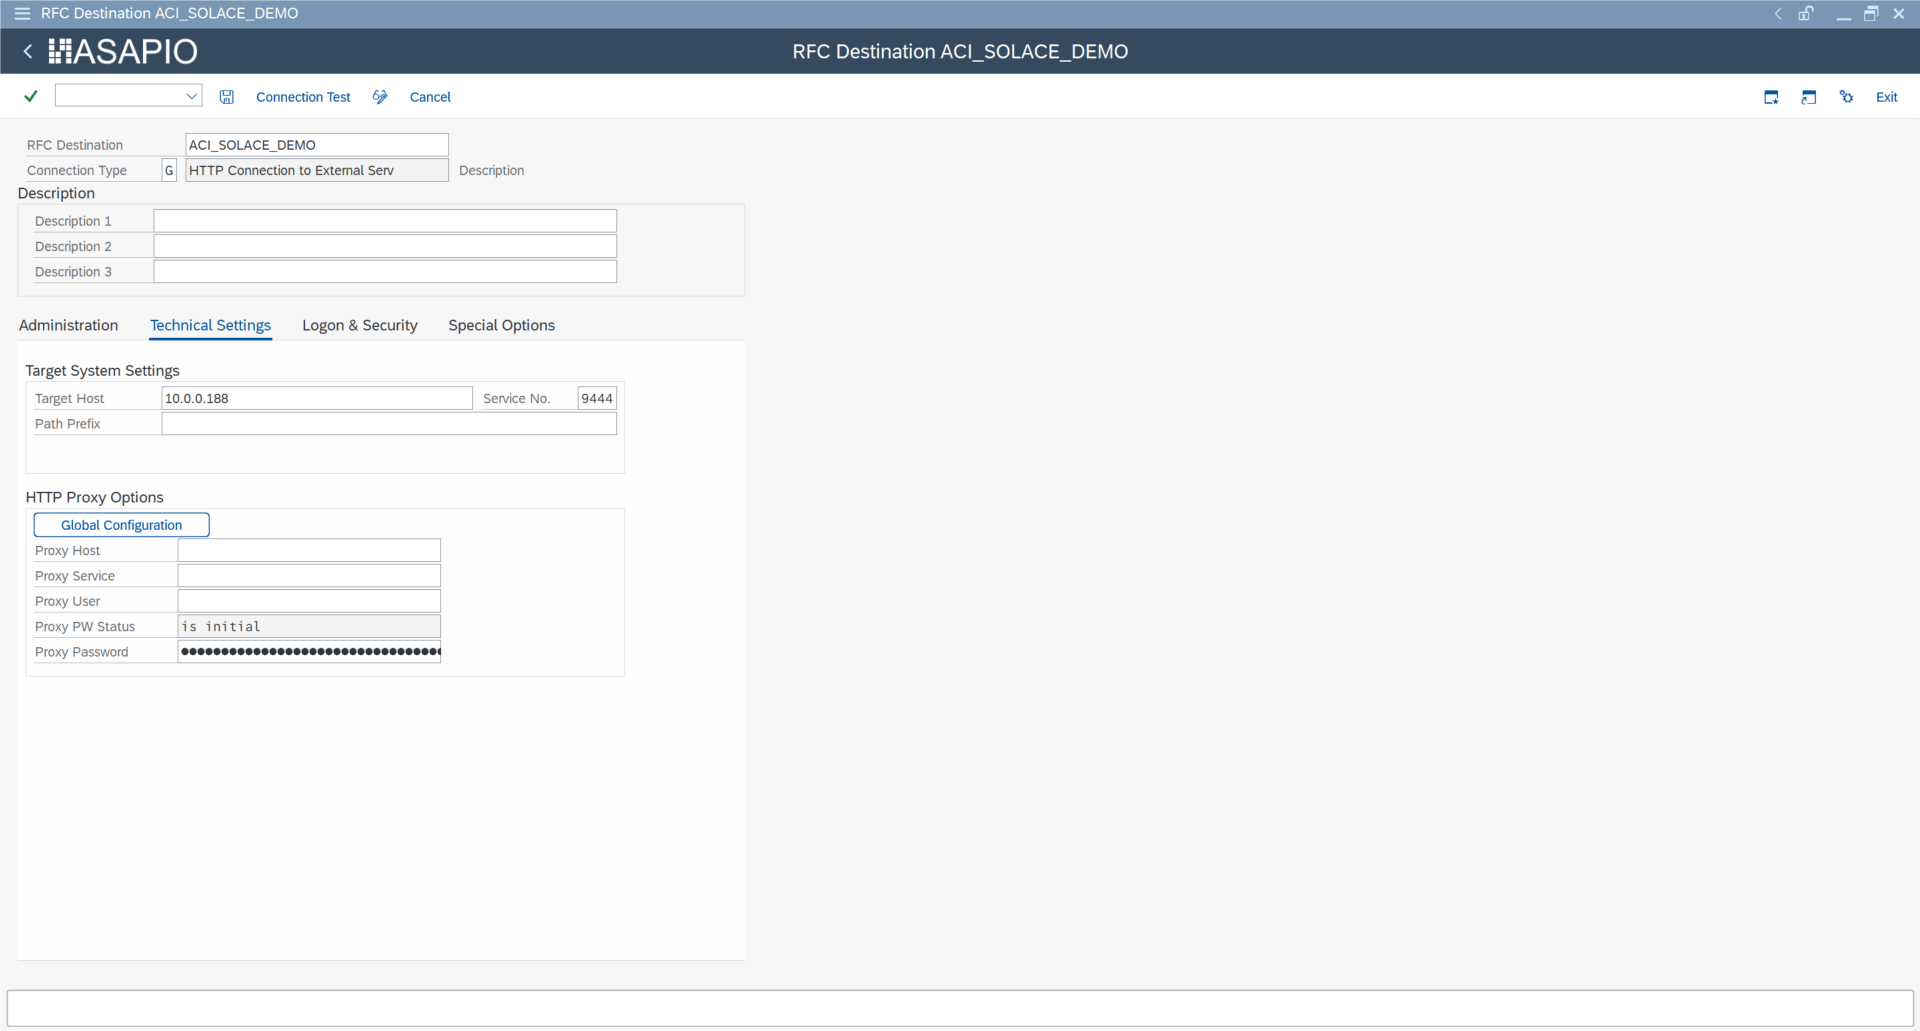
Create a new RFC destination of type “G” (HTTP Connection to External Server).
- Transaction: SM59
- Create new destination of type “G”
- Specify Target Host and Service No. (Port): endpoint for the Solace Messaging VPN
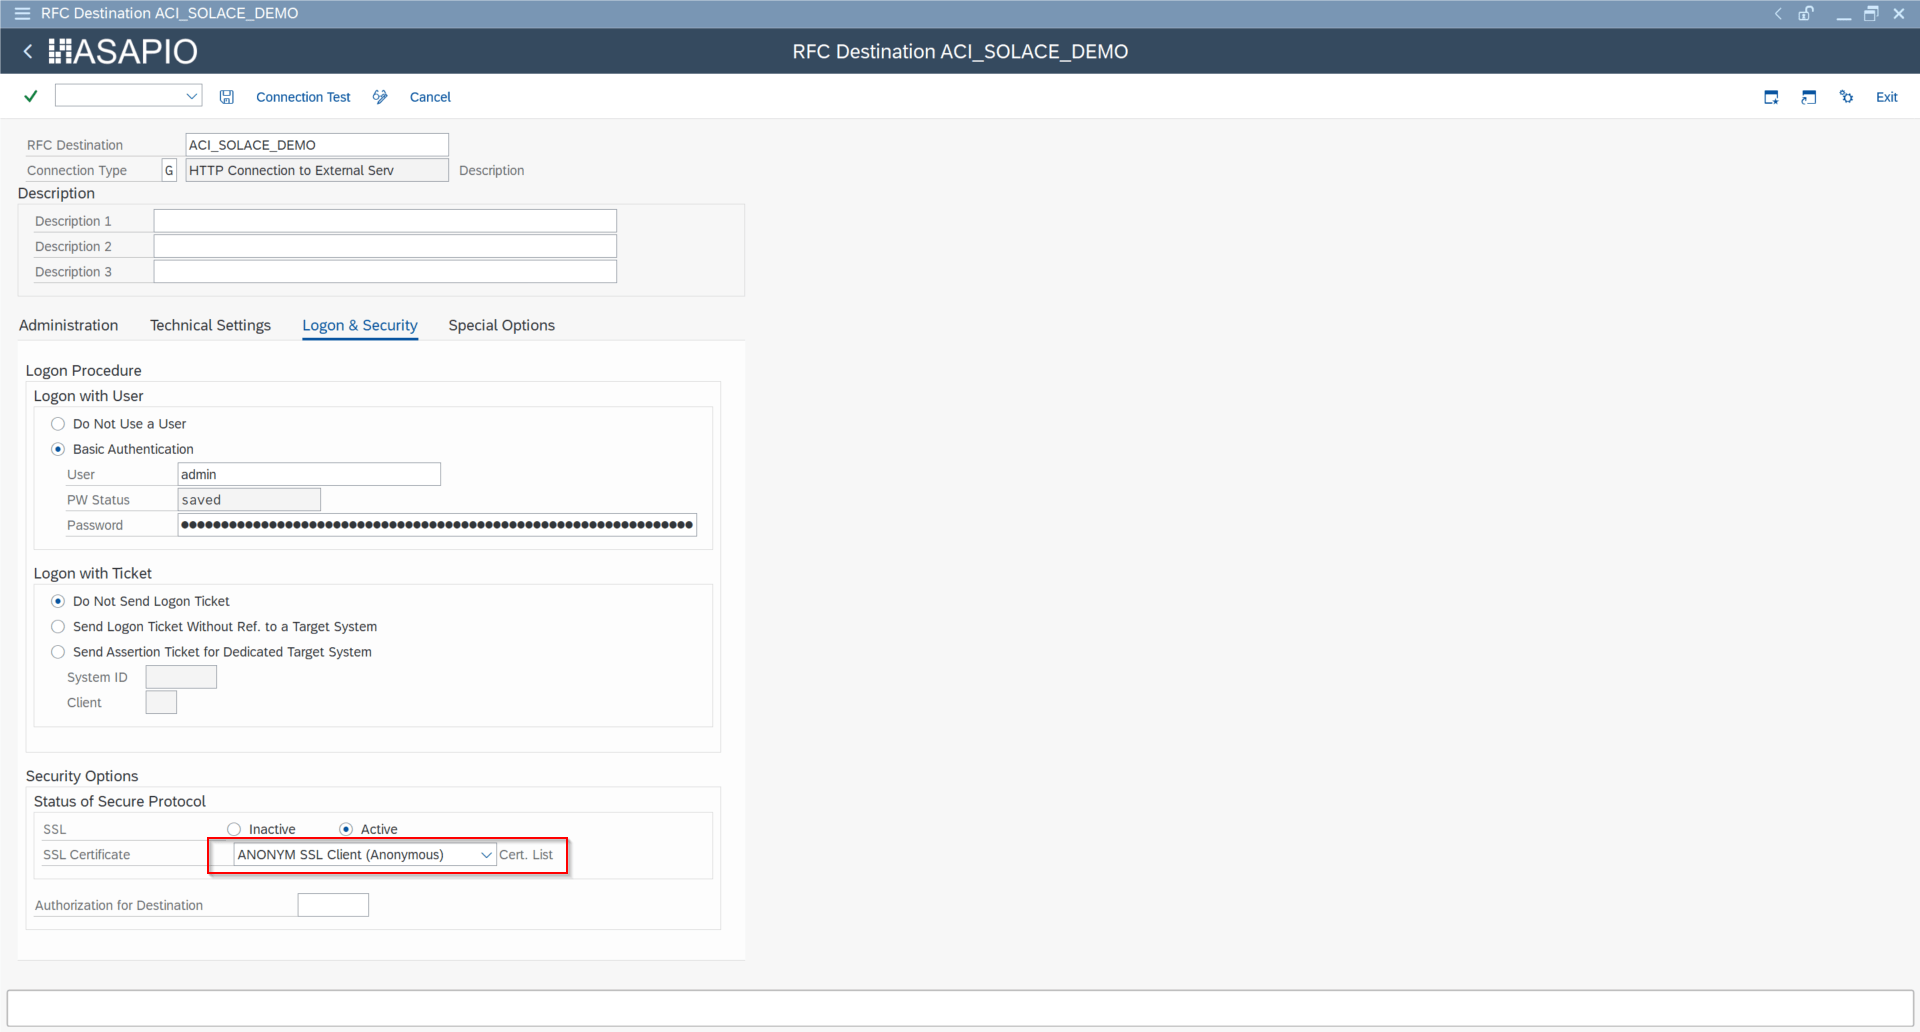
- Credentials or certificates for authentication can be specified on tab Logon & Security
Add the certificates for the created destinations to the certificate list selected in tab Logon & Security:
Create RFC Destination for OAuth Authentication (Optional)
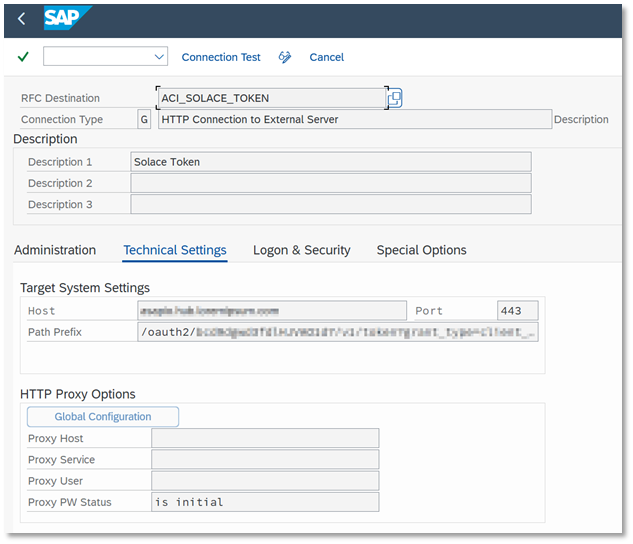
To use OAuth authentication with Solace, please configure an RFC destination specifying the OAuth endpoint:
- Transaction: SM59
- Create new destination of type “G”
- Specify Target Host: endpoint for the Solace token destination
- Specify Path Prefix:
/oauth2/<endpoint>
Add Certificates to Trust Store
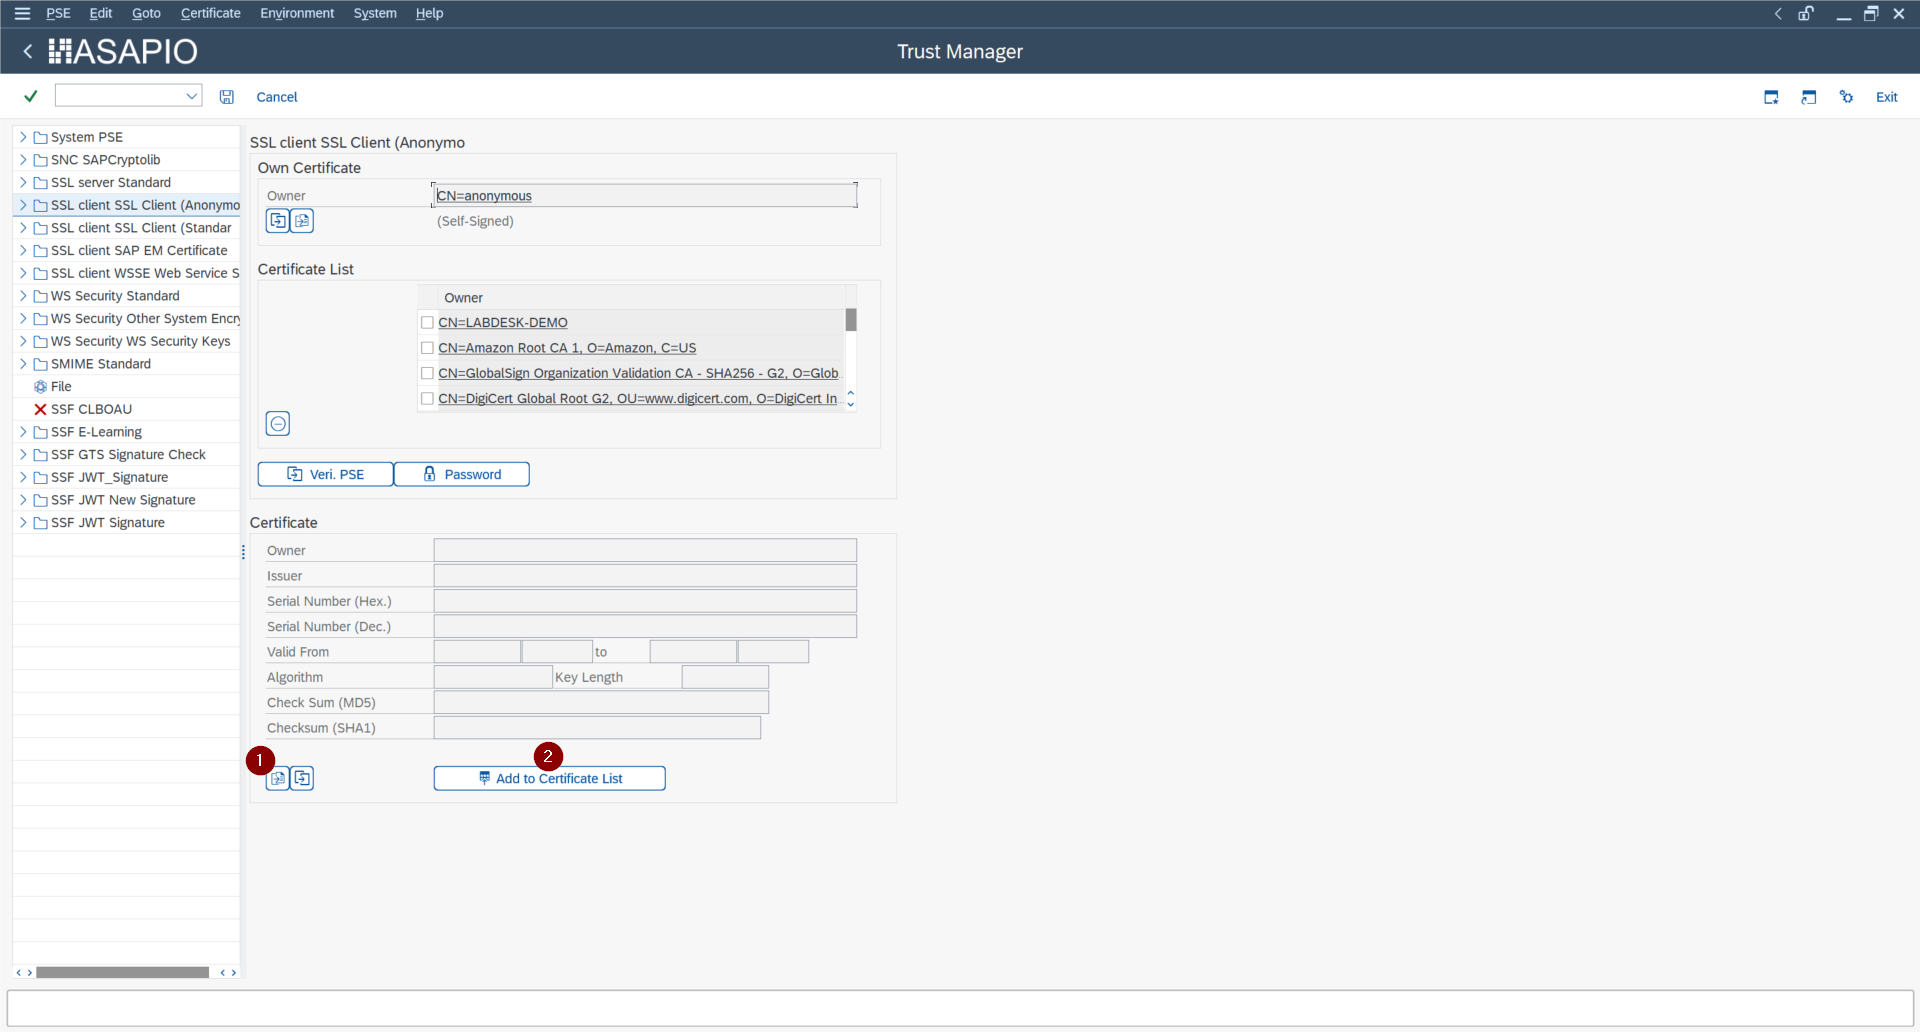
- Transaction: STRUST
- Select Certificate List as used in the RFC destination created above
- Click button Import certificate (1)
- Click button Add to Certificate List (2)
Save Secret in SAP Secure Store (Optional: Only Necessary for OAuth)
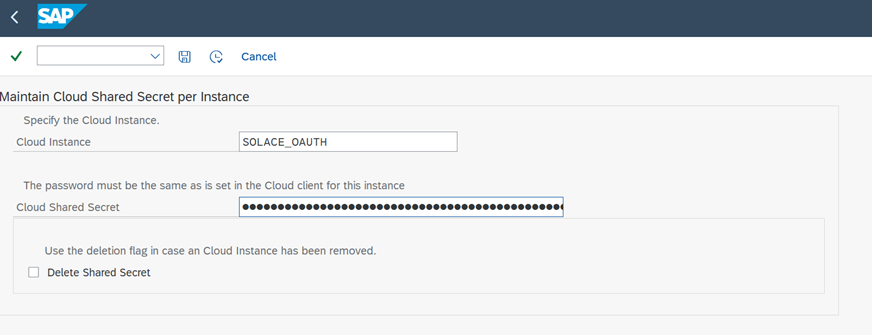
For OAuth authentication, a secret has to be stored in the system’s SAP Secure Store. This secret is the Client Secret for OAuth.
Enter the secret in the SAP Secure Store:
- Transaction: SPRO
- Go to ASAPIO Cloud Integrator – Set the Cloud Connection Password
- Or go directly to transaction:
/ASADEV/SCI_TPW - Select the created Cloud Instance
- Enter the client secret in the Cloud Shared Secret field and execute
Set-Up Basic Settings
Activate BC-Set
Business Configuration sets (BC-Set) contain customizing and configuration-related table entries that are not imported with the add-on.
- Transaction: SCPR20
- BC-Set includes:
- Configuration for cloud adapter
- Configuration for cloud codepages
- Definition of IDoc segments
- Activate the BC-Set with default values:
/ASADEV/ACI_BCSET_FRAMEWORK_SOLC
Configure Cloud Adapter (Optional: Only if BC-Set Is Not Activated)
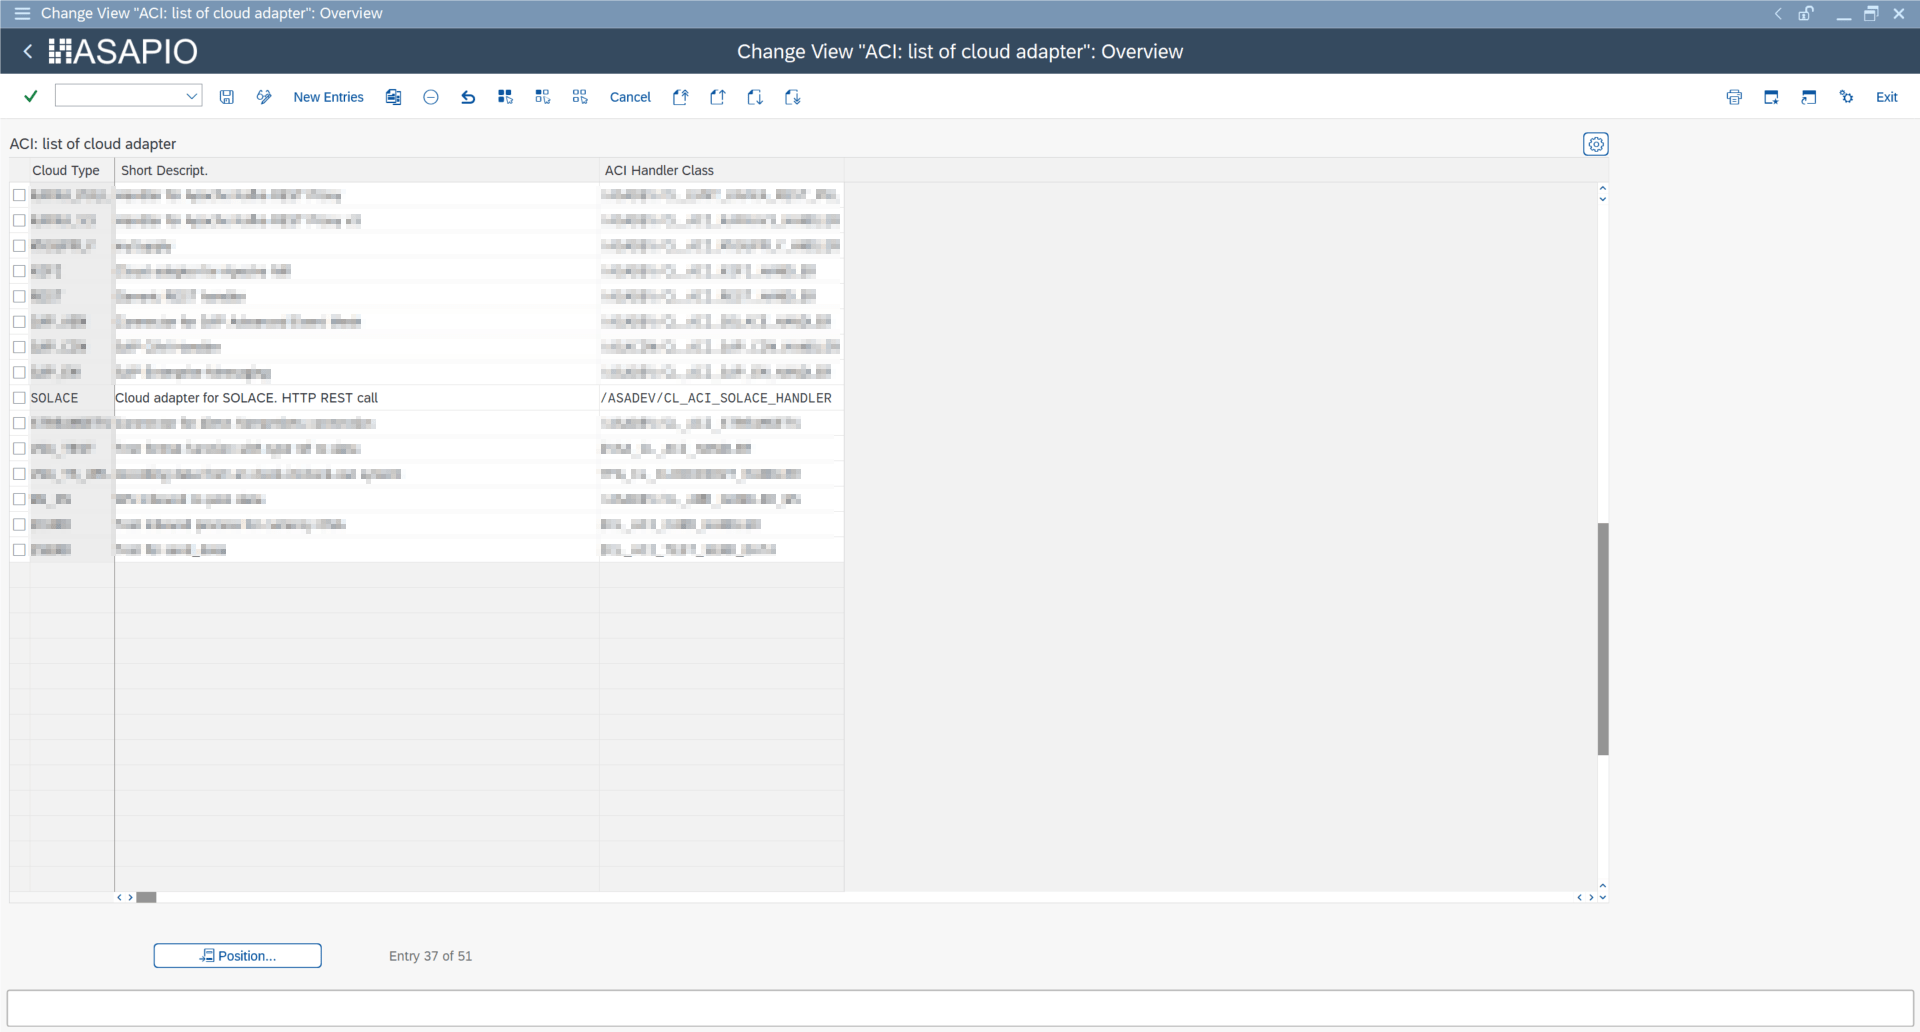
Add an entry for the connector to the list of cloud adapters:
- Transaction: SPRO
- Go to ASAPIO Cloud Integrator – Maintain Cloud Adapter
- Add New Entry and specify:
- Cloud Type: name with which to reference this type of connector
- ACI Handler Class:
/ASADEV/CL_ACI_SOLACE_HANDLER
Set-Up Codepages (Optional: Only if BC-Set Is Not Activated)
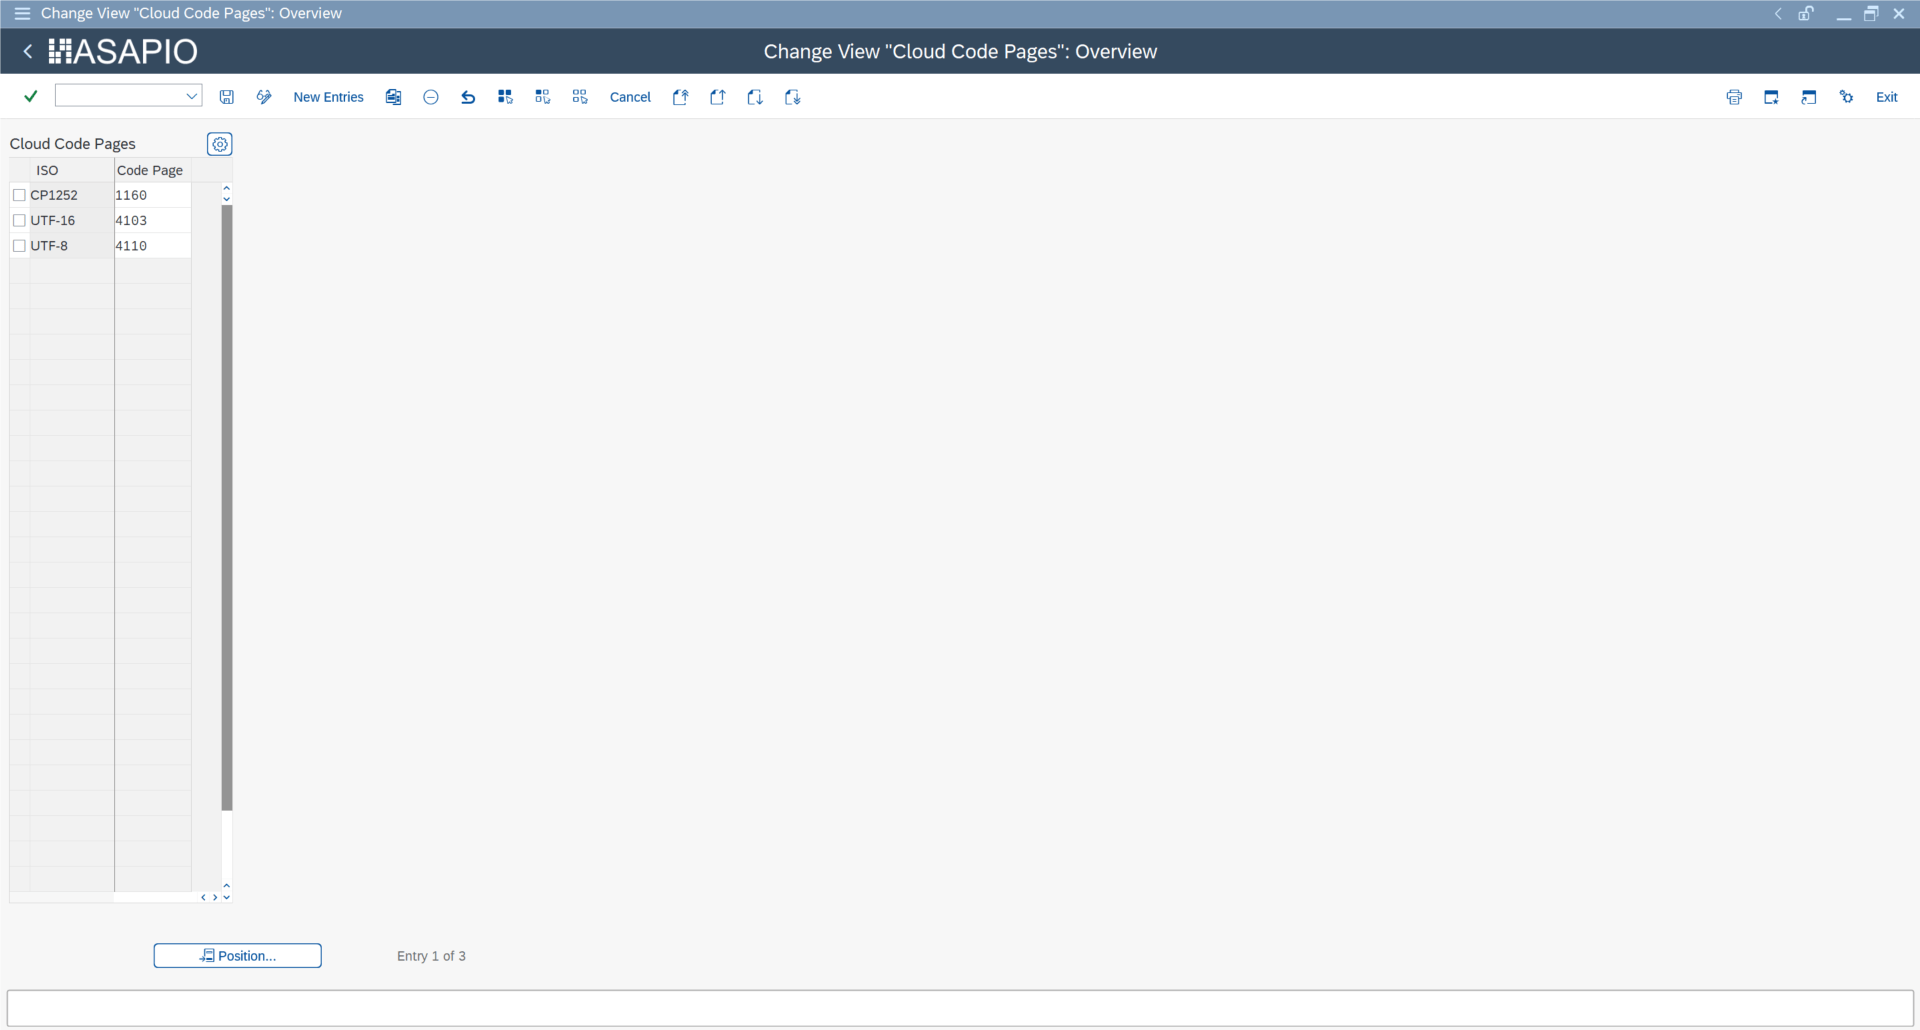
Specify codepages used in the integration:
- Transaction: SPRO
- Go to ASAPIO Cloud Integrator – Maintain Cloud Codepages
- Add New Entry and specify the code pages to be used
Set-Up Connection Instance
Create the connection instance customizing that ties together the RFC destination created earlier and the cloud connector type:
- Transaction: SPRO
- Go to ASAPIO Cloud Integrator – Connection and Replication Object Customizing
- Or go directly to transaction:
/ASADEV/ACI_SETTINGS - Add New Entry and specify:
- Instance: a name for this connection
- RFC Dest. (Upload): the RFC destination created for the messaging endpoint
- ISO Code: the code page to use
- Cloud Type:
SOLACE(or the name you chose when adding the connector)
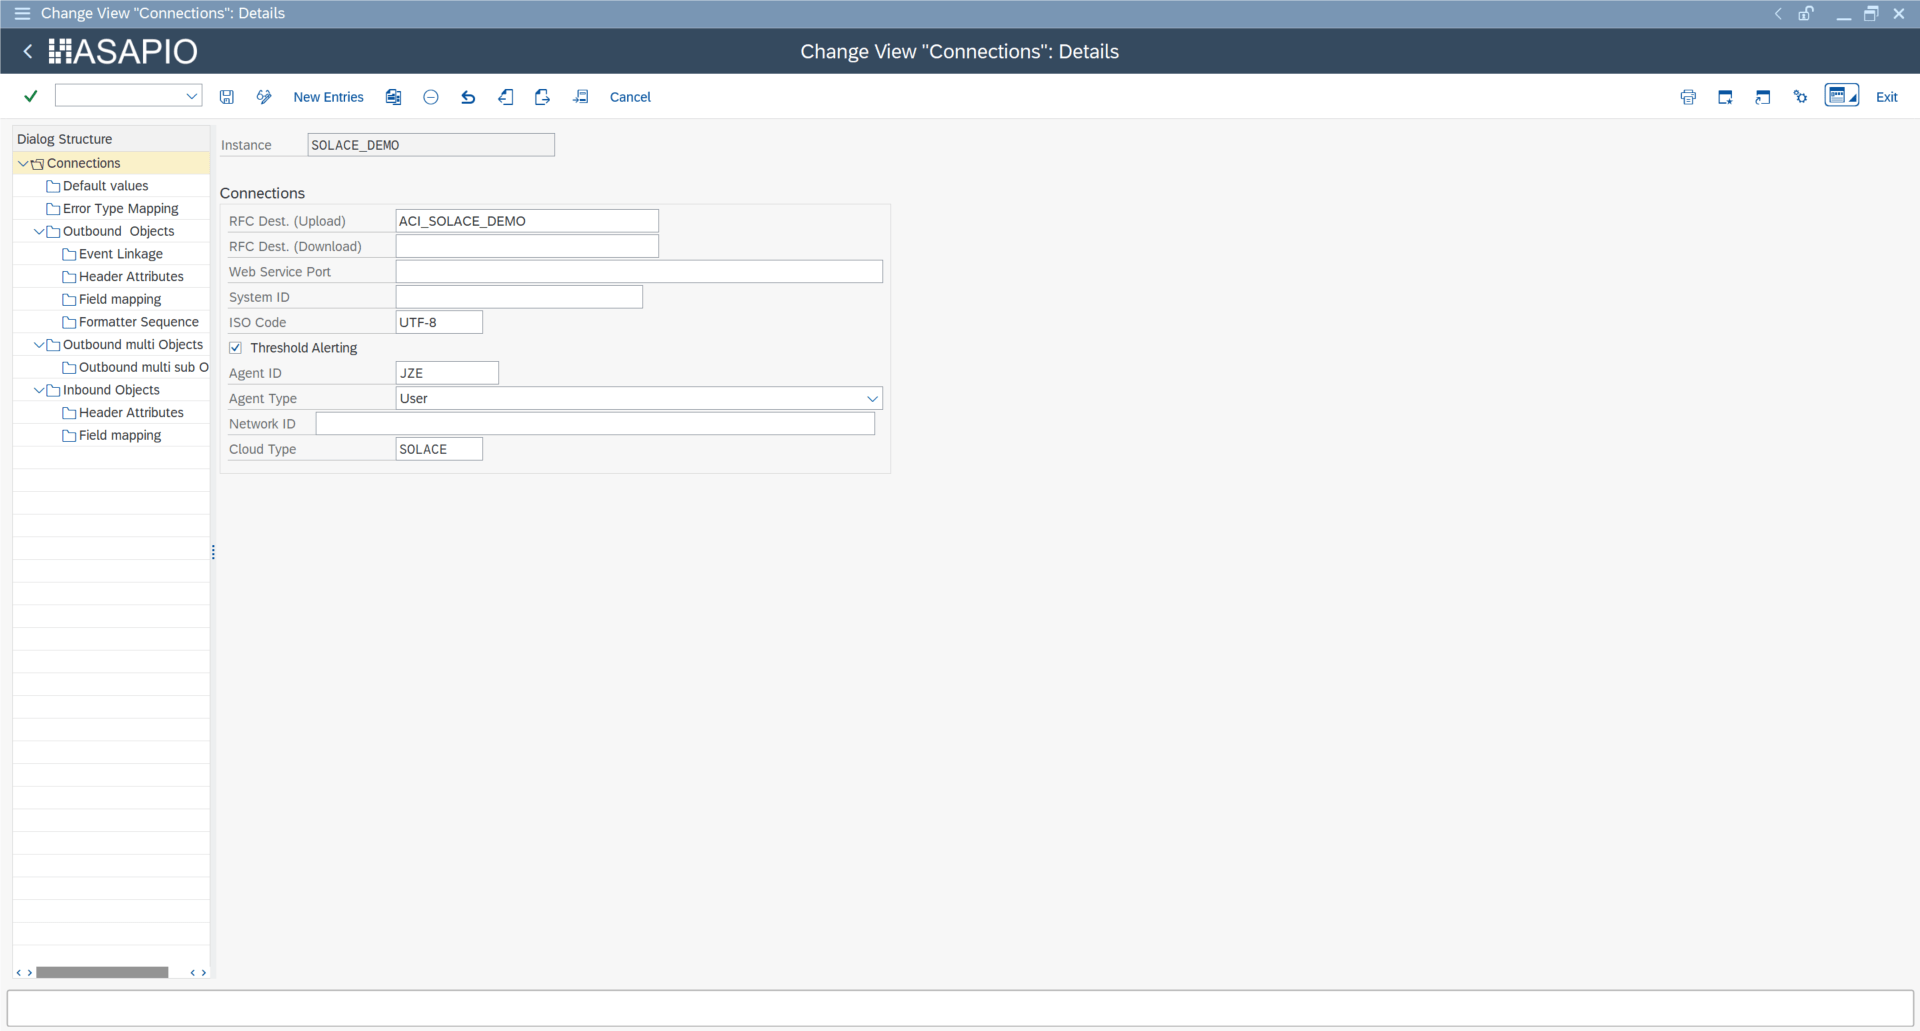
Note: in case you have a HA setup with 2 Solace brokers, enter the second RFC destination in field RFC Dest. (Download).
Default Values (Optional: Only Necessary for OAuth)
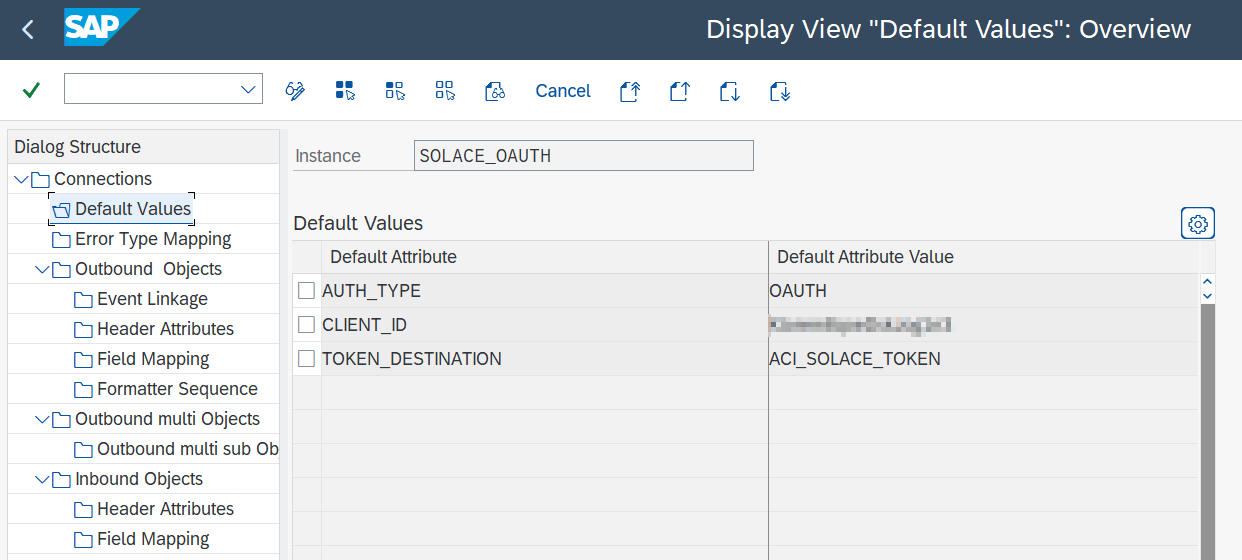
- Go to section Default Values
- Add New Entry and specify:
AUTH_TYPE:OAUTHCLIENT_ID: enter client IDTOKEN_DESTINATION: RFC destination created in SM59 for the token endpoint
AMQP-Based Connectivity
With release 2510 Solace is the first connector that supports AMQP connectivity. With the new connectivity the Solace connector sends event data to an ABAP daemon, which has a constant connection and session to the broker.
Note: currently only Basic Auth is supported.
Create RFC Destinations
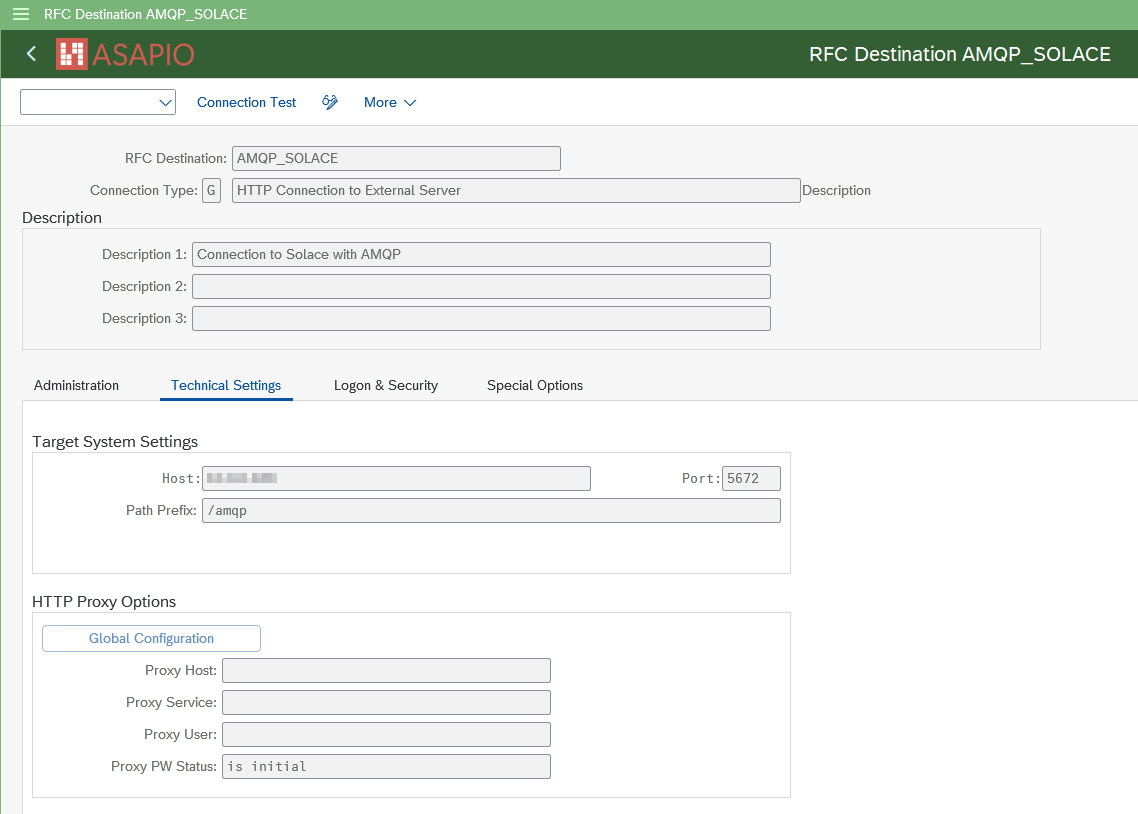
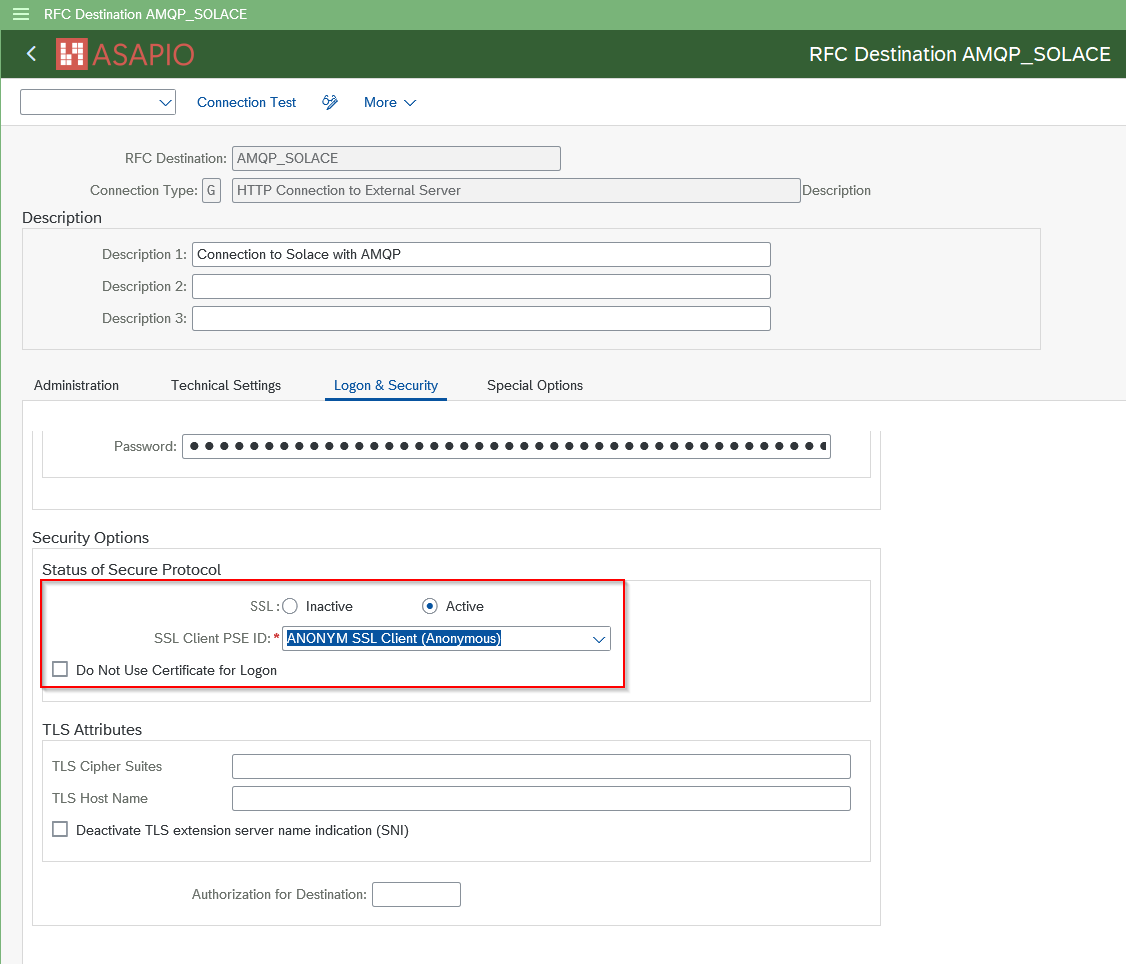
Create a new RFC destination of type “G” (HTTP Connection to External Server).
- Transaction: SM59
- Create new destination of type “G”
- Specify Target Host and Service No. (Port): endpoint for the Solace Messaging VPN
Add the certificates for the created destinations to the certificate list selected in tab Logon & Security:
Configure AMQP Cloud Adapter
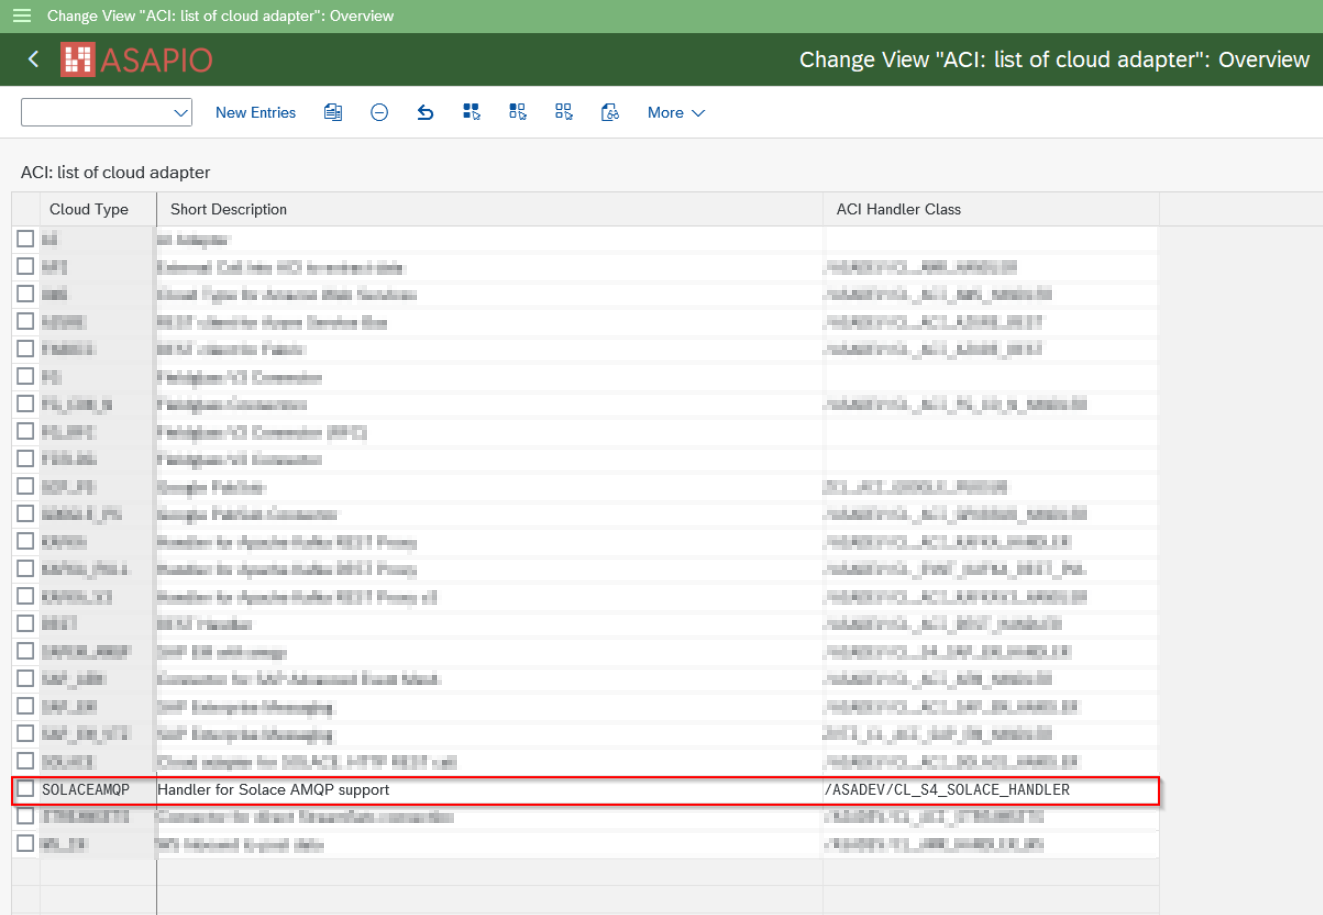
Add an entry for the connector to the list of cloud adapters:
- Transaction: SPRO
- Go to ASAPIO Cloud Integrator – Maintain Cloud Adapter
- Add New Entry and specify:
- Cloud Type: name with which to reference this type of connector
- ACI Handler Class:
/ASADEV/CL_S4_SOLACE_HANDLER
Set-Up Connection Instance
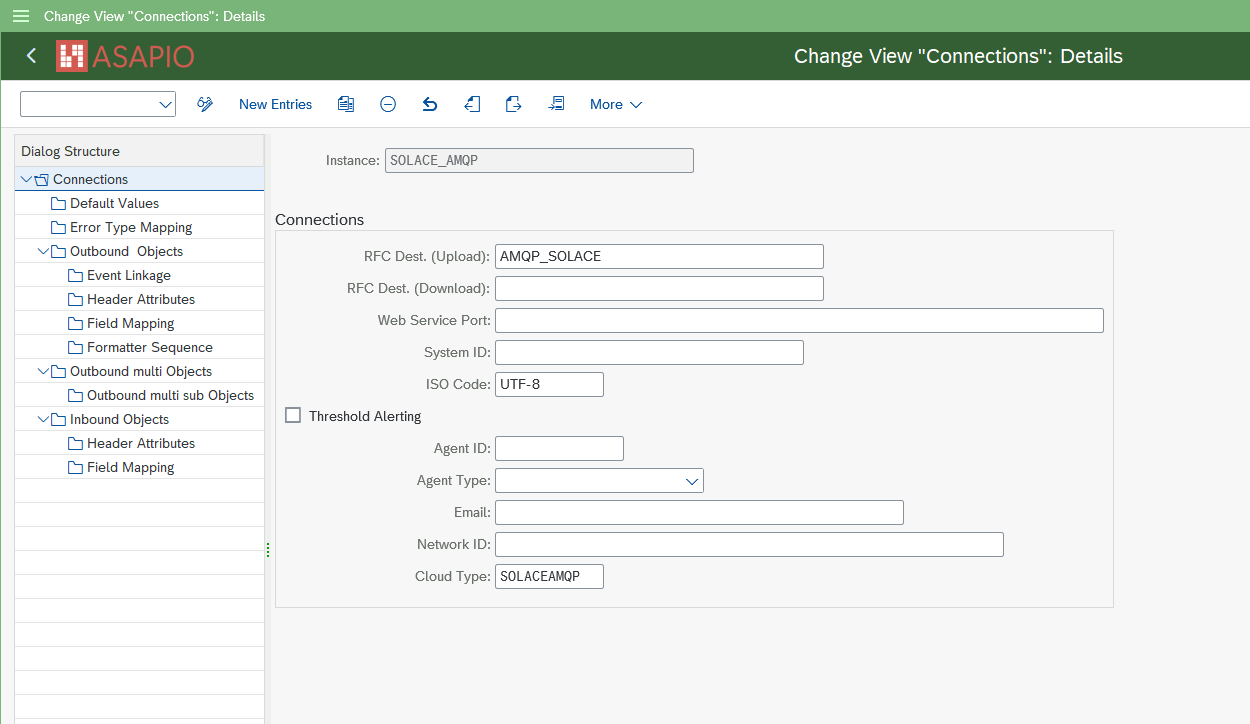
Create the connection instance customizing that ties together the RFC destination created earlier and the cloud connector type:
- Transaction: SPRO
- Go to ASAPIO Cloud Integrator – Connection and Replication Object Customizing
- Or go directly to transaction:
/ASADEV/ACI_SETTINGS - Add New Entry and specify:
- Instance: a name for this connection
- RFC Dest. (Upload): the RFC destination created for the messaging endpoint
- ISO Code: the code page to use
- Cloud Type:
SOLACEAMQP(or the name you chose when adding the connector)
Set-Up Basic Authentication
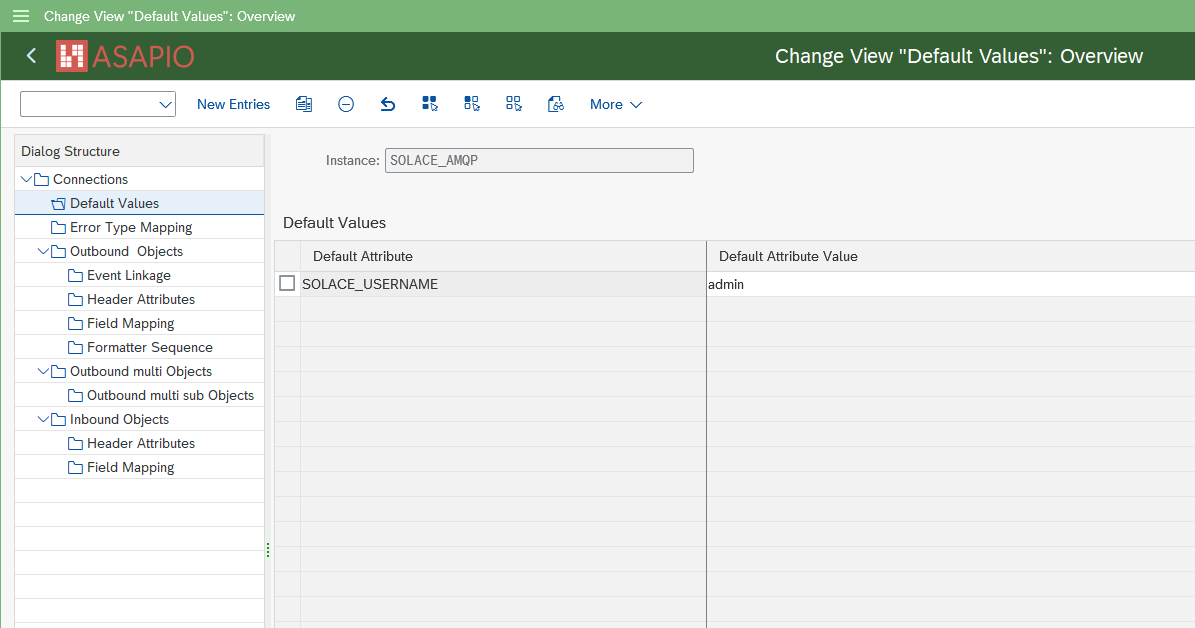
Default Values
- Go to section Default Values
- Add New Entry and specify:
AMQP_USERNAME:<username>
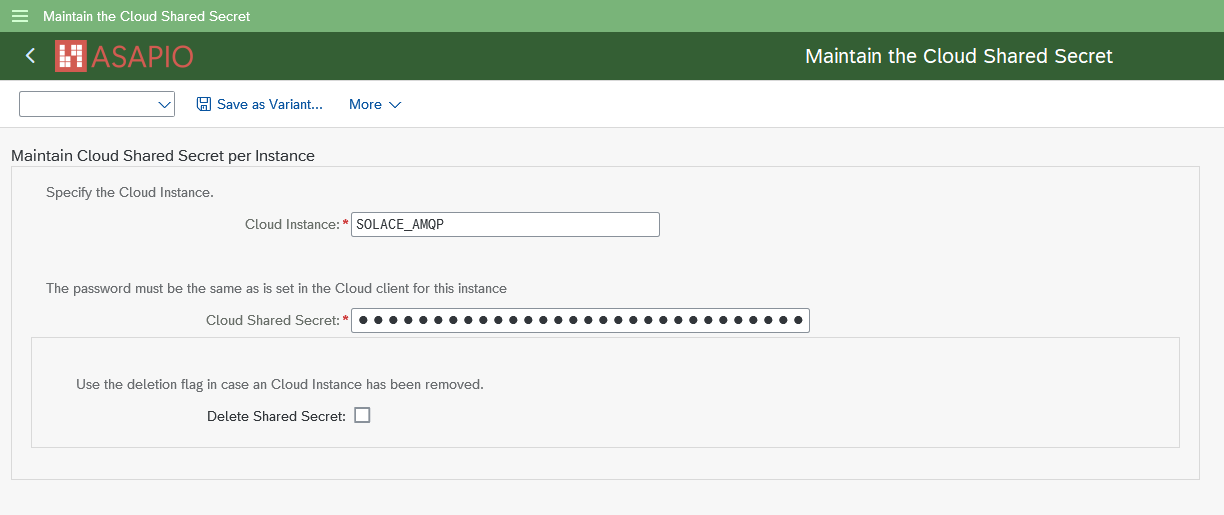
Save Password in SAP Secure Store
Enter the secret in the SAP Secure Store:
- Transaction: SPRO
- Go to ASAPIO Cloud Integrator – Set the Cloud Connection Password
- Or go directly to transaction:
/ASADEV/SCI_TPW - Select the created Cloud Instance
- Enter the password in the Cloud Shared Secret field and execute
Outbound Interface Configuration
Configuration of outbound objects is the same as for HTTP connectivity. See also Outbound Messaging.
Inbound Interface Configuration
With release January 2026 it is also possible to receive messages via AMQP protocol.
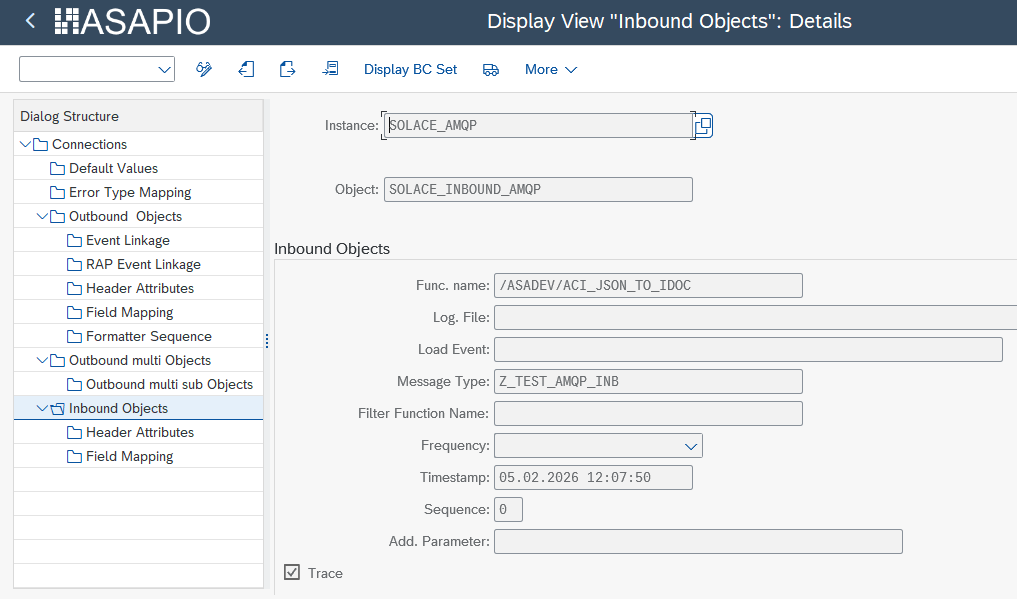
To receive messages you need to configure an inbound object:
- Transaction: SPRO
- Go to ASAPIO Cloud Integrator – Connection and Replication Object Customizing
- Or go directly to transaction:
/ASADEV/ACI_SETTINGS - Select the created Connection
- Go to section Inbound Objects
- Add New Entry and specify:
- Object: name of the inbound interface
- Func. name: function module to process the message, e.g.
/ASADEV/ACI_JSON_TO_IDOC - Message Type: a unique message type
- Trace: activate for testing purposes
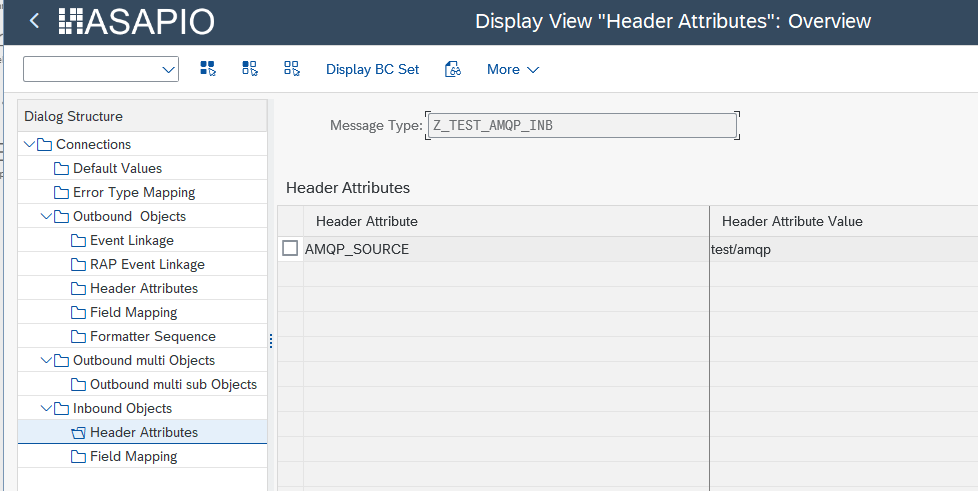
Navigate further to Header Attributes. Add new entry and specify:
- Header Attribute:
AMQP_SOURCE - Header Attribute Value:
<the queue name to subscribe to>
Send Example Outbound Message
Create Message Type
Example: we use the Sales Order (BUS2032) event as an example. Please choose any other suitable example if required.
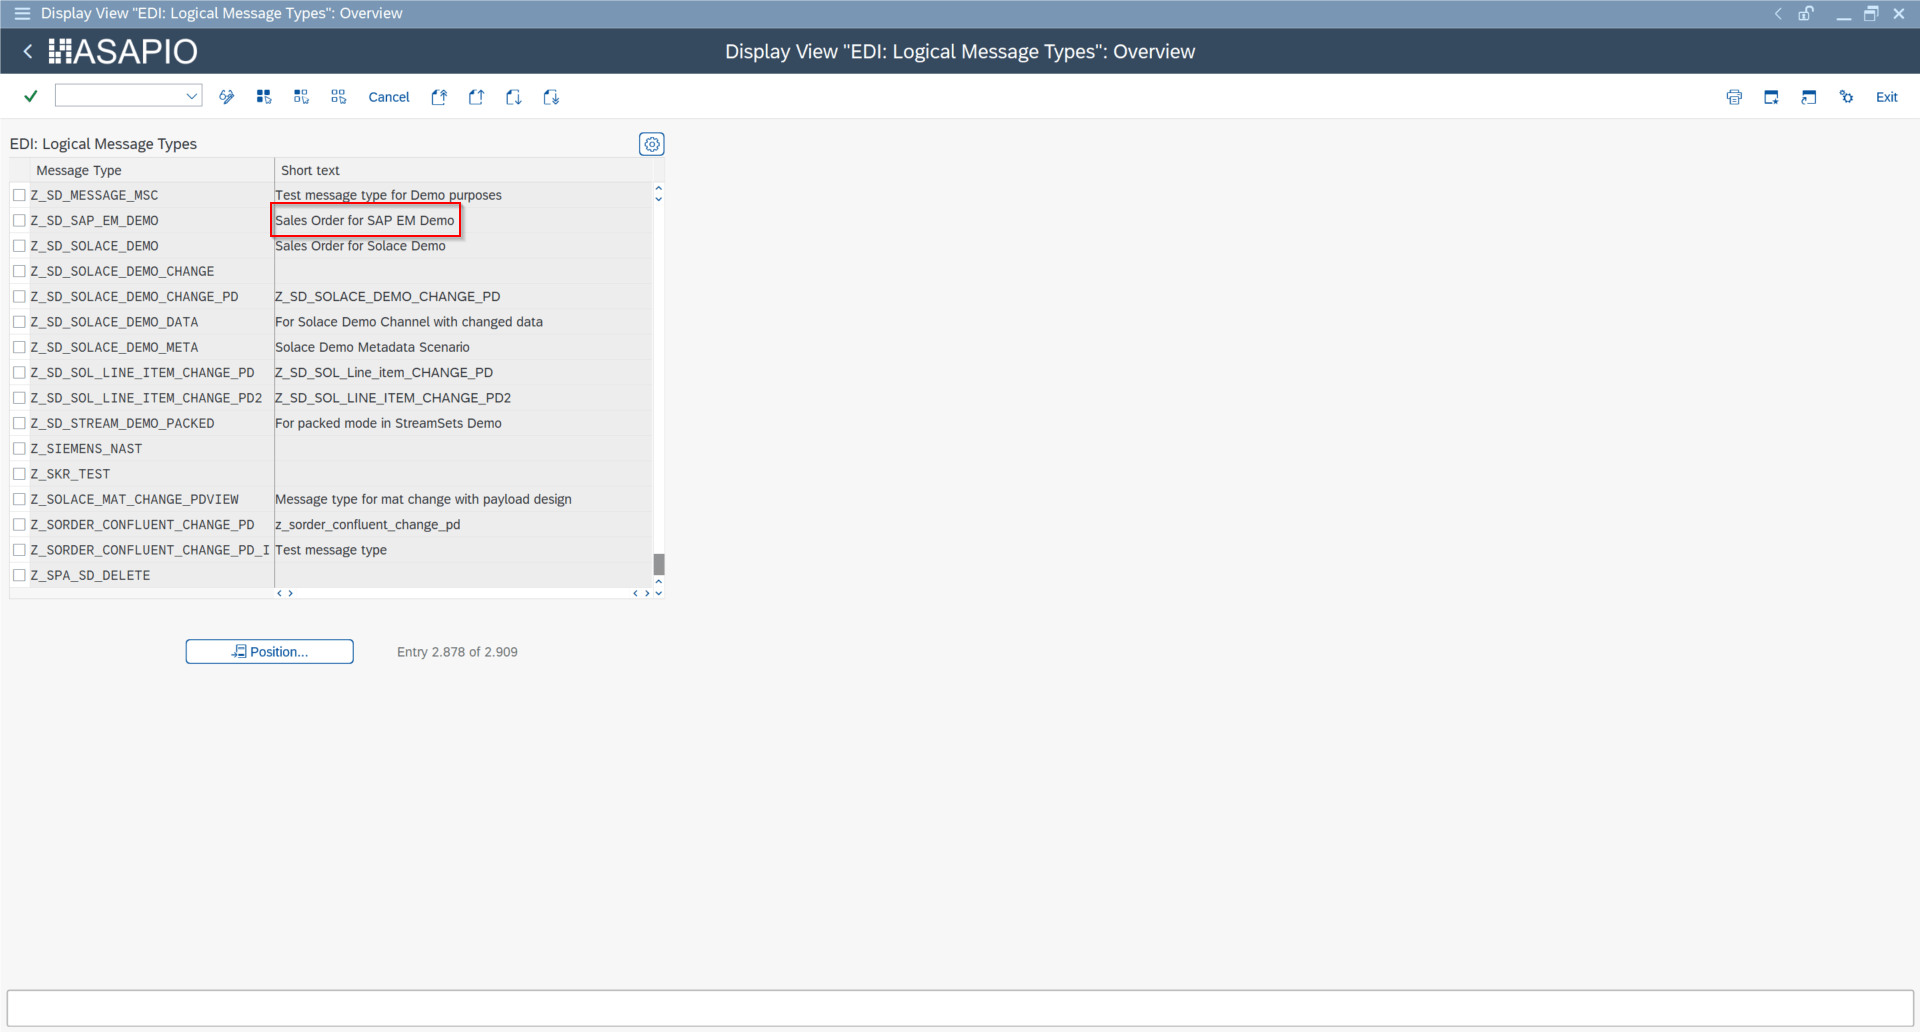
For each object to be sent via ACI you have to create a message type:
- Transaction: WE81
- Add New Entry and specify:
- Message Type: unique name for the integration
- Description: description of the purpose
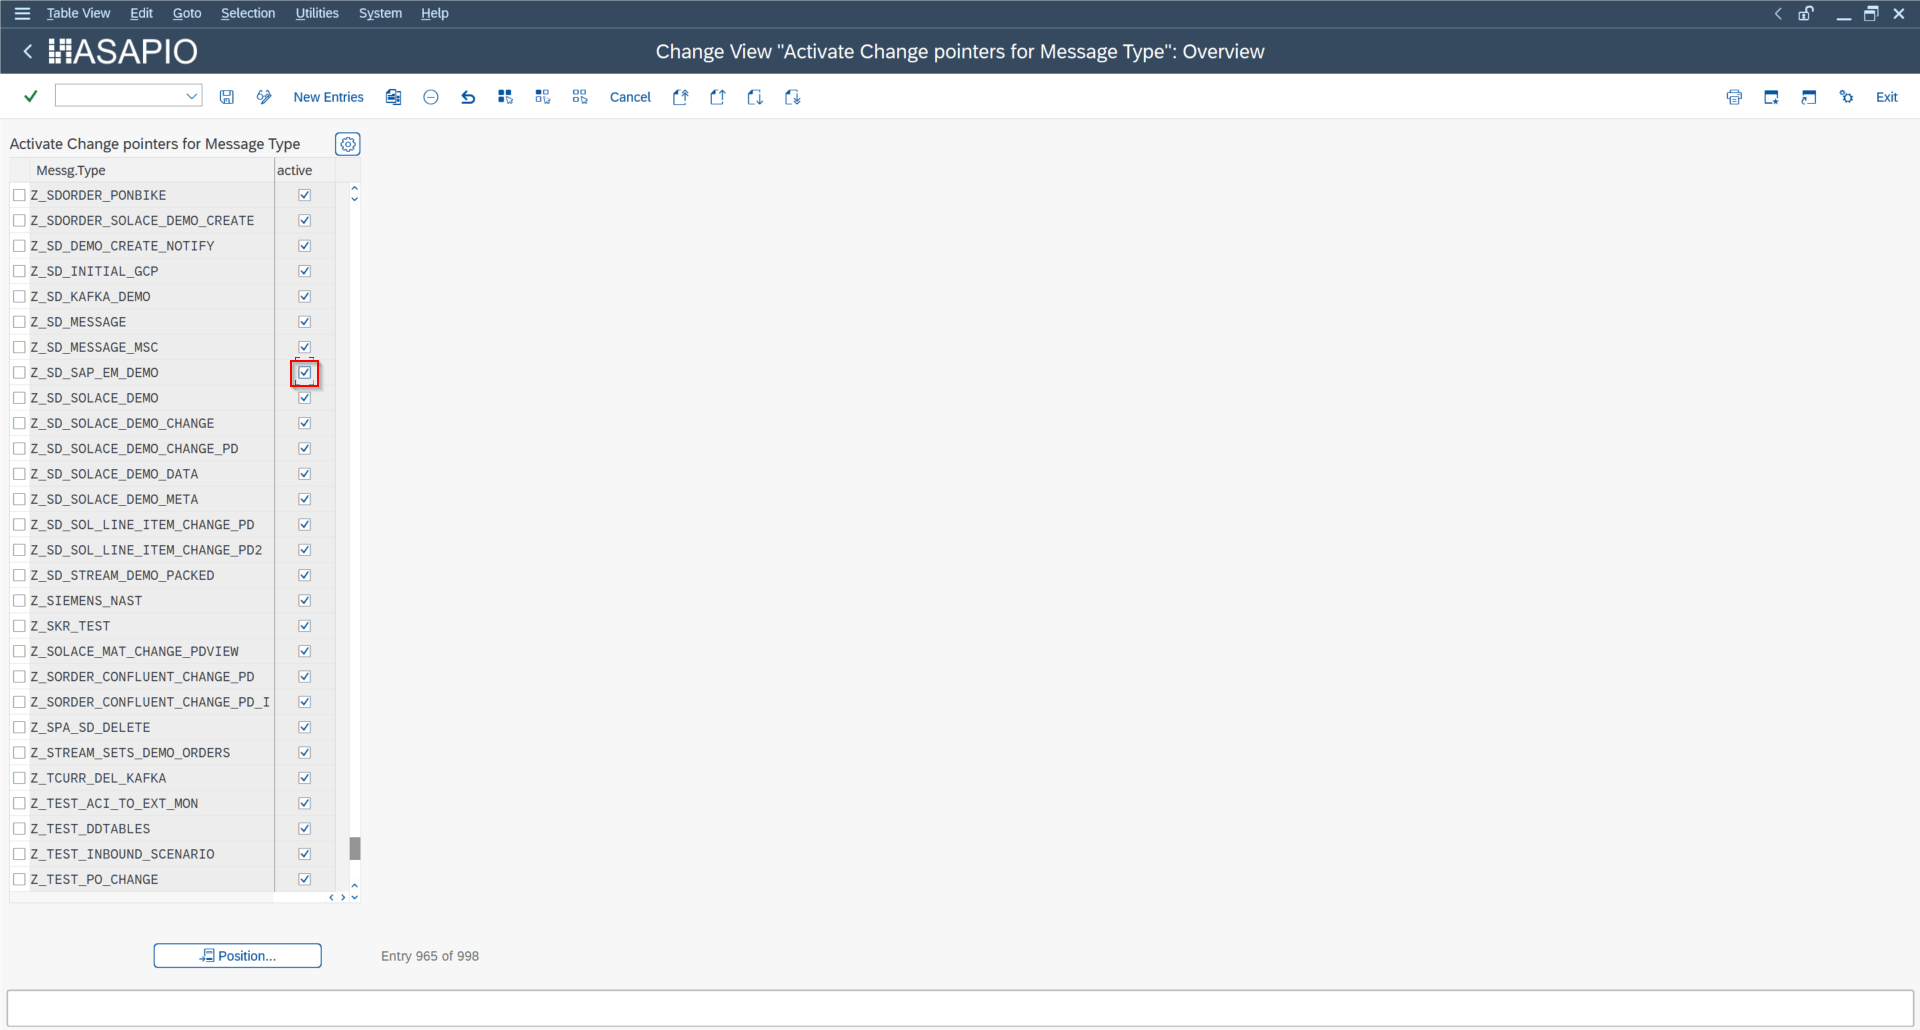
Activate Message Type
The created message type has to be activated:
- Transaction: BD50
- Add New Entry and specify:
- Message Type: the created message type
- Active: tick the checkbox
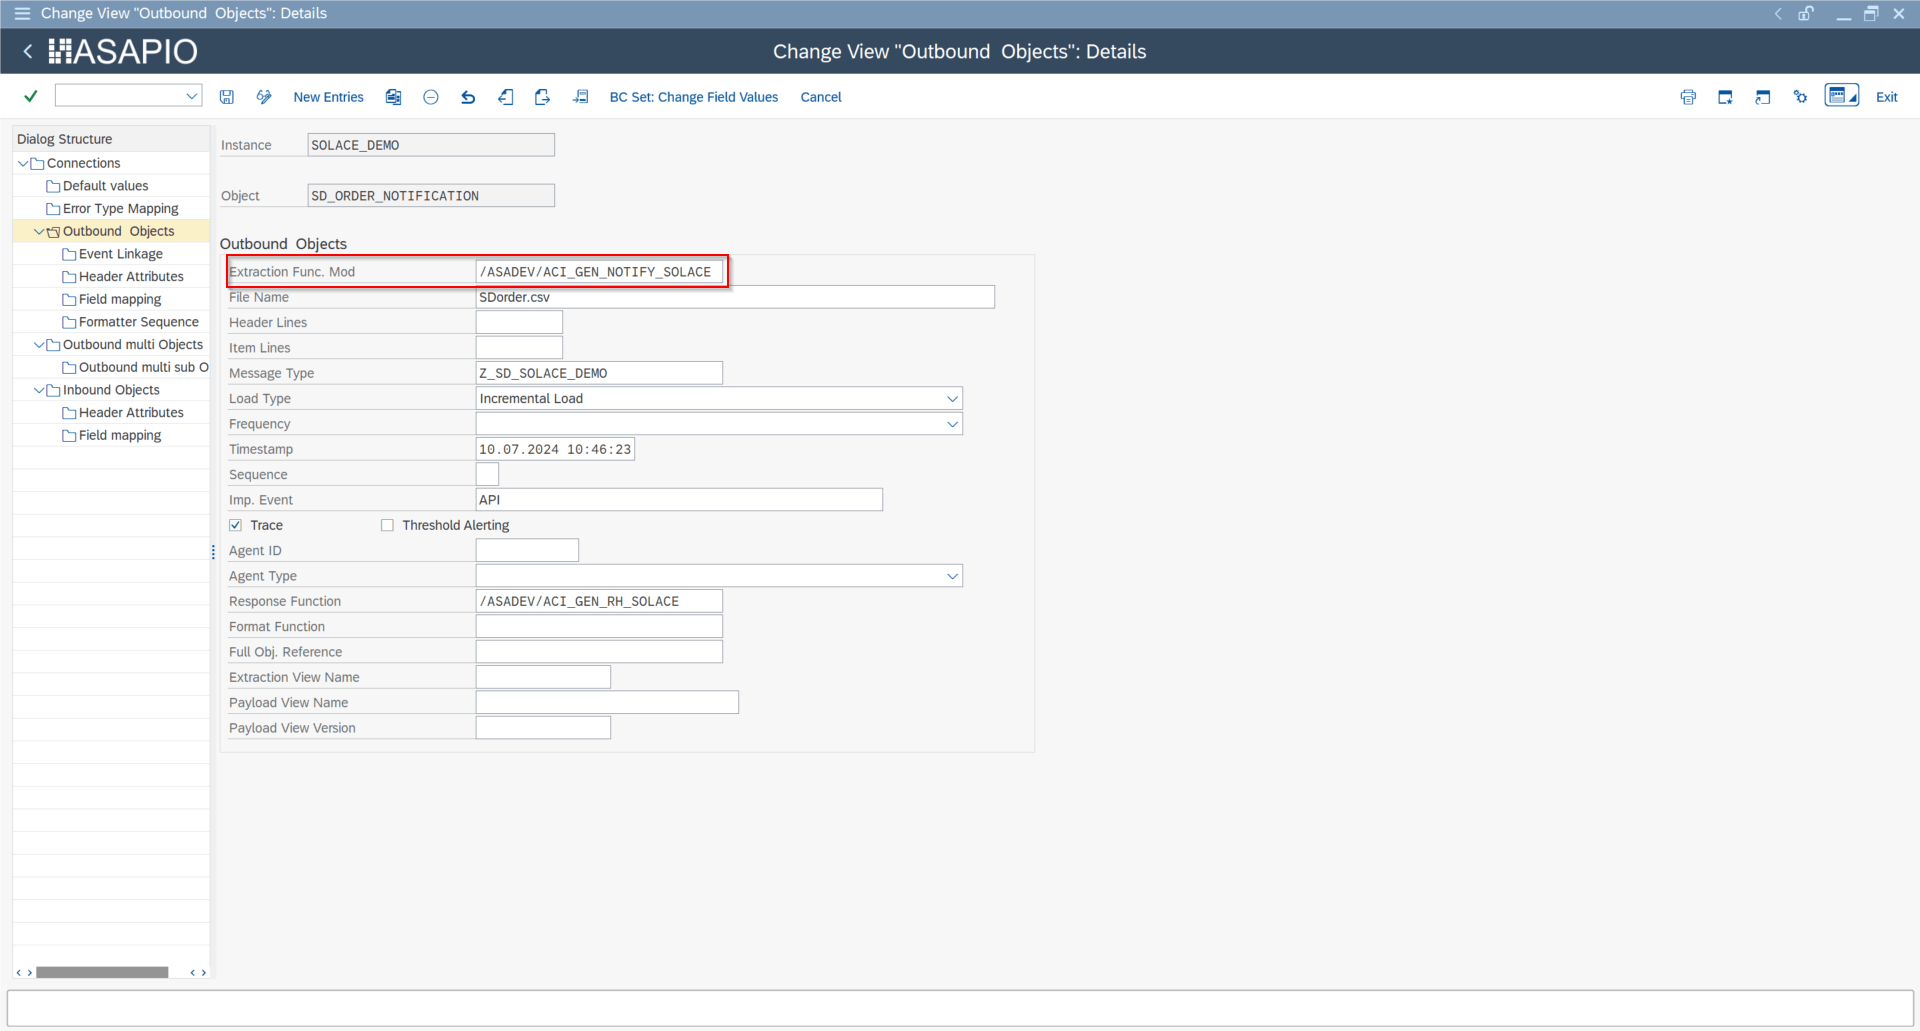
Create Outbound Object Configuration
This example uses the built-in notification event.
- Transaction: SPRO
- Go to ASAPIO Cloud Integrator – Connection and Replication Object Customizing
- Or go directly to transaction:
/ASADEV/68000202 - Select the created Connection
- Go to section Outbound Objects
- Add New Entry and specify:
- Object: name of the outbound configuration
- Extraction Func. Module:
/ASADEV/ACI_GEN_NOTIFY_SOLACE - Message Type: the created message type
- Load Type: Incremental Load
- Trace: activate for testing purposes
Set Up Target Endpoint in ‘Header Attributes’
The header attributes for each object contain some technical information for the call to the Solace broker and establish the header table for this object (i.e. the main table with information on this object). The header table can then be used to create a dynamic topic with the field mappings.
- Go to section Header Attributes
- Add New Entry and specify the header attribute and its value
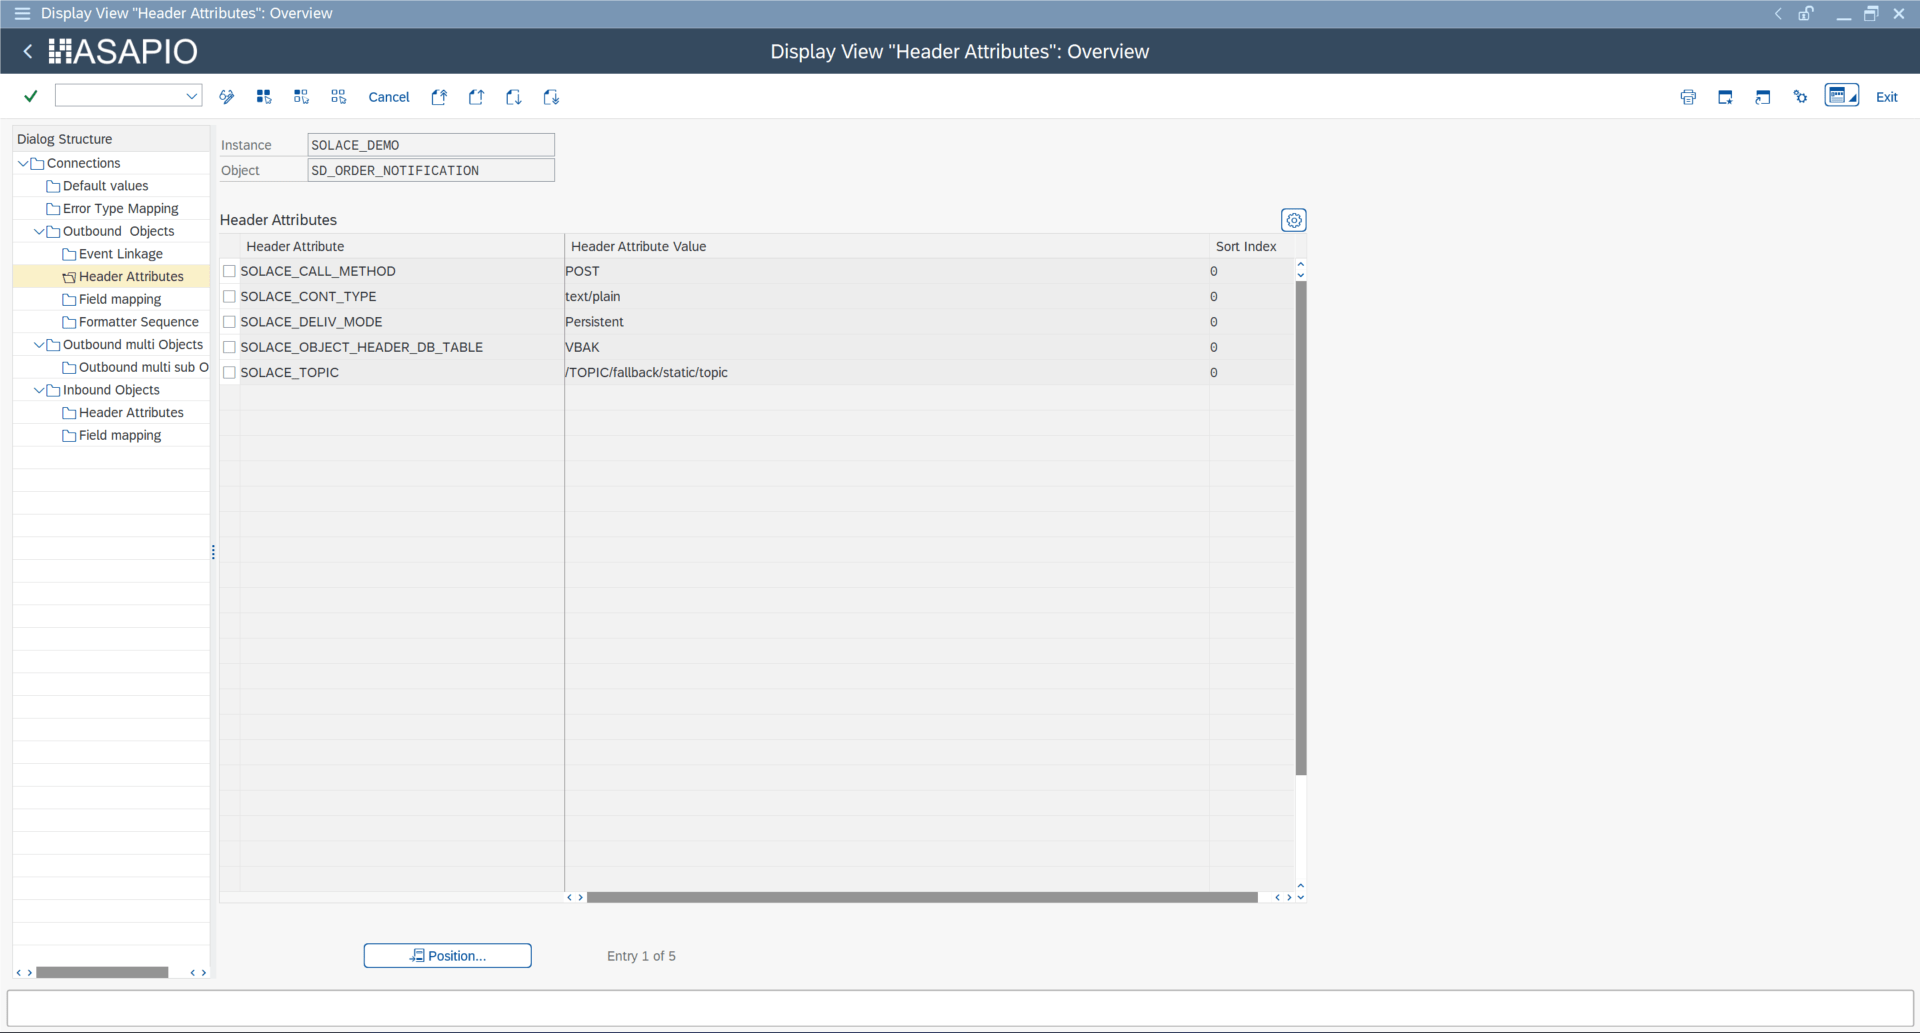
| Header Attribute | Header Attribute Value |
|---|---|
SOLACE_CALL_METHOD | POST |
SOLACE_CONT_TYPE | Content type (e.g. application/json) |
SOLACE_DELIV_MODE | Persistent |
SOLACE_OBJECT_HEADER_DB_TABLE | DB table to use for dynamic topics (e.g. VBAK) |
SOLACE_TOPIC | Fixed topic (if dynamic topics should not be used) |
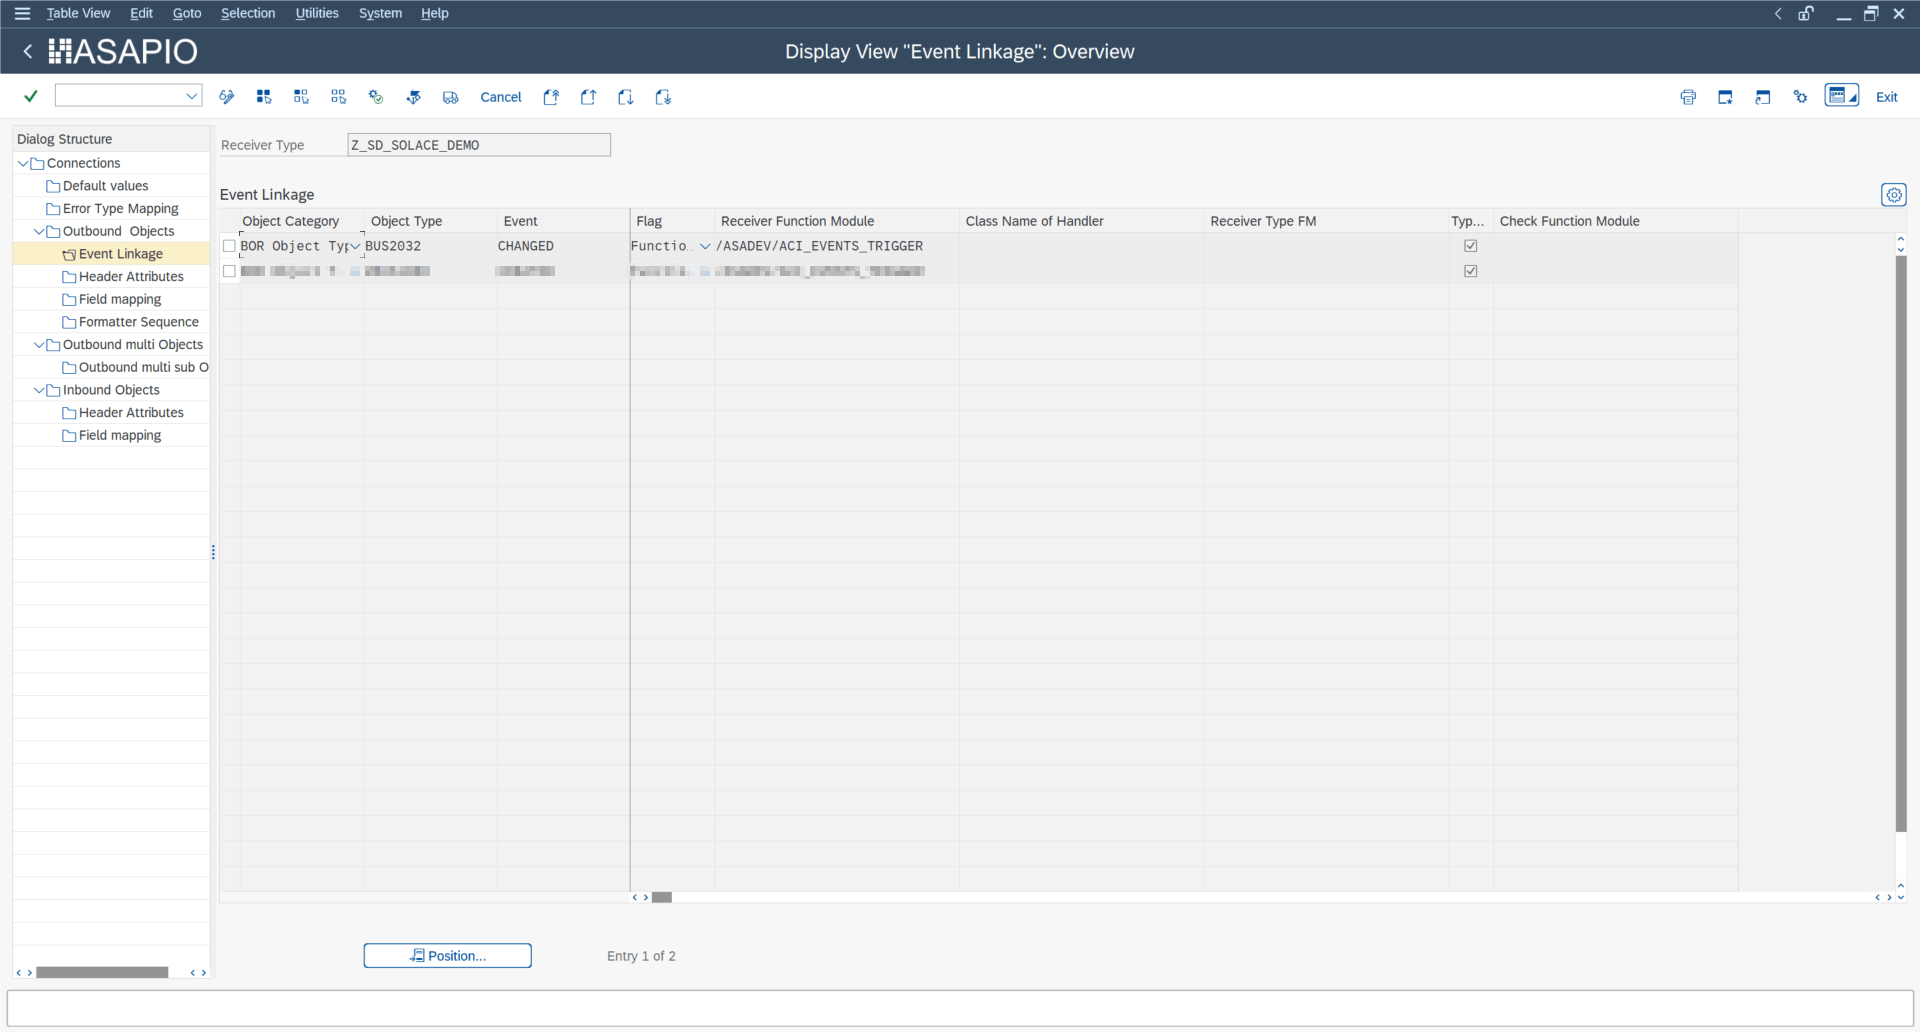
Set Up ‘Business Object Event Linkage’
Link the configuration of the outbound object to a Business Object event:
- Go to section Event Linkage
- Add New Entry and specify:
- Object Category: BO BOR Object Type
- Object Type: the Business Object Type sending the event
- Event: the event to react to
- Receiver Type: the message type of the outbound object (this is the link to the Add-on configuration)
- Receiver Call: Function Module
- Receiver Function Module:
/ASADEV/ACI_EVENTS_TRIGGER - Type Linkage Activated: tick the checkbox
Test the Outbound Event Creation
In the example above, please pick any test sales order in transaction /nVA02 and force a change event, e.g. by changing the requested delivery date on header level.
Outbound Messaging
For outbound messaging, you can use and even combine the following methods:
- Simple Notifications
- Message Builder (Generic View Extractor)
- Custom-built triggers and extractors
Pre-requisite for all methods is to create a message type, which will be used throughout the configuration process.
Create a New Message Type
Create Message Type
Note: in the example below, we use the Sales Order (BUS2032) event. Please use suitable data for your use case as required.
For each object to be sent via ACI you have to create a message type:
- Transaction: WE81
- Add New Entry and specify:
- Message Type: unique name for the integration
- Description: description of the purpose

Activate Message Type
- Transaction: BD50
- Add New Entry and specify:
- Message Type: the created message type
- Active: tick the checkbox

Simple Notifications
Create Outbound Object Configuration
This example uses the built-in notification event.
- Transaction: SPRO
- Go to ASAPIO Cloud Integrator – Connection and Replication Object Customizing
- Or go directly to transaction:
/ASADEV/68000202 - Select the created Connection
- Go to section Outbound Objects
- Add New Entry and specify:
- Object: name of the outbound configuration
- Extraction Func. Module:
/ASADEV/ACI_GEN_NOTIFY_SOLACE - Message Type: the created message type
- Load Type: Incremental Load
- Trace: activate for testing purposes

Set Up Target Endpoint in ‘Header Attributes’
The header attributes for each object contain some technical information for the call to the Solace broker and establish the header table for this object (i.e. the main table with information on this object). The header table can then be used to create a dynamic topic with the field mappings.
- Go to section Header Attributes
- Add New Entry and specify the header attribute and its value

| Header Attribute | Header Attribute Value |
|---|---|
SOLACE_CALL_METHOD | POST |
SOLACE_CONT_TYPE | Content type (e.g. application/json) |
SOLACE_DELIV_MODE | Persistent |
SOLACE_OBJECT_HEADER_DB_TABLE | DB table to use for dynamic topics (e.g. VBAK) |
SOLACE_TOPIC | Fixed topic (if dynamic topics should not be used) |
Set-Up Dynamic Topic Inside the ‘Field Mapping’
- Go to section Field Mapping
- Add New Entry and specify:
- Target structure: URL segment
- Target field: description
- Source structure: table for the dynamic field
- Source field: dynamic value for the URL segment
- Default value: static value for the URL segment

New option with release 2504 (9.32504): conversion methods. With the new option you can specify a conversion class/method to determine the value of the topic level, e.g. to translate SAP-specific values to more commonly used terms, or to determine a new value like a region based on data that only contains plant/country info.
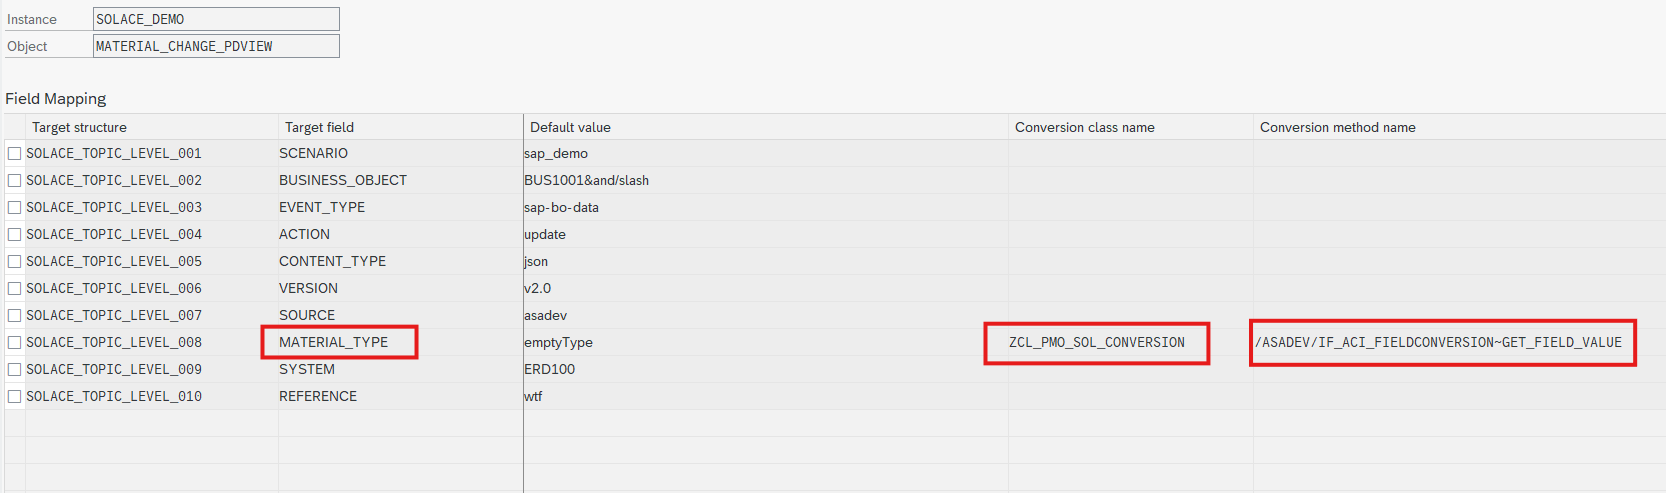
The dynamic topic is visible inside the monitor with dynamic (highlighted) and static URL segments:

Set-Up User Properties and Message Headers (from Release 2610 / 9.32610)
New option with release 2610 (9.32610): user properties and message headers. You can send custom Solace user properties and dedicated Solace message headers with every outbound message. They are configured in the Field Mapping of the outbound object, using dynamic values from the SAP source record or static default values.
The metadata stays attached to the payload that produced it. When one run creates multiple payloads, every payload is sent with its own headers, user properties and topic, both for direct sending and for messages processed through message sequencing (Outbox).
Key features:
- Custom Solace user properties per message (
Solace-User-Property-<name>) - Dedicated Solace message headers per message (
Solace-<name>), e.g.Solace-Correlation-ID - Dynamic values from the current payload source record
- Static values maintained as Default value
- Default value as fallback and support for conversion classes/methods, same as for dynamic topics
- Headers, user properties and dynamic topic are preserved for sequenced messages in single and batch mode
- Fully backward compatible with existing outbound configurations
User properties and headers are maintained in the same field mapping that is used for dynamic topics. The prefix of the target structure determines which kind of metadata is created.
- Go to section Field Mapping of the outbound object
- Add New Entry and specify:
- Target structure: numbered metadata type, e.g.
SOLACE_USER_PROPERTY_001orSOLACE_HEADER_001 - Target field: name of the user property or header (without prefix)
- Source structure: table for the dynamic value
- Source field: dynamic value for the user property or header
- Default value: static value, or fallback if the dynamic value is empty
- Target structure: numbered metadata type, e.g.

| Target structure | Purpose | Outgoing name |
|---|---|---|
SOLACE_TOPIC_LEVEL_### | Dynamic topic segment (existing) | Appended to the destination topic |
SOLACE_USER_PROPERTY_### | Custom Solace user property | Solace-User-Property-<Target field> |
SOLACE_HEADER_### | Dedicated Solace message header | Solace-<Target field> |
Configuration rules:
- Use singular, numbered target structures, e.g.
SOLACE_USER_PROPERTY_001,SOLACE_USER_PROPERTY_002,SOLACE_HEADER_001. - Target field contains the name of the user property or header, not the source field. The prefix
Solace-User-Property-orSolace-is added automatically. - Use Default value only for static values, or as fallback when the dynamic value is empty.
- The dynamic value is read from the first data line of the current payload, same as for dynamic topics.
Values are determined with the same rules as for dynamic topics:
- If Source field is maintained and filled, the value from the current payload source record is used.
- If a conversion class and method are maintained, the converted value is used when returned.
- If the resulting value is empty and a Default value is maintained, the default value is used as fallback.
- If Source field is empty, the Default value is sent as a static user property or header.
- If the final value is empty, no user property or header is sent.
The conversion class and method are maintained in the same field mapping entry, as for dynamic topics. They can be used e.g. to translate SAP-specific values to more commonly used terms, or to determine a new value.
Example: Sales Order
This example uses the Sales Order (BUS2032) change event. Please use suitable data for your use case as required.
| Target structure | Target field | Source structure | Source field | Default value |
|---|---|---|---|---|
SOLACE_HEADER_001 | Correlation-ID | Z_SD_ORDER_BIKE | MATNR | NoMaterial |
SOLACE_USER_PROPERTY_001 | SourceSystem | SAP | ||
SOLACE_USER_PROPERTY_002 | EventType | Z_SD_ORDER_BIKE | EVENT_TYPE | NoEvent |
SOLACE_USER_PROPERTY_003 | JMSXGroupID | Z_SD_ORDER_BIKE | SALESDOCUMENT | NoSalesdocument |
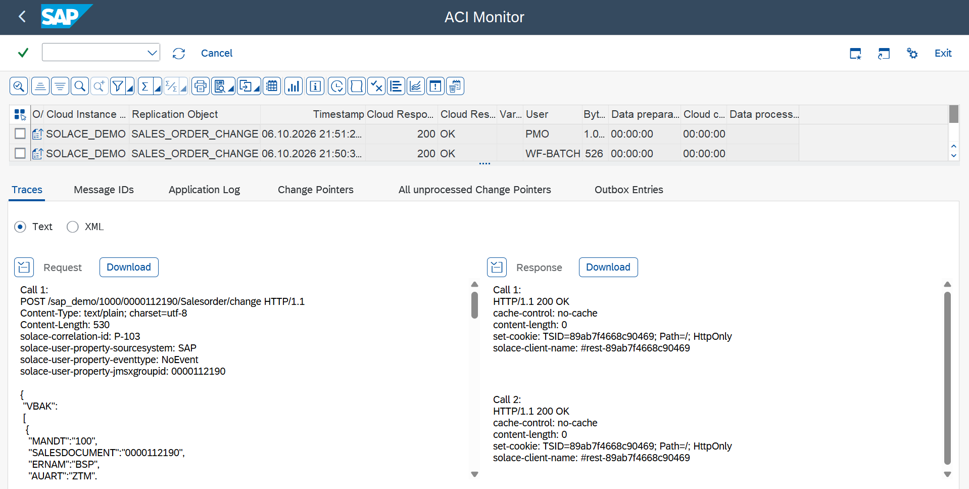
Resulting HTTP headers sent to Solace:
Solace-Correlation-ID: P-103
Solace-User-Property-SourceSystem: SAP
Solace-User-Property-EventType: NoEvent
Solace-User-Property-JMSXGroupID: 0000112190
The field EVENT_TYPE is empty for this sales order, so the default value NoEvent is sent as fallback. SourceSystem is a static user property; all other values are taken from the source record.
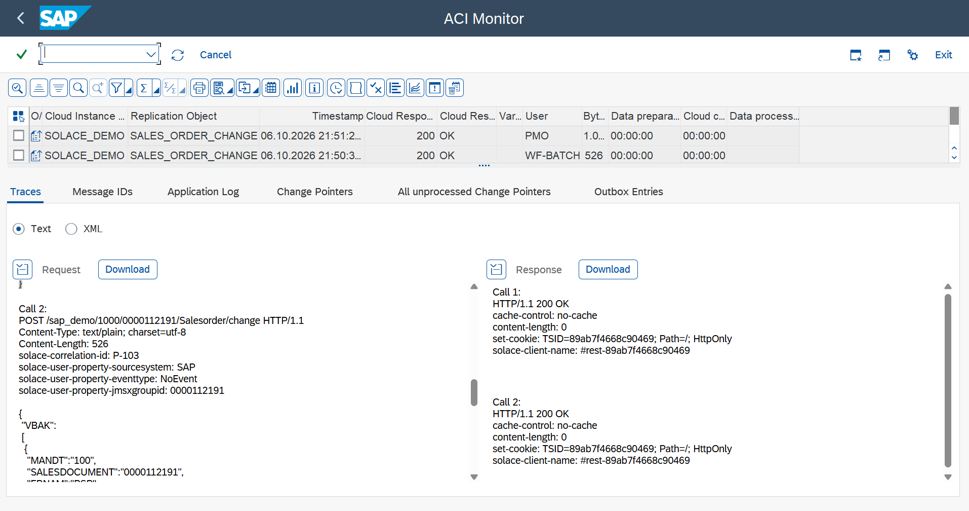
The headers are visible inside the monitor (transaction /ASADEV/ACI_MONITOR) in the request trace. HTTP header names are not case-sensitive, so the trace may display them in lower case.

Example: Purchase Order
| Target structure | Target field | Source structure | Source field | Default value |
|---|---|---|---|---|
SOLACE_HEADER_001 | Correlation-ID | EKKO | EBELN | |
SOLACE_USER_PROPERTY_001 | JMSXGroupID | EKKO | EBELN | |
SOLACE_USER_PROPERTY_002 | SourceSystem | SAP | ||
SOLACE_USER_PROPERTY_003 | EventType | PurchaseOrderChanged |
Resulting HTTP headers sent to Solace:
Solace-Correlation-ID: 4500018123
Solace-User-Property-JMSXGroupID: 4500018123
Solace-User-Property-SourceSystem: SAP
Solace-User-Property-EventType: PurchaseOrderChanged
Topic selection
Each payload is sent to its own topic, determined in this order:
- Dynamic topic from the Field Mapping (
SOLACE_TOPIC_LEVEL_###), if it could be determined - Fixed topic from header attribute
SOLACE_TOPIC, if no dynamic topic was determined
A fixed topic does not overwrite a dynamic topic.
Message sequencing
User properties, headers and the topic are fully supported with message sequencing. When sequencing is active, the values are stored for each Outbox entry and restored when the message is sent. Every payload keeps its own topic, headers and user properties, in single send and in batch send. In a batch send, the monitor shows all payloads of the run in one trace entry; each call is sent to the topic of its own payload, with the headers and user properties of that payload. See also Message Sequencing.
Compatibility and limitations
- Outbound objects without user property or header mappings continue to work unchanged.
- Existing Header Attributes are still read and applied. If a user property or header from the Field Mapping has the same outgoing name as a Header Attribute, the value from the Field Mapping takes precedence.
- Messages without user properties or headers are sent as before.
- Existing dynamic topic configurations continue to work as before.
- The feature is available for REST-based connectivity. AMQP-based connectivity is not yet supported.
Set Up ‘Business Object Event Linkage’
Link the configuration of the outbound object to a Business Object event:
- Go to section Event Linkage
- Add New Entry and specify:
- Object Category: BO BOR Object Type
- Object Type: the Business Object Type sending the event
- Event: the event to react to
- Receiver Type: the message type of the outbound object (this is the link to the Add-on configuration)
- Receiver Call: Function Module
- Receiver Function Module:
/ASADEV/ACI_EVENTS_TRIGGER - Type Linkage Activated: tick the checkbox

Test the Outbound Event Creation
In the example above, please pick any test sales order in transaction /nVA02 and force a change event, e.g. by changing the requested delivery date on header level.
Message Builder (Generic View Extractor)
Create Outbound Object Configuration
- Transaction: SPRO
- Go to ASAPIO Cloud Integrator – Connection and Replication Object Customizing
- Or go directly to transaction:
/ASADEV/ACI_SETTINGS - Select the created Connection
- Go to section Outbound Objects
- Add New Entry and specify:
- Object: name of the outbound configuration
- Extraction Func. Module:
/ASADEV/ACI_GEN_VIEWEXT_SOLACE - Message Type: the created message type
- Load Type: Incremental Load
- Trace: activate for testing purposes
- Formatting Function:
/ASADEV/ACI_GEN_VIEWFRM_SOLACE - Extraction View Name: add a database view or CDS view

Create Database View
For the data events also configure the DB view that is used to define the extraction:
- Transaction: SE11 (for SAP ERP or S/4HANA on-prem deployments with SAP GUI access)
- Alternatively, use Eclipse with ABAP Development Tools, or the SAP Fiori app “Create Custom CDS Views” if available in SAP S/4HANA
Example: Material master view (e.g. to be used for Material Master (BUS1001) change events).

Set Up ‘Business Object Event Linkage’
Link the configuration of the outbound object to a Business Object event:
- Go to section Event Linkage
- Add New Entry and specify:
- Object Category: BO BOR Object Type
- Object Type: the Business Object Type sending the event
- Event: the event to react to
- Receiver Type: the message type of the outbound object (this is the link to the Add-on configuration)
- Receiver Call: Function Module
- Receiver Function Module:
/ASADEV/ACI_EVENTS_TRIGGER - Type Linkage Activated: tick the checkbox

Set-Up Packed Load (Split Large Data)
Create Outbound Object Configuration
- Transaction: SPRO
- Go to ASAPIO Cloud Integrator – Connection and Replication Object Customizing
- Or go directly to transaction:
/ASADEV/ACI_SETTINGS - Select the created Connection
- Go to section Outbound Objects
- Add New Entry and specify:
- Object: name of the outbound configuration
- Extraction Func. Module:
/ASADEV/ACI_GEN_VIEW_EXT_PACK - Message Type: the created message type (optional)
- Load Type: Packed Load
- Trace: activate for testing purposes
- Formatting Function:
/ASADEV/ACI_GEN_VIEW_FORMATTER(depending on your use case) - Extraction View Name: add a database view or CDS view
Create Database View
For the data events also configure the DB view that is used to define the extraction:
- Transaction: SE11 (for SAP ERP or S/4HANA on-prem deployments with SAP GUI access)
- Alternatively, use Eclipse with ABAP Development Tools, or the SAP Fiori app “Create Custom CDS Views” if available in SAP S/4HANA
Example: Material master view.

Set-Up ‘Header Attributes’
Go to section Header Attributes of the outbound object created previously. Add New Entry and specify the header attributes and values:
| Header Attribute | Header Attribute Value | Example |
|---|---|---|
ACI_PACK_BDCP_COMMIT | Flag for change pointer creation. If set, change pointers will be generated for every entry. If this flag is set, a message type has to be maintained in the outbound object. Caution: this approx. halves performance. | X |
ACI_PACK_TABLE | Name of the table to take the key fields from. This is typically different from the DB view specified in ‘Extraction View Name’, as we only want to build packages based on the header object, and the DB view typically contains sub-objects as well. | MARA |
ACI_PACK_RETRY_TIME | Time in seconds. This is the duration in which the framework will attempt to get a new resource from the server group. | 60 |
ACI_PACK_WHERE_COND | Condition that is applied to the table defined in ‘ACI_PACK_TABLE’. | – |
ACI_PACK_SIZE | Number of entries to send. | 500 |
ACI_PACK_KEY_LENGTH | Length of the key to use from the ACI_PACK_TABLE (e.g. MANDT + MATNR). | 13 |

Execute the Initial Load
Warning: depending on the amount of data, this can stress the SAP system servers immensely. Please always consult with your basis team for the correct server group to use.
- Transaction:
/ASADEV/ACI - Select the Connection and hit enter
- Select Upload Type:
P - Select Replication Object
- Select a Server Group (this is mandatory)


Demos and Slides
Demo Videos