Connectors > Microsoft® Azure®
Overview
You can connect SAP systems with Microsoft® Azure® Service Bus, Event Grid or Event Hub services.
Required components of ASAPIO Integration Add-ons:
| Add-on/component name | Type |
| ASAPIO Integration Add-on – Framework | Base component (required) |
| ASAPIO Integration Add-on – Connector for Microsoft® Azure® | Additional package |
Key features:
- Supports a wide range of SAP NetWeaver based systems, including SAP ERP, S/4HANA, BW, HCM and many more
- Out-of-the-box connectivity to ASAPIO Microsoft® Azure® Service Bus, Event Grid and Event Hubs
- REST-based outbound communication
- Inbound communication is supported via
- Pull-based from Service Bus
- Push-based to the ASAPIO REST endpoint, via a Webhook (e.g. Azure Function) triggered by Event Grid or Event Hubs
- Switch between event-driven (single events) or batch mode (job-driven) calls
- Batch mode allows multi-threading with multiple SAP work processes
- Requires SAP NetWeaver 7.31 or higher as SAP_BASIS component
Block Architecture: 
Pre-requisites
Pre-requisites for Microsoft® Azure® services
Note The following settings are specific to the connector for Microsoft® Azure®. A Microsoft® Azure® account is required, with access to one of the following services:
- Event Hub
- Service Bus
- Event Grid
-
Data Lake Storage 2. Generation (ADLSgen2) (from release 9.32507)
Steps required to establish connectivity
To establish connectivity with the Microsoft Azure platform, please proceed with the following activities and refer to the specific documentation articles please.
- Create RFC destinations to Microsoft Azure platform in SAP system settings
- Set-up connection instance to Microsoft Azure platform in ASAPIO Integration Add-on
- Endpoint configuration (Event Grid, Event Hub, Service Bus or custom HTTP endpoint)Please see article “Authentication options” for an overview of supported authentication options for the different endpoints.
- See article example outbound message for a simple example to test the connectivity
Authentication options
The different Azure services offer different authorization options:
- OAuth via Entra ID
- Managed Identities
- Shared Access Signatures (SAS)
| Authentication mechanism | Azure Service |
| OAuth via Entra ID |
|
| Managed Identities |
|
| Shared Access Signatures |
|
To learn how to configure each of above, see the specific article for the service
Create RFC destinations
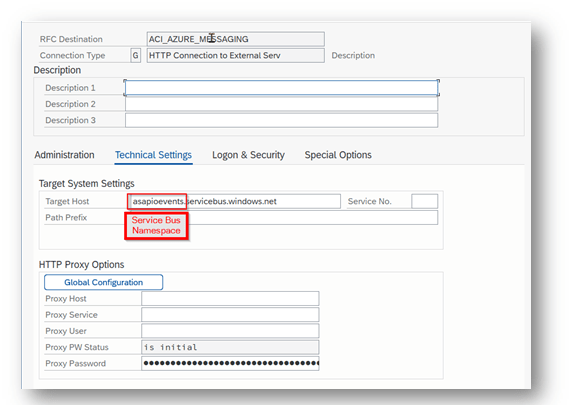
Create RFC destination for messaging endpoints
Create a new RFC destination of type “G” (HTTP Connection to External Server).
- Transaction: SM59
- Create new destination of type “G”
- Specify Target Host: endpoint for Service Bus Namespace or Event Hubs Namespace
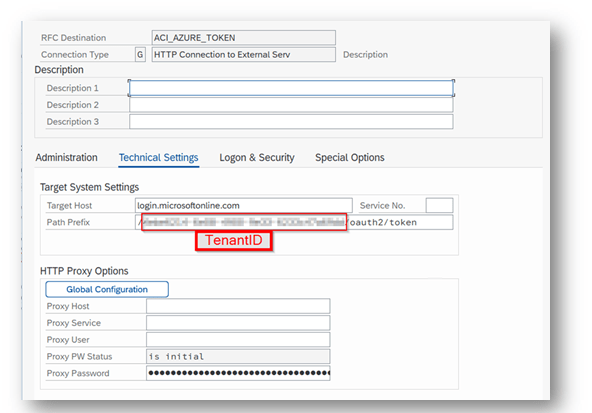
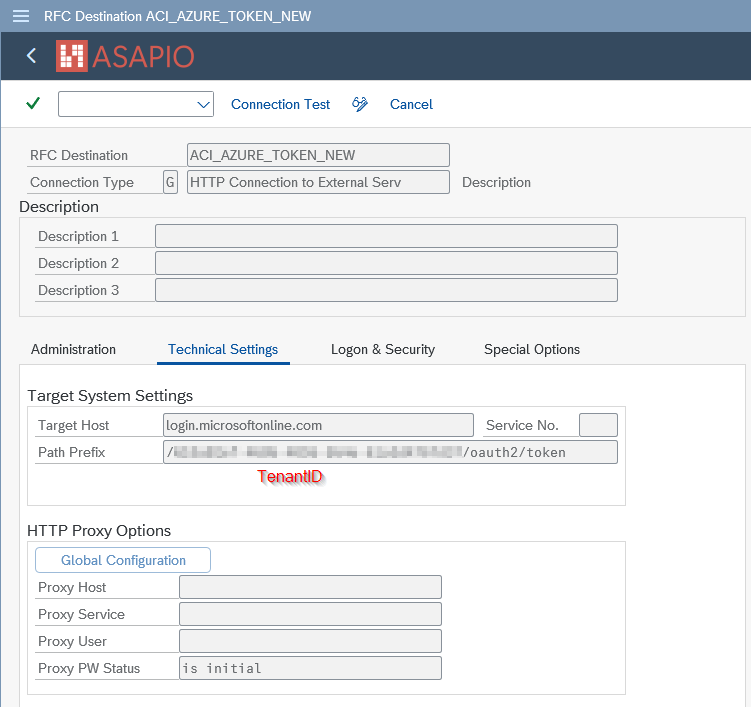
Create RFC destination for OAuth Authentication (optional)
To use OAuth authentication with Entra ID, please configure a RFC destination specifying the OAuth endpoint
- Transaction: SM59
- Create new destination of type “G”
- Specify Target Host: login.microsoftonline.com
- Specify Path Prefix: <tenantID>/oauth2/token
Note: <tenantID> is the client id of the Entra ID, please find it at https://portal.azure.com/#blade/Microsoft_AAD_IAM/ActiveDirectoryMenuBlade/Properties
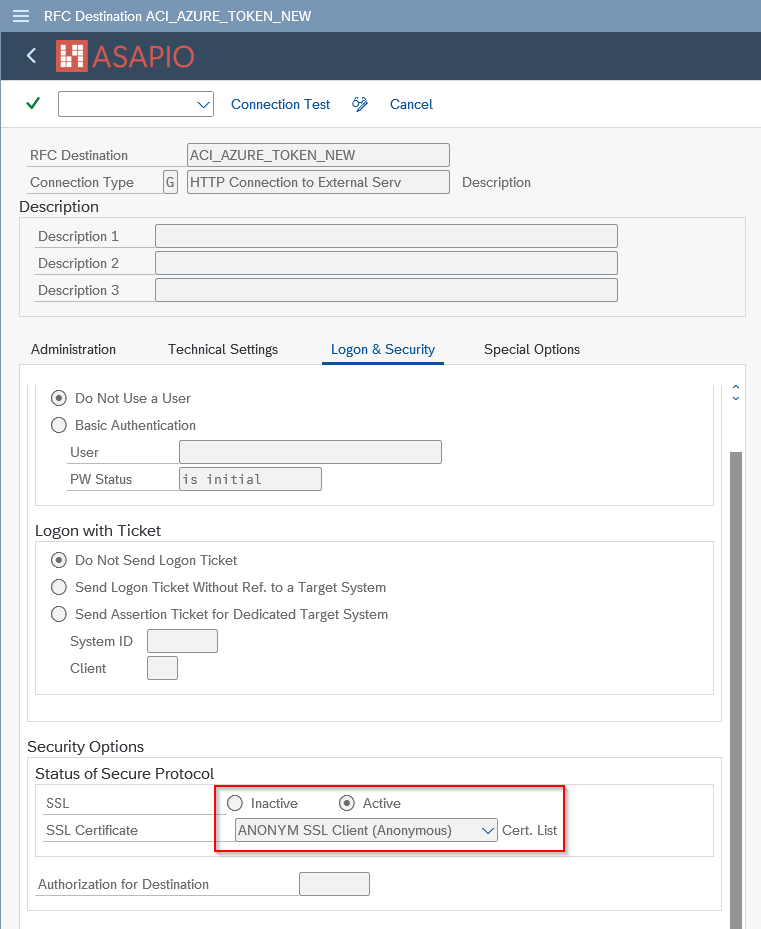
Add the certificates for the created destinations to the certificate list selected in tab Logon & Security:

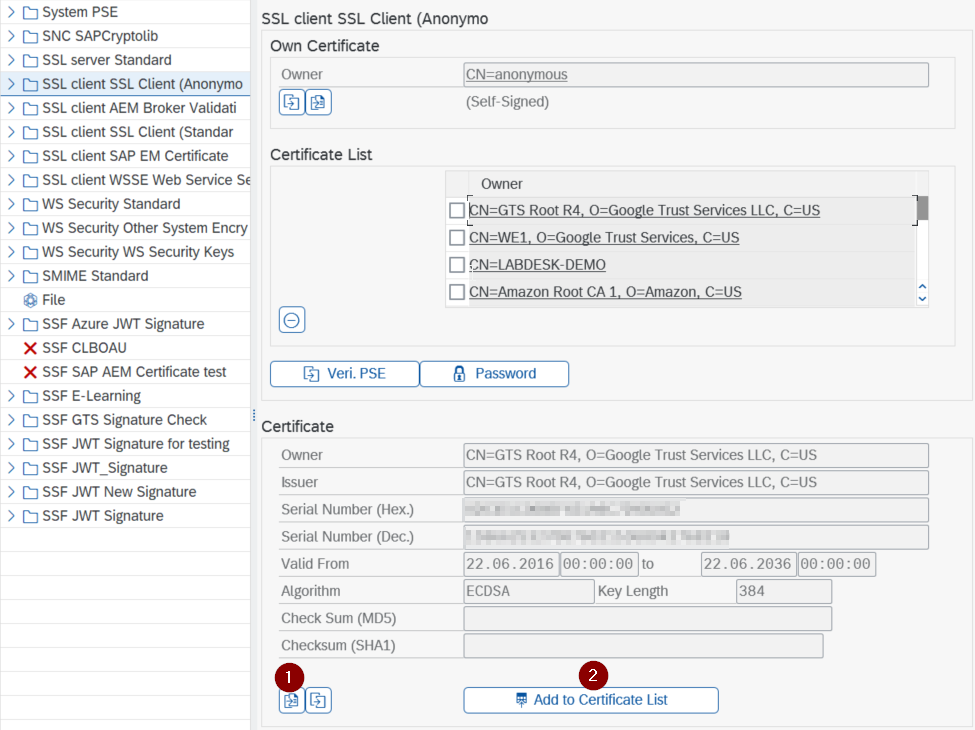
Add Certificates to Trust Store
- Transaction: STRUST
- Select Certificate List as used in RFC destination created above
- Click button Import certificate (1)
- Click button Add to Certificate List (2)

Set-up basic settings
Activate BC-Set
Business Configuration sets (BC-Set) contain customizing and configuration-related table entries that are not imported with the add-on.
- Transaction: SCPR20
- BC-Set includes:
- Configuration for cloud adapter
- Configuration for cloud codepages
- Definition of IDoc segments
- Activate the BC-Set with default values: /ASADEV/ACI_BCSET_FRAMEWORK_AZ
Configure cloud adapter
Add an entry for the connector to the list of cloud adapters:
- Transaction: SPRO
- Goto ASAPIO Cloud Integrator – Maintain Cloud Adapter.
- Add New Entry and specify:
- Cloud Type: name with which to reference this type of connector
- ACI Handler Class: /ASADEV/CL_ACI_AZURE_REST

Set-up connection instance
Create the connection instance customizing that ties together the RFC destination created earlier and the cloud connector type:
- Transaction: SPRO
- Goto ASAPIO Cloud Integrator – Connection and Replication Object Customizing
- Or go directly to transaction: /ASADEV/ACI_SETTINGS
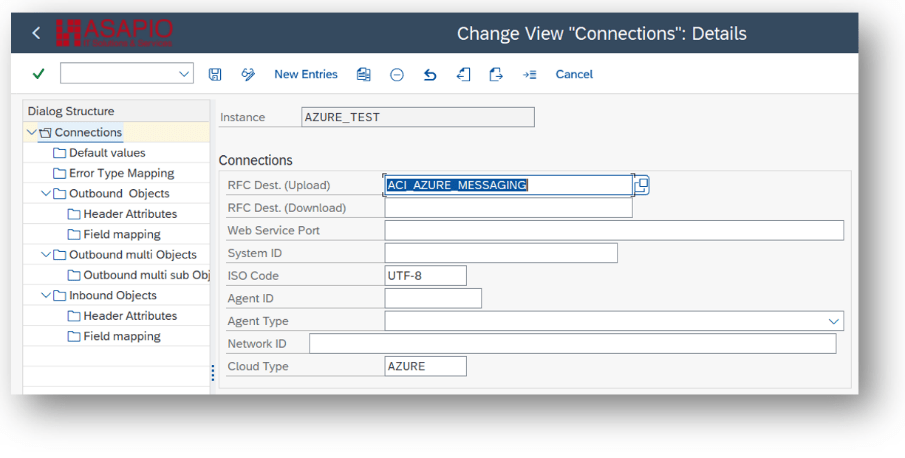
- Add New Entry and specify:
- Field Instance: a name for this connection in
- Field RFC Dest. (Upload): the RFC destination create for the messaging endpoint (please see article Create RFC destinations)
- Field ISO Code: the code page to use
- Field Cloud Type: AZURE (or the name you chose when adding the connector)
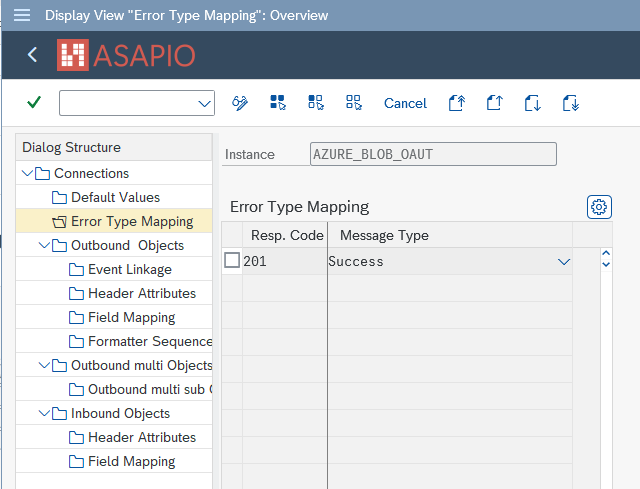
Set-up Error Type Mapping
Create an entry in section Error Type Mapping and specify at least the following mapping:
| Resp. Code: 201 | Message Type: Success |
| Resp. Code: 202 | Message Type: Success |

Set-up Authentication
Please specify the desired authentication scheme to be used, in the connection data. You can choose from
- OAuth using Entra ID
- Managed Identities
- Shared Access Signatures (SAS)
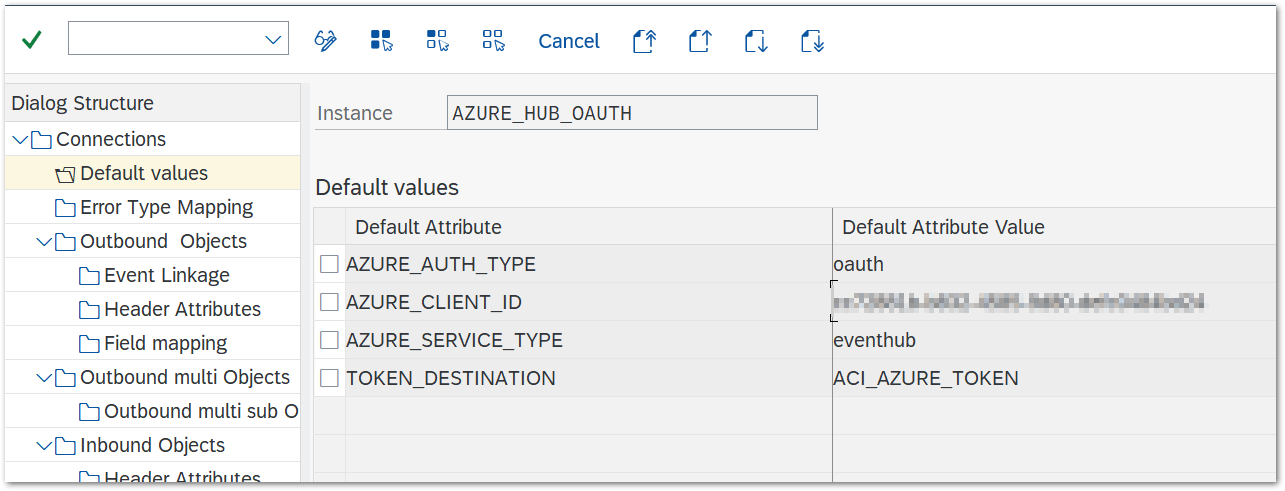
OAuth using Entra ID
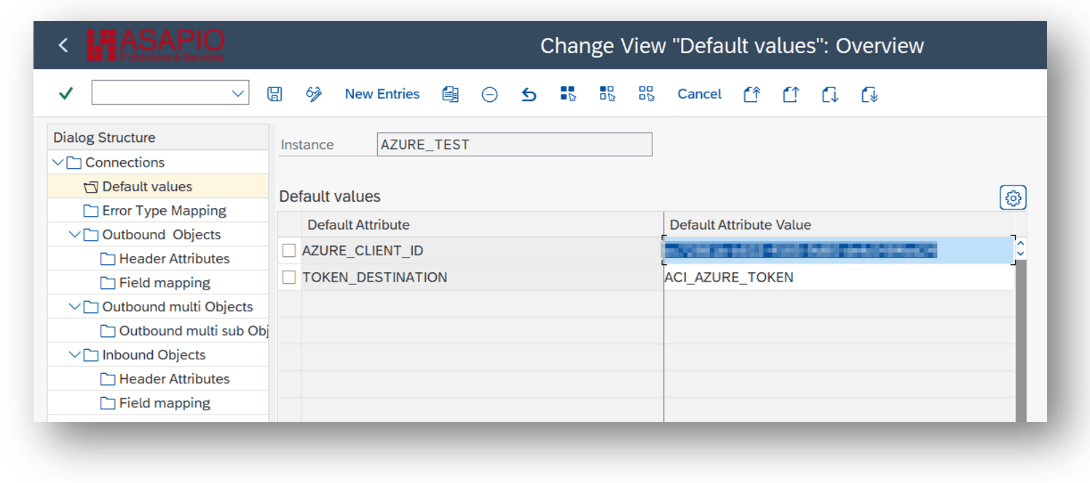
For OAuth based authentication using Entra ID, provide these values:
- AZURE_CLIENT_ID: the client id created in Azure for this integration
- TOKEN_DESTINATION: the RFC destination created for the OAuth endpoint
- AZURE_AUTH_RESOURCE: Optional. Note: only needed for custom http endpoints
Managed Identities
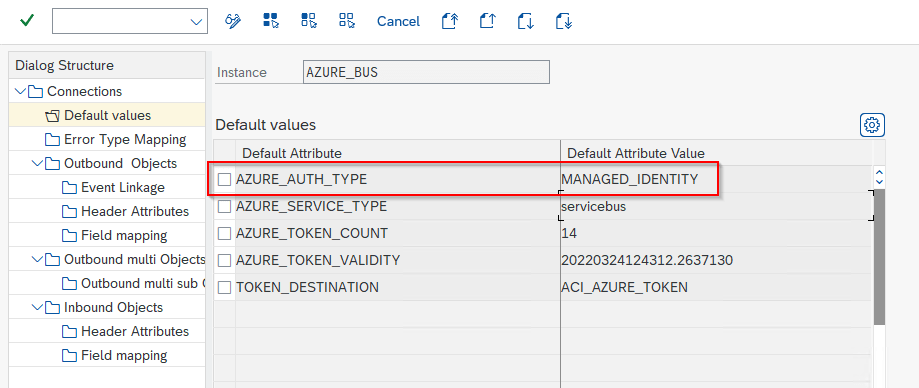
Note: Authentication based on managed identities only works if your SAP system is also running in the Azure cloud! For authentication based on Managed Identities specify the following values:
| Default Attribute | Default Attribute Value |
|---|---|
| AZURE_SERVICE_TYPE | Specifying your service (e.g. servicebus) |
| AZURE_AUTH_TYPE | MANAGED_IDENTITY |
| TOKEN_DESTINATION | RFC destination for Managed Identity endpoint |
In the default values for the Connection:
The RFC destination for the Managed Identities endpoint:
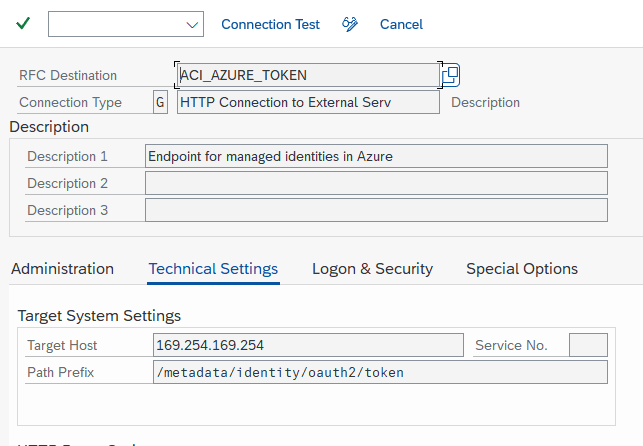
Note: The destination must be configured to use HTTP (not HTTPS!)
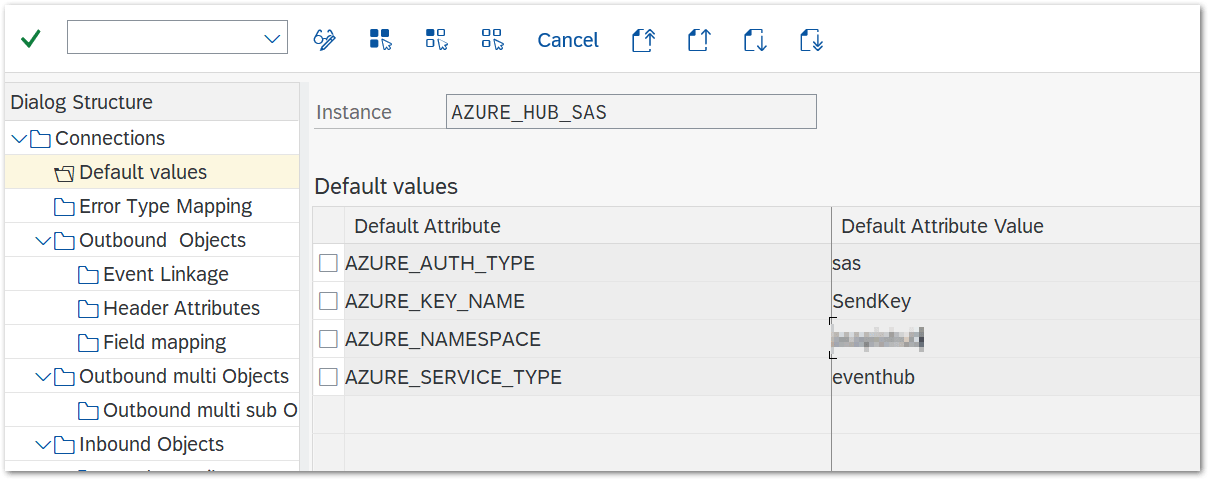
Shared Access Signatures (SAS)
For SAS based authentication, provide these values:
- AZURE_KEY_NAME: the name of the SAS policy (not required for Data Lake Storage)
- AZURE_NAMESPACE: the namespace used in Azure Service Bus / Event Hub (not required for Data Lake Storage)
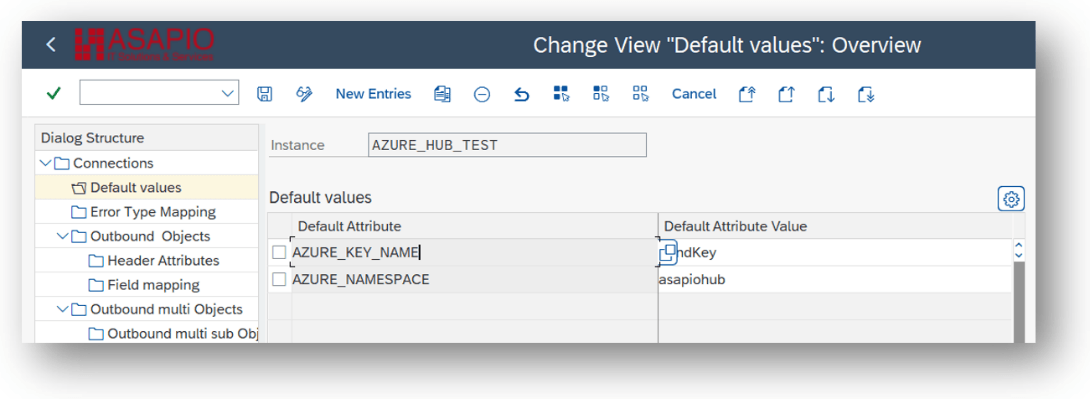
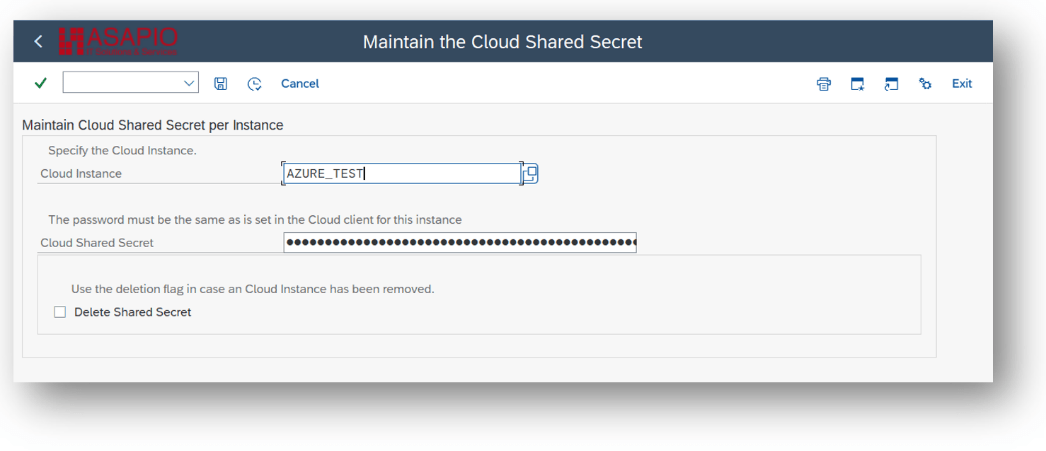
Save Secret in SAP Secure Store
For OAuth and SAS based authentications, a secret has to be stored in the systems’ SAP Secure Store. This secret is either:
- Client Secret for OAuth
- Primary Key of SAS Policy
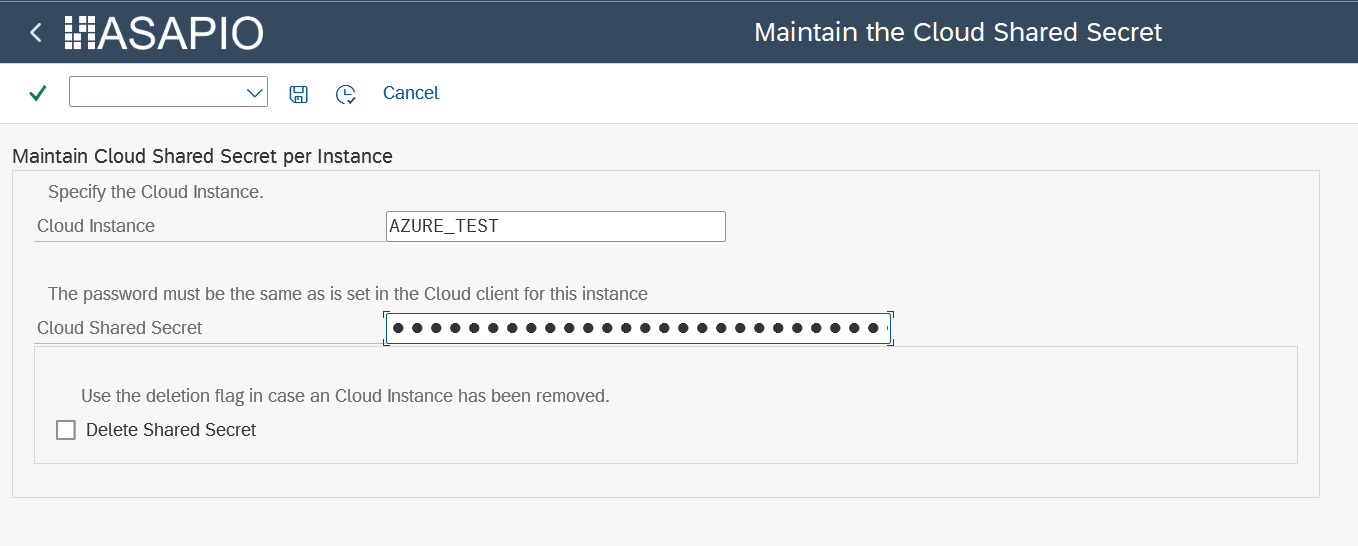
Enter the secret in the SAP Secure Store:
- Transaction: SPRO
- Goto ASAPIO Cloud Integrator – Set the cloud connection password
- Or go directly to transaction: /ASADEV/SCI_TPW
- Select the create Cloud Instance
- Enter the client secret in the Cloud Shared Secret field and execute
 Note: For authentication using Managed Identities no secret has to be stored!
Endpoint configuration
Service Bus endpoint configuration
Note: Please complete the instructions from chapters “Create RFC destinations” and “Set-up connection instance” first. There are two possibilities to set up the Service Bus endpoint:
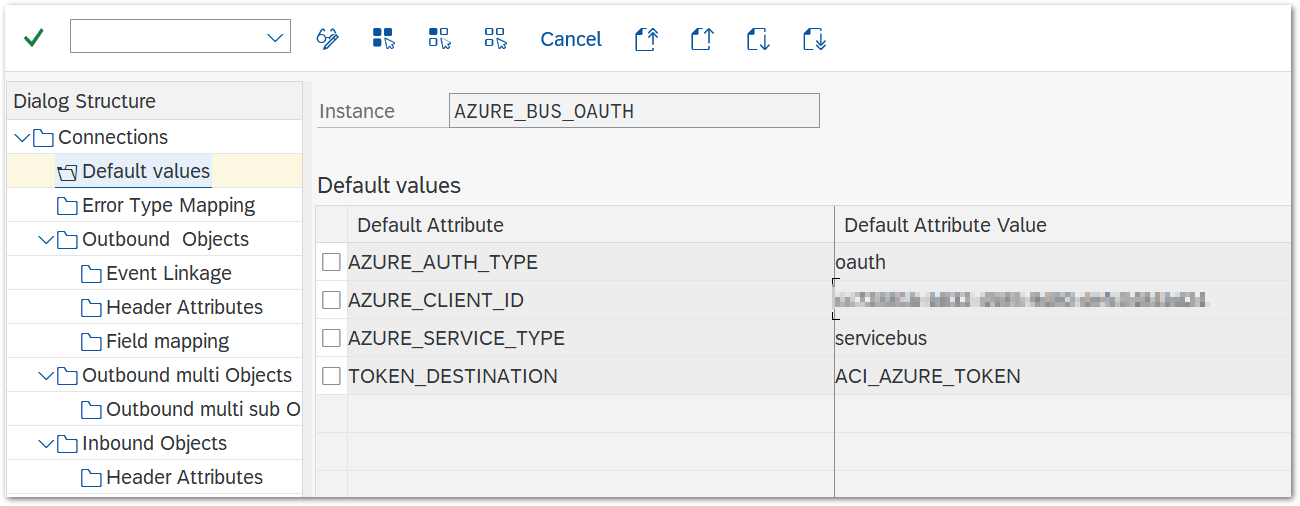
- For OAuth based authentication: add default values AZURE_AUTH_TYPE and AZURE_SERVICE_TYPE
| Default Attribute | Default Attribute Value |
| AZURE_SERVICE_TYPE | servicebus |
| AZURE_AUTH_TYPE | oauth |
| AZURE_CLIENT_ID | your client id specified in Azure |
| TOKEN_DESTINATION | RFC destination for OAuth endpoint |
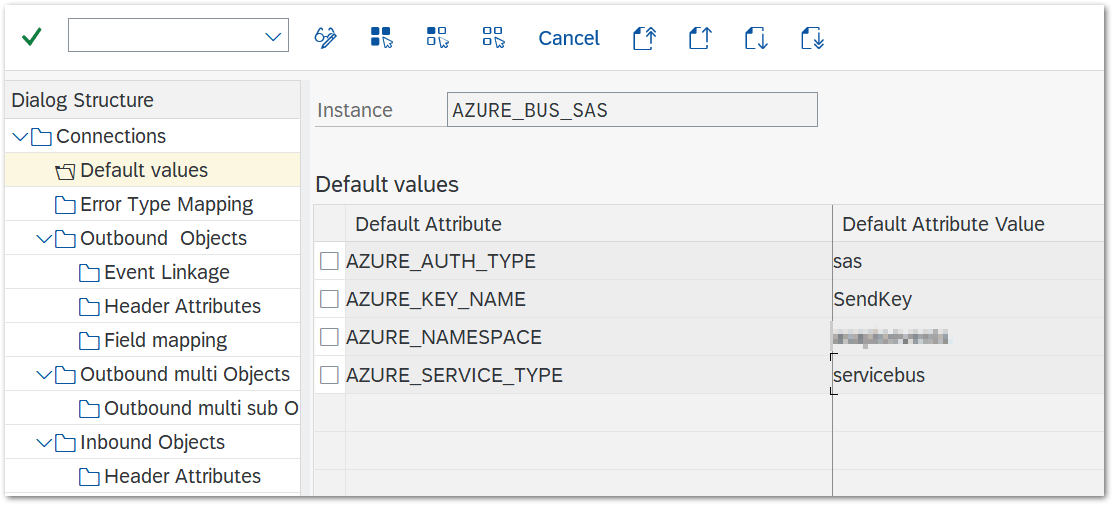
- For SAS based authentication: add default values AZURE_AUTH_TYPE and AZURE_SERVICE_TYPE
| Default Attribute | Default Attribute Value |
| AZURE_SERVICE_TYPE | servicebus |
| AZURE_AUTH_TYPE | sas |
| AZURE_KEY_NAME | the key name specified in Azure |
| AZURE_SERVICE_TYPE | servicebus |
Event Hub endpoint configuration
Note: Please complete the instructions from chapters “Create RFC destinations” and “Set-up connection instance” first. There are two possibilities to set up the Event Hub endpoint:
- For oAuth based authentication: add the default values AZURE_SERVICE_TYPE and AZURE_AUTH_TYPE
| Default Attribute | Default Attribute Value |
| AZURE_SERVICE_TYPE | eventhub |
| AZURE_AUTH_TYPE | oauth |
| AZURE_CLIENT_ID | your client id specified in Azure |
| TOKEN_DESTINATION | RFC destination for OAuth endpoint |
- For SAS based authentication: add the default values AZURE_SERVICE_TYPE and AZURE_AUTH_TYPE
| Default Attribute | Default Attribute Value |
| AZURE_SERVICE_TYPE | servicebus |
| AZURE_AUTH_TYPE | sas |
| AZURE_NAMESPACE | your Azure EventHub namespace |
| AZURE_KEY_NAME | key name specified in Azure |
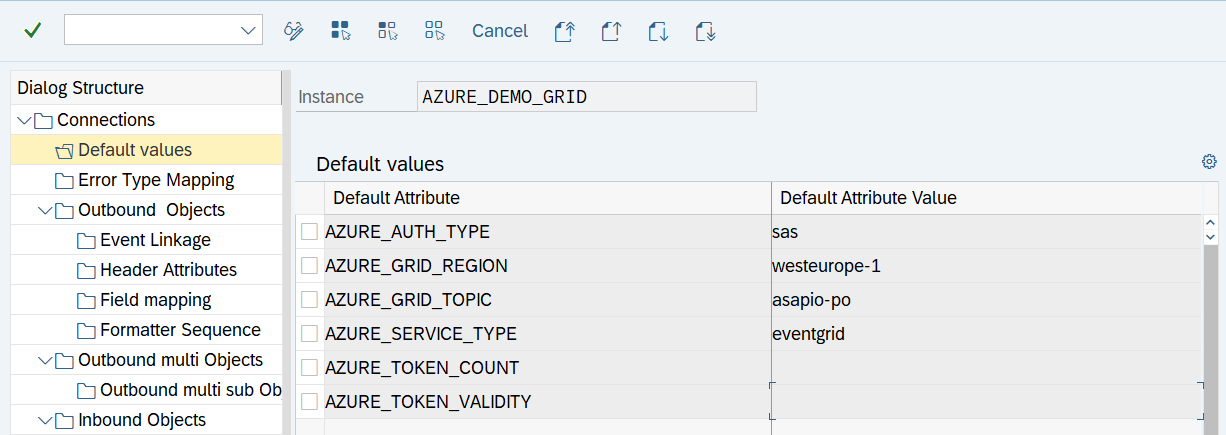
Event Grid endpoint configuration
Note: Please complete the instructions from chapters “Create RFC destinations” and “Set-up connection instance” first.
- For SAS based authentication: add default values AZURE_GRID_REGION and AZURE_GRID_TOPIC
| Default Attribute | Default Attribute Value |
| AZURE_SERVICE_TYPE | eventgrid |
| AZURE_AUTH_TYPE | sas |
| AZURE_GRID_REGION | your Azure EventGrid region (technical name) |
| AZURE_GRID_TOPIC | your Azure EventGrid topic |
Custom HTTP endpoint configuration
Note: Please complete the instructions from chapters “Create RFC destinations” and “Set-up connection instance” first. Note Only OAuth Authentication with Entra ID is supported. To use custom http endpoints, please configure the following two additional settings: Connection Default Values:
| Default Attribute | Default Attribute Value |
| AZURE_AUTH_RESOURCE | specify the resource to use in the OAuth authentication call |
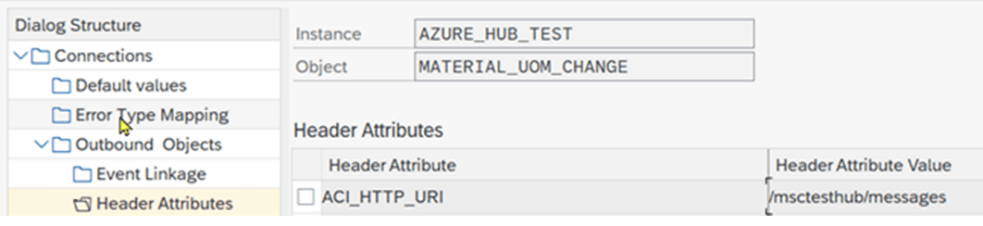
 Outbound Object Header Attributes:
| Default Attribute | Default Attribute Value |
| ACI_HTTP_URI | specify the path to send the messages to |
Data Lake Storage (ADLSgen2) configuration
Note: Please complete the instructions from chapters “Create RFC destinations” and “Set-up connection instance” first. There are two possibilities to set up the Data Lake Storage endpoint:
- For OAuth based authentication: add the default values AZURE_SERVICE_TYPE, AZURE_AUTH_TYPE and AZURE_STORAGE_ACCOUNT
| Default Attribute | Default Attribute Value |
| AZURE_SERVICE_TYPE | datalake |
| AZURE_AUTH_TYPE | oauth |
| AZURE_CLIENT_ID | your client id specified in Azure |
| TOKEN_DESTINATION | RFC destination for OAuth endpoint |
| AZURE_STORAGE_ACCOUNT | storage account |
- For SAS based authentication: add default values AZURE_AUTH_TYPE, AZURE_SERVICE_TYPE and AZURE_STORAGE_ACCOUNT
| Default Attribute | Default Attribute Value |
| AZURE_SERVICE_TYPE | datalake |
| AZURE_AUTH_TYPE | sas |
| AZURE_STORAGE_ACCOUNT | storage account |
Set-up outbound messaging
For outbound messaging, you can use and even combine the following methods:
- Simple Notifications
- Message Builder (Generic View Generator)
- IDoc capturing
- Custom-built triggers and extractors
Pre-requisite for all methods is to create a message type, which will be used throughout the configuration process. The following articles explain the individual possibilities.
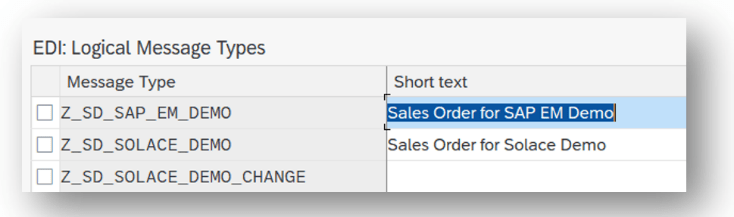
Create a new Message Type
Create Message Type
Note: In the example below, we use the Sales Order (BUS2032) event. Please use suitable data for your use-case as required. For each object to be sent via ACI you have to create a message type:
- Transaction: WE81
- Add New Entry and specify:
- Message Type: unique name for the integration
- Description: description of the purpose
Activate Message Type
- Transaction: BD50
- Add New Entry and specify:
- Message Type: the created message type
- Active: tick the checkbox

Simple Notifications
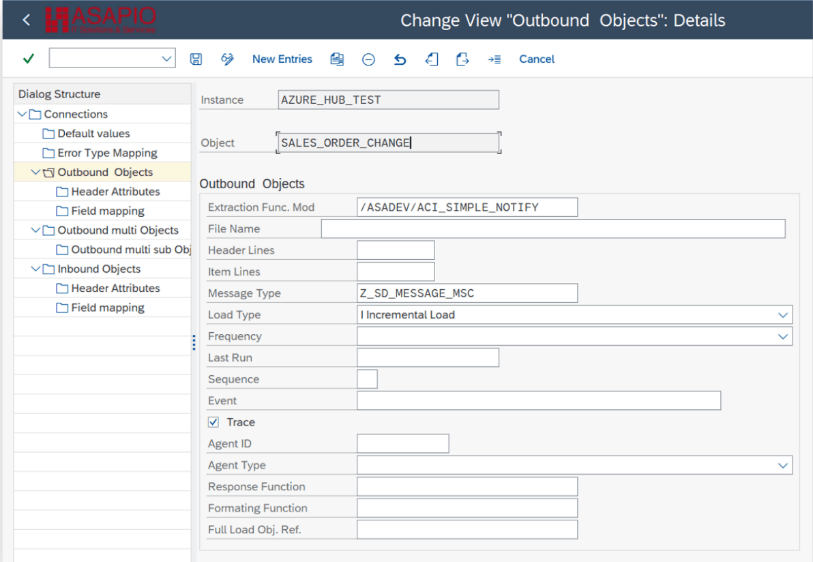
Create Outbound Object configuration
- Transaction: SPRO
- Goto ASAPIO Cloud Integrator – Connection and Replication Object Customizing
- Or go directly to transaction: /ASADEV/ACI_SETTINGS
- Select the created Connection
- Go to section Outbound Objects
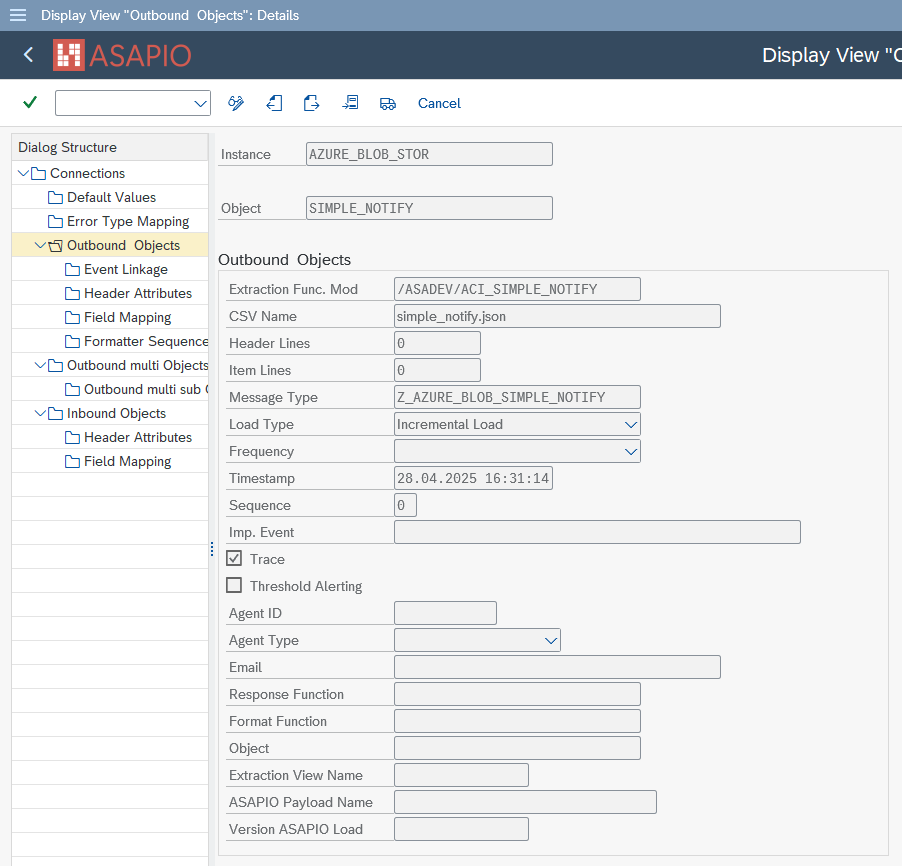
- Add New Entry and specify:
- Object: name of the outbound configuration
- Extraction Func. Module: /ASADEV/ACI_SIMPLE_NOTIFY
- Message Type: the created message type
- Load Type: Incremental Load
- Trace: activate for testing purposes
This example uses the built-in notification event.
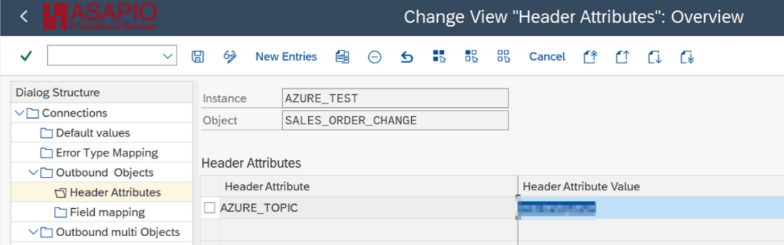
Set-up target endpoint in ‘Header Attributes’
Configure the topic / queue / event hub name to send the events to:
- Go to section Header Attributes
- Add New Entry and specify:
- Header Attribute: AZURE_TOPIC (mandatory)
- Header Attribute Value: the topic/queue/event hub
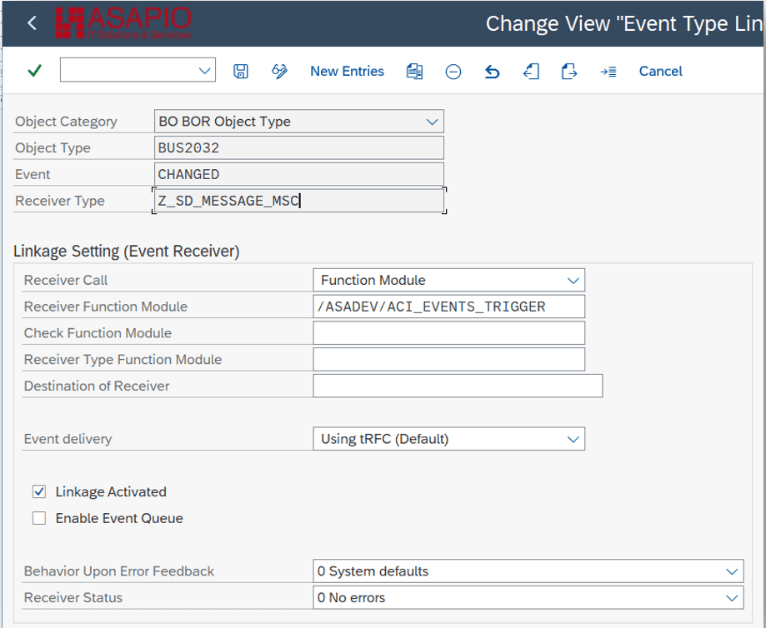
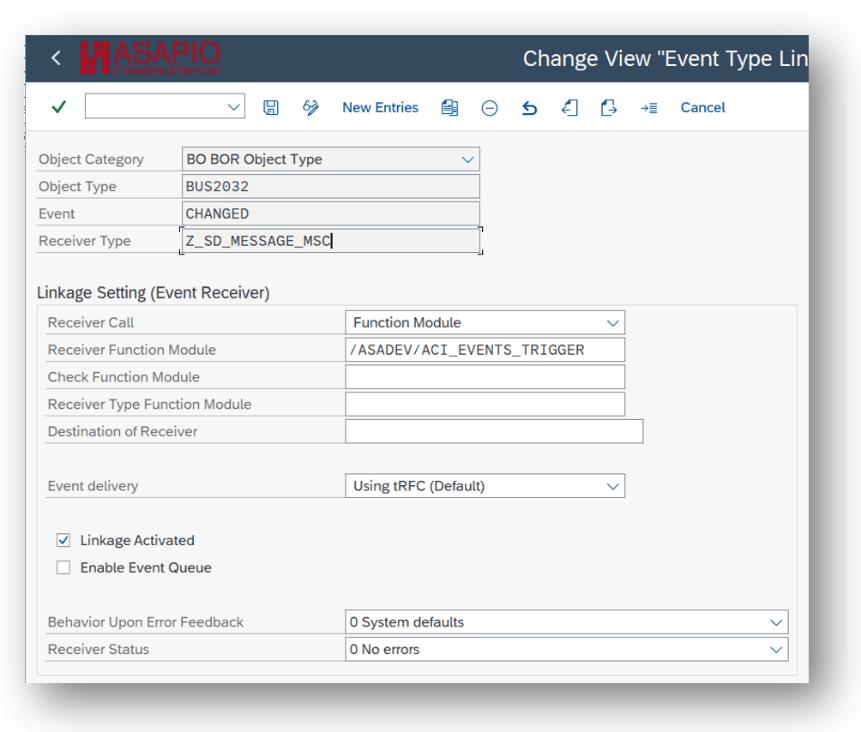
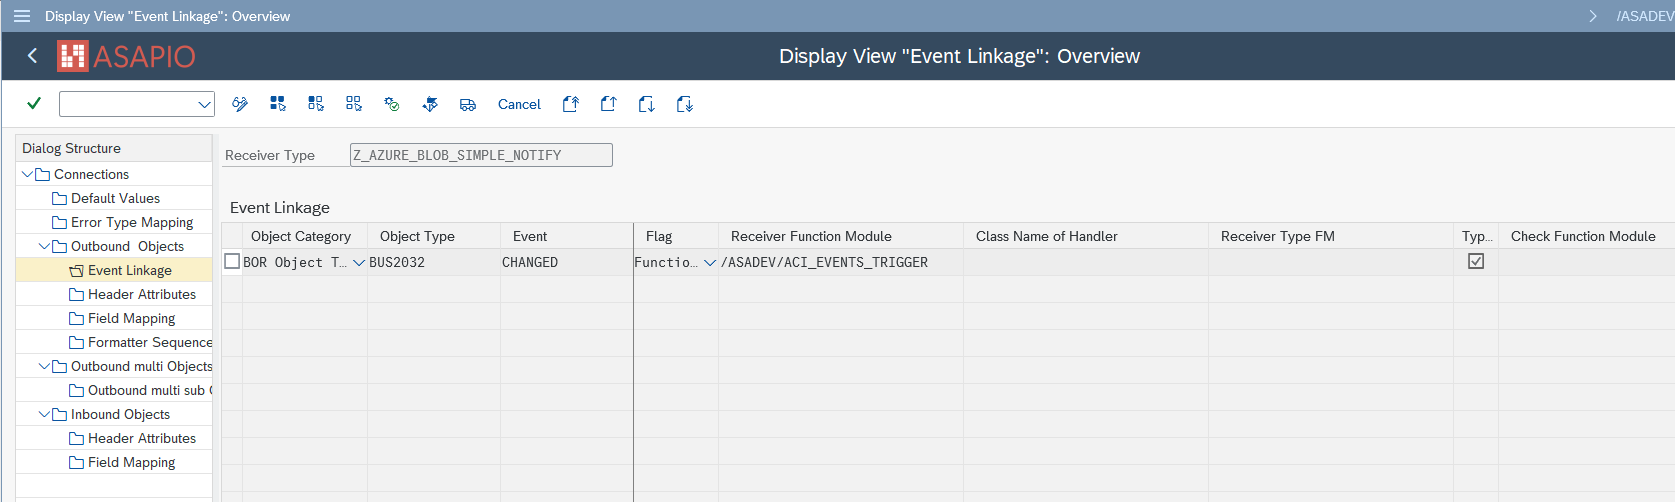
Set up ‘Business Object Event Linkage’
Link the configuration of the outbound object to a Business Object event:
- Transaction: SWE2
- Add New Entry and specify:
- Object Category: BO BOR Object Type
- Object Type: the Business Object Type sending the event
- Event: the event to react to
- Receiver Type: the message type of the outbound object (this is the link to the Addon configuration)
- Receiver Call: Function Module
- Receiver Function Module: /ASADEV/ACI_EVENTS_TRIGGER
- Linkage Activated: tick the checkbox
Test the outbound event creation
In the example above, please pick any test sales order in transaction /nVA02 and force a change event, e.g. by changing the requested delivery date on header level.
Message Builder (Generic View Extractor)
The message builder is based on database views. It can extract and format data based on the configured database view. The formatting tries to nest the data based on the used database tables.
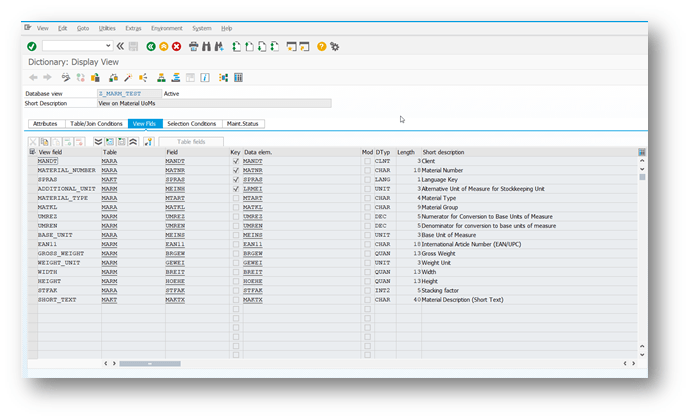
Create database view
For the data events also configure the DB view that is used to define the extraction:
- Transaction: SE11 (for SAP ERP or S/4HANA on-prem deployments with SAP GUI access)
- Alternatively, you can use Eclipse with ABAP Development Tools, or the SAP Fiori App “Create Custom CDS Views” to create a database view if you have this app available in SAP S/4HANA.
Example: Material master view (e.g. to be used for Material Master (BUS1001) change events)

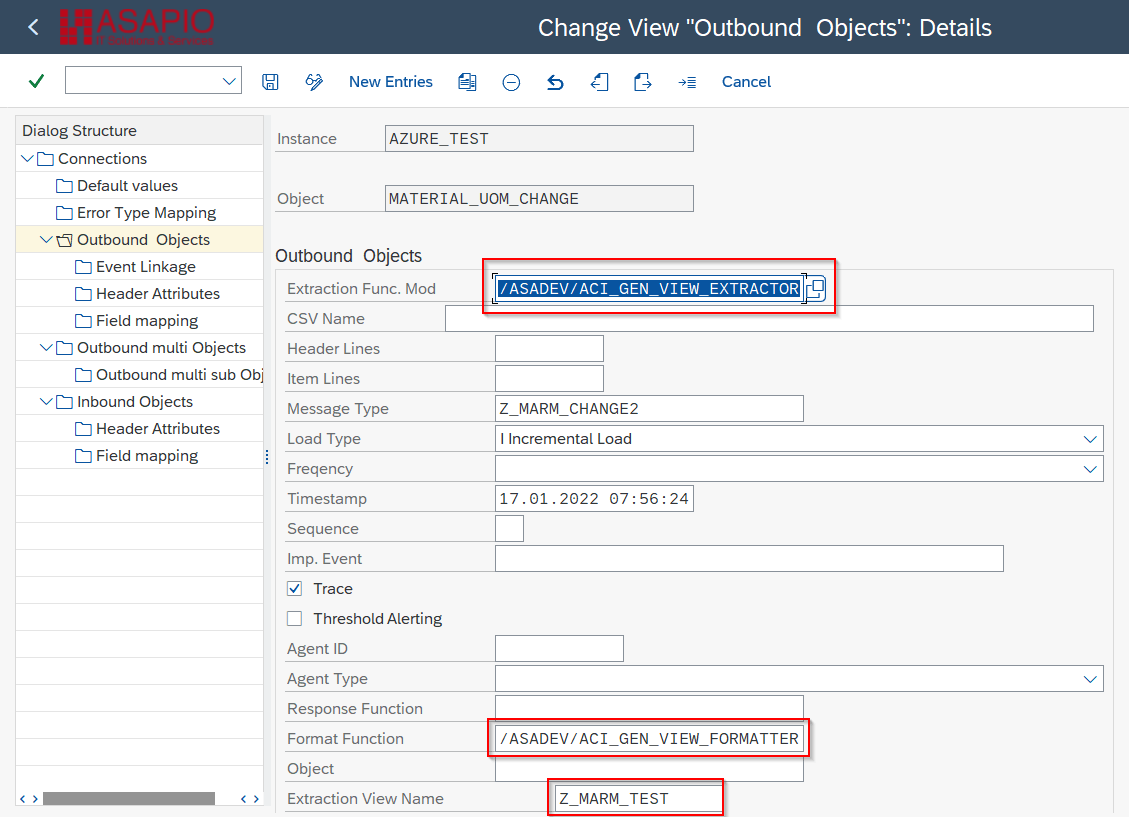
Create Outbound Object configuration
- Transaction: SPRO
- Goto ASAPIO Cloud Integrator – Connection and Replication Object Customizing
- Or go directly to transaction: /ASADEV/ACI_SETTINGS
- Select the created Connection
- Go to section Outbound Objects
- Add New Entry and specify:
- Object: name of the outbound configuration
- Extraction Func. Module: /ASADEV/ACI_GEN_VIEW_EXTRACTOR
- CSV Name (optional for Blob Storage): Defines the prefix of the file name used when writing data to Azure Blob Storage. The final file name is composed of the configured CSV Name, a timestamp, and a unique identifier, e.g.: Sales_Order_20260624_111339_c30d9bIf left empty, a default name is generated automatically.
- Message Type: the created message type
- Load Type: Incremental Load
- Trace: activate for testing purposes
- Formatting Function: /ASADEV/ACI_GEN_VIEW_FORMATTER
- Extraction View Name: name of the DB view
Set-up ‘Header Attributes’
Configure the topic / queue / event hub name to send the events to:
- Go to section Header Attributes
- Add New Entry and specify the header attributes and values
Please note the header attributes are endpoint/platform specific. Here are examples:
| Header attribute | Header attribute value | Example | required for Connector |
|---|---|---|---|
| AZURE_TOPIC | the topic/queue/event hub | MaterialMaster | Microsoft Azure |
| ACI_ADD_LOGSYS | To add the logical system to the top level of the payload. Only works for the generic view extractors / formatters | X | All connectors – optional |
| AZURE_IMMEDIATE_RETRY | Amount of retries – default is 2 | 4 | Microsoft Azure – optional |
| AZURE_CONTAINER | the container name | SalesOrderContainer | Microsoft Azure (only for Data Lake Storage) |

Set up ‘Business Object Event Linkage’
Link the configuration of the outbound object to a Business Object event:
- Transaction: SWE2
- Add New Entry and specify:
- Object Category: BO BOR Object Type
- Object Type: the Business Object Type sending the event
- Event: the event to react to
- Receiver Type: the message type of the outbound object (this is the link to the Addon configuration)
- Receiver Call: Function Module
- Receiver Function Module: /ASADEV/ACI_EVENTS_TRIGGER
- Linkage Activated: tick the checkbox
Test the outbound event creation
In the example above, please pick any test sales order in transaction /nVA02 and force a change event, e.g. by changing the requested delivery date on header level.
Configure Payload changes
The new versions of the generic view formatters support more control over the payload via configuration. There are three different possibilities:
- Rename table: renaming for the tables involved
- Rename field: better and more JSON friendly names for the fields
- Append a new field: e.g. a custom computed field or some additional fixed values
Each option is described below. To rename a table you:
- Go to Field Mapping, add New Entry and specify:
- Target structure: TABLE_RENAME
- Target field: the new name as it should appear in the JSON (e.g. MaterialMaster)
- Source structure: the original name of the table (e.g. MARA)
 To rename a field you:
- Go to Field Mapping, add New Entry and specify:
- Target structure: FIELD_RENAME
- Target field: the new name as it should appear in the JSON (e.g. ChangeDate)
- Source field: the original name of the field (e.g. ERSDA)
 To append a new field you:
- Go to Field Mapping, add New Entry and specify:
- Target structure: APPEND_<tablename> (e.g. APPEND_MAKT); the table name is used to determine the level where the new field is added to the JSON
- Target field: the name of the field as it should appear in the JSON (e.g. CustomField)
- Default value: if the field should be set to a fixed value
- Conversion class/method name: name of a class and method used to determine the value of the field; the class must implement interface /ASADEV/ACI_CONVER_IF

Set-up Packed Load (split large data)
Create Outbound Object configuration
- Transaction: SPRO
- Goto ASAPIO Cloud Integrator – Connection and Replication Object Customizing
- Or go directly to transaction: /ASADEV/ACI_SETTINGS
- Select the created Connection
- Go to section Outbound Objects
- Add New Entry and specify:
- Object: name of the outbound configuration
- Extraction Func. Module: /ASADEV/ACI_GEN_VIEW_EXT_PACK
- Message Type: the created message type(optional)
- Load Type: Packed Load
- Trace: activate for testing purposes
- Formatting Function: /ASADEV/ACI_GEN_VIEW_FORMATTER (depending on your use case)
Create database view
Note Please also refer to chapter 4.6.3.1 For the data events also configure the DB view that is used to define the extraction:
- Transaction: SE11 (for SAP ERP or S/4HANA on-prem deployments with SAP GUI access)
- Alternatively, you can use Eclipse with ABAP Development Tools, or the SAP Fiori App “Create Custom CDS Views” to create a database view if you have this app available in SAP S/4HANA.
Example: Material master view
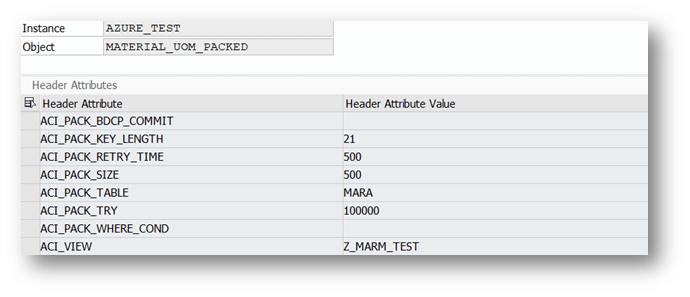
Set-up ‘Header Attributes’
- Go to section Header Attributes of the outbound object created previously
- Add New Entry and specify the header attributes and values
| Header attribute | Header attribute value | Example |
|---|---|---|
| ACI_PACK_BDCP_COMMIT | Flag for changepointer creation. If set, changepointers will be generated for every entry. IF this flag is set, a messagetype has to be maintained in the outbound object. Caution: This may heavily impact performance. | X |
| ACI_PACK_TABLE | Name of the table to take the keyfields from. This is typically different then the db view specified in ‘ACI_VIEW‘ as we only want to build packages based on the header object and the db view typically contains sub-objects as well | MARA |
| ACI_PACK_RETRY_TIME | Time in seconds. This is the duration in which the framework will attempt to get a new resource from the servergroup | 300 |
| ACI_PACK_WHERE_COND | Condition that is applied to the table defined in ‘ACI_PACK_TABLE‘ | |
| ACI_PACK_SIZE | Number of entries to send | 500 |
| ACI_PACK_KEY_LENGTH | Length of the key to use from the ACI_PACK_TABLE (e.g. MANDT + MATNR) | 13 |
| ACI_VIEW | name of a SAP database view that is key compatible with the ACI_PACK_TABLE | Z_MARM_TEST |
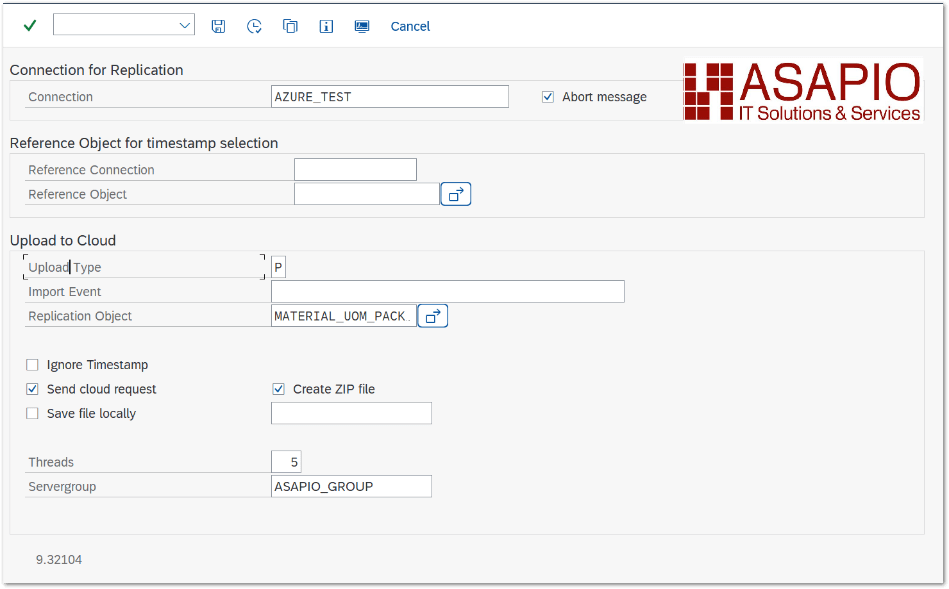
Execute the initial load
Warning depending on the amount of data this can stress the SAP system servers immensely. Please always consult with your basis team for the correct server group to use!
- Transaction: /ASADEV/ACI
- Select the Connection and hit enter
- Select Upload Type: P
- Select Replication Object
- Select a Servergroup (this is mandatory)
Payload Offloading for Azure Service Bus
With Payload Offloading enables you to manage payloads that is larger than the current Service Bus limit of 256 KB for the Standard tier, and 1 MB for the Premium tier and up to a maximum of 2 GiB. This is made possible by offloading the data to Blob Storage. Service Bus then only receives a reference to where the payload was stored.
This feature is new with release 2504 (9.32504)
The payload offloading currently supports the following authorization variants between Service Bus and Blob Storage:
| Service Bus | Blob Storage | Comment |
| OAuth 2.0 | OAuth 2.0 | same service principal |
| OAuth 2.0 | OAuth 2.0 | different service principal |
| OAuth 2.0 | Shared Access Signature (SAS) | |
| Shared Access Signature (SAS) | OAuth 2.0 | |
| Shared Access Signature (SAS) | Shared Access Signature (SAS) | different service principal |
Configuration
If you have decided on one of the above authentication options, this will result in different configurations.
Create RFC destination for Blob Storage endpoint
Create a new RFC destination of type “G” (HTTP Connection to External Server).
- Transaction: SM59
- Create new destination of type “G”
- Specify Target Host: endpoint of the service to connect to

OAuth 2.0 with same service principal
The configuration in the instance remains the same for the normal OAuth 2.0 for Service Bus. Only the header attributes in the object need to be adjusted.
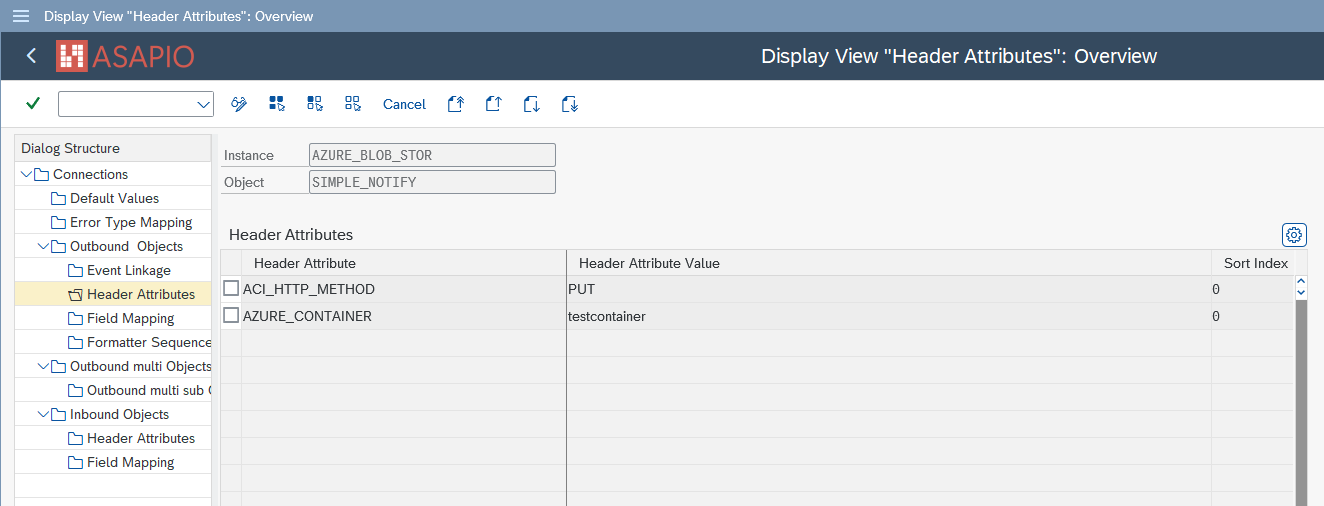
Header Attributes:
| Header Attribute | Header Attribute Value | Example |
|---|---|---|
| AZURE_CONTAINER | <name of container> | testcontainer |
| AZURE_PAYLOAD_OFFLOADING | X | X |
| AZURE_PAYLOAD_OFFLOADING_SIZE | <Threshold value for offloading in bytes> | 265 |
| AZURE_STORAGE_ACCOUNT | <name of storage account> | teststorage |
| AZURE_STORAGE_DESTINATION | <RFC destination for Managed Blob Storage endpoint> | |
| AZURE_TOPIC | <service bus queue or topic> | testqueue |
OAuth 2.0 with different service principal
The configuration in the instance remains the same for the normal OAuth 2.0 for Service Bus. The header attributes in the object must be adjusted and an additional instance created for the Blob Storage Endpoint.
Set-up Blob Storage instance
Create the connection instance customizing that ties together the RFC destination created earlier.
- Transaction: SPRO
- Goto ASAPIO Cloud Integrator – Connection and Replication Object Customizing
- Or go directly to transaction: /ASADEV/ACI_SETTINGS
- Add New Entry and specify:
- Field Instance: a name for this connection in
- Field RFC Dest. (Upload): the RFC destination created for the messaging endpoint

The client secret of OAuth 2.0 can you configure in SAP Secure Store: https://asapio.com/docs/connectors/azure/#save_secret_in_sap_secure_store
Set-up Default Values
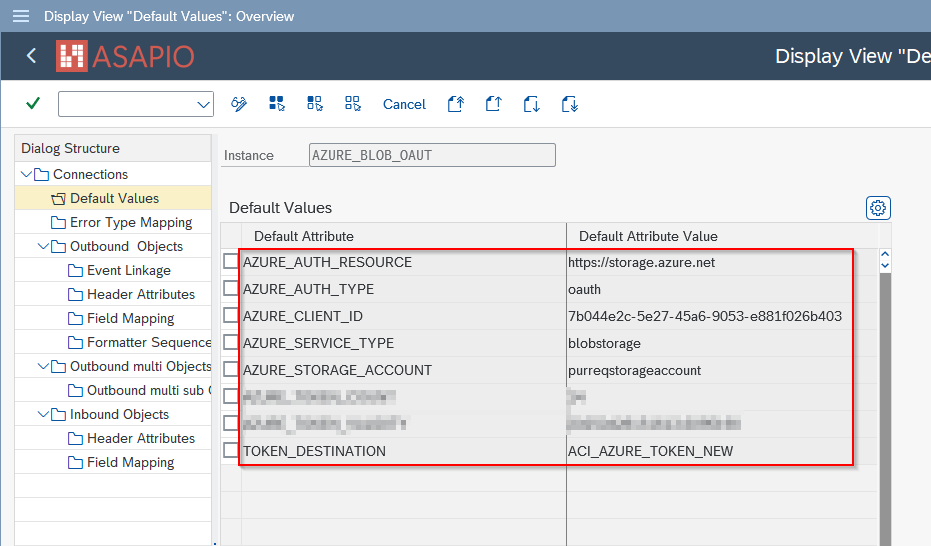
For OAuth 2.0, the following default values must be configured in the instance for the blob storage:
Default Values
| Default Attribute | Default Attribute Value |
|---|---|
| AZURE_AUTH_RESOURCE | https://storage.azure.net |
| AZURE_AUTH_TYPE | oauth |
| AZURE_CLIENT_ID | <client id of service principal> |
| AZURE_SERVICE_TYPE | blobstorage |
| AZURE_STORAGE_ACCOUNT | <storage account name> |
| TOKEN_DESTINATION | <rfc destination for token endpoint> |
Set-up Header Attributes on Service Bus object
The configuration in the instance remains the same for the normal OAuth 2.0 for Service Bus. Only the header attributes in the object need to be adjusted.
Header Attributes:
| Header Attribute | Header Attribute Value | Example |
|---|---|---|
| AZURE_CONTAINER | <name of container> | testcontainer |
| AZURE_PAYLOAD_OFFLOADING | X | X |
| AZURE_PAYLOAD_OFFLOADING_SIZE | <Threshold value for offloading in bytes> | 265 |
| AZURE_STORAGE_ACCOUNT | <name of storage account> | teststorage |
| AUTH_INSTANCE | <instance for blob storage endpoint> | |
| AZURE_TOPIC | <service bus queue or topic> | /testqueue |
Service Bus and Blob Storage have different authentication methods
A separate instance must always be created for the configuration of different authentication methods.
Set-up Blob Storage instance
Create the connection instance customizing that ties together the RFC destination created earlier.
- Transaction: SPRO
- Goto ASAPIO Cloud Integrator – Connection and Replication Object Customizing
- Or go directly to transaction: /ASADEV/ACI_SETTINGS
- Add New Entry and specify:
- Field Instance: a name for this connection in
- Field RFC Dest. (Upload): the RFC destination created for the messaging endpoint
The primary key of SAS or client secret of OAuth 2.0 can you configure in SAP Secure Store: https://asapio.com/docs/connectors/azure/#save_secret_in_sap_secure_store
Set-up Default Values for OAuth 2.0
For OAuth 2.0, the following default values must be configured in the instance for the blob storage:
Default Values
| Default Attribute | Default Attribute Value |
|---|---|
| AZURE_AUTH_RESOURCE | https://storage.azure.net |
| AZURE_AUTH_TYPE | oauth |
| AZURE_CLIENT_ID | <client id of service principal> |
| AZURE_SERVICE_TYPE | blobstorage |
| AZURE_STORAGE_ACCOUNT | <storage account name> |
| TOKEN_DESTINATION | <rfc destination for token endpoint> |
Set-up Default Values for Shared Access Signature (SAS)
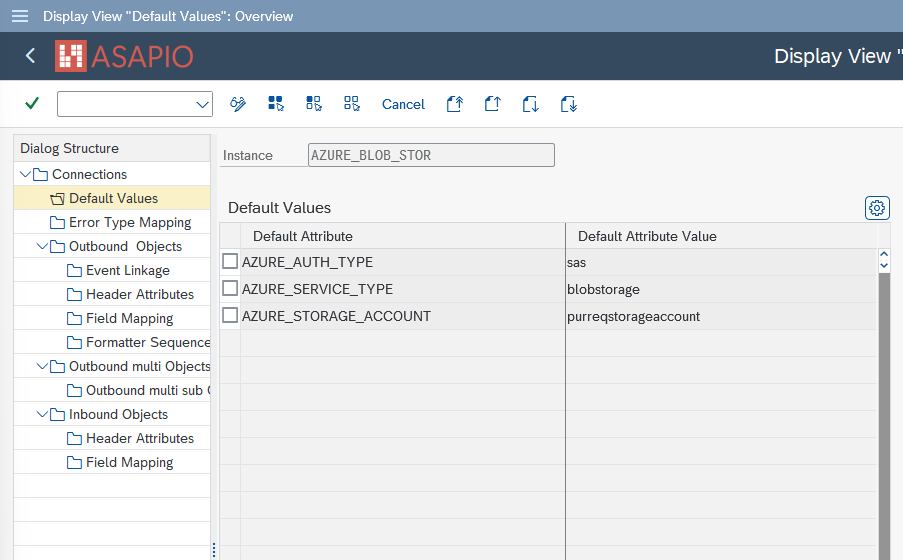
For Shared Access Signature (SAS), the following default values must be configured in the instance for the blob storage:
Default Values
| Default Attribute | Default Attribute Value |
|---|---|
| AZURE_AUTH_TYPE | sas |
| AZURE_SERVICE_TYPE | blobstorage |
| AZURE_STORAGE_ACCOUNT | <storage account name> |
Set-up Header Attributes on Service Bus object
The configuration in the instance remains the same for both authentication methods:
Header Attributes:
| Default Attribute | Default Attribute Value | Example |
|---|---|---|
| AUTH_INSTANCE | <blob storage instance> | AZURE_BLOB_OAUT |
| AZURE_CONTAINER | <blob storage container> | testcontainer |
| AZURE_PAYLOAD_OFFLOADING | X | X |
| AZURE_PAYLOAD_OFFLOADING_SIZE | <Threshold value for offloading in bytes> | 256 |
| AZURE_STORAGE_ACCOUNT | <storage account name> | testcontainer |
| AZURE_TOPIC | <service bus queue or topic> | /testtopic |
Shared Access Signature (SAS) for both services
Die Konfiguration bei der Verwendung von Shared Access Signature (SAS) hat keine großen unterschiede zu der mit OAuth 2.0
Set-up Blob Storage instance
Create the connection instance customizing that ties together the RFC destination created earlier.
- Transaction: SPRO
- Goto ASAPIO Cloud Integrator – Connection and Replication Object Customizing
- Or go directly to transaction: /ASADEV/ACI_SETTINGS
- Add New Entry and specify:
- Field Instance: a name for this connection in
- Field RFC Dest. (Upload): the RFC destination created for the messaging endpoint
The primary key of SAS can you configure in SAP Secure Store: https://asapio.com/docs/connectors/azure/#save_secret_in_sap_secure_store
Set-up Default Values for Shared Access Signature (SAS)
For Shared Access Signature (SAS), the following default values must be configured in the instance for the blob storage:
Default Values
| Default Attribute | Default Attribute Value |
|---|---|
| AZURE_AUTH_RESOURCE | https://storage.azure.net |
| AZURE_AUTH_TYPE | sas |
| AZURE_STORAGE_ACCOUNT | <storage account name> |
Set-up Header Attributes on Service Bus object
The configuration in the instance for Shared Access Signature (SAS) on Service Bus object:
Header Attributes:
| Default Attribute | Default Attribute Value | Example |
|---|---|---|
| AUTH_INSTANCE | <blob storage instance> | AZURE_BLOB_SAS |
| AZURE_CONTAINER | <blob storage container> | testcontainer |
| AZURE_PAYLOAD_OFFLOADING | X | X |
| AZURE_PAYLOAD_OFFLOADING_SIZE | <Threshold value for offloading in bytes> | 256 |
| AZURE_STORAGE_ACCOUNT | <storage account name> | testcontainer |
| AZURE_TOPIC | <service bus queue or topic> | /testtopic |
Pull-based inbound processing for Azure Service Bus
Inbound messages can be received using an Azure Service Bus queue. The messages are read from the queue using the Peek-Lock mechanism. After the message has been read and processed successfully it is deleted from the queue. This is repeated until all messages in the queue have been processed and the queue is empty. To process the inbound messages, you can use either the generic IDoc based approach as displayed in the example or you can directly process the payload.
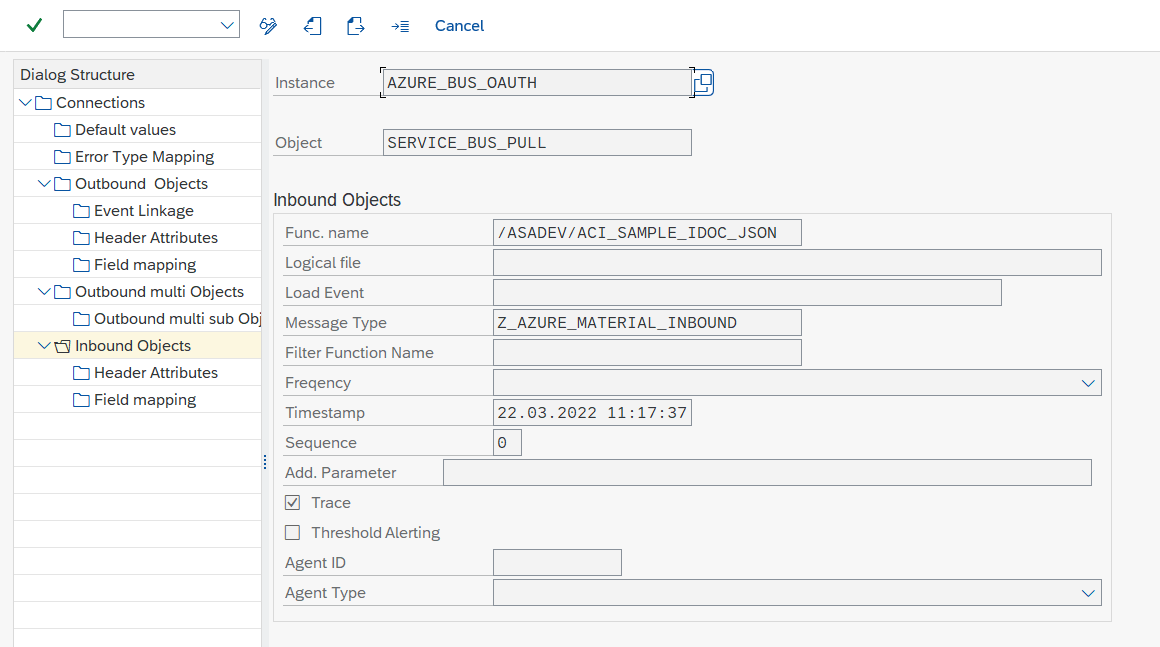
Create Inbound Object configuration
- Transaction: SPRO
- Go to ASAPIO Cloud Integrator – Connection and Replication Object Customizing
- Or go directly to transaction: /ASADEV/68000202
- Select the Connection to your Azure Service Bus
- Go to section Inbound Objects
- Add New Entry and specify:
- Object: name of the inbound configuration
- Func. name: /ASADEV/ACI_SAMPLE_IDOC_JSON
- Message Type: the created message type
- Trace: activate for testing purposes
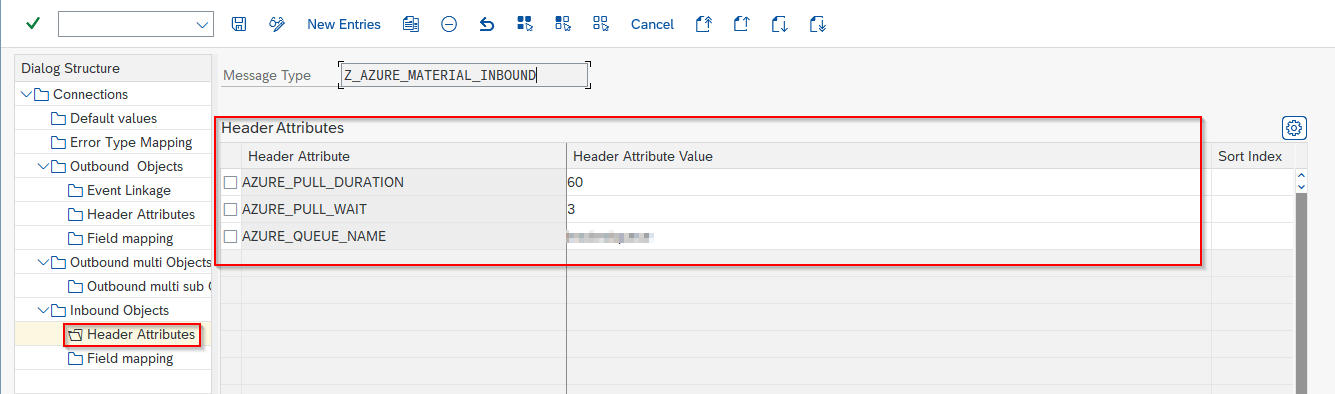
Configure Header Attributes
Configure the queue name to pull the messages from and settings for the polling:
- Go to section Header Attributes
- Add New Entry and specify:
- Header Attribute: AZURE_QUEUE_NAME
- Header Attribute Value: the queue name from which to pull messages
| Default Attribute | Default Attribute Value |
| AZURE_QUEUE_NAME | Queue to pull messages from; Mandatory |
| AZURE_PULL_DURATION | Duration of the polling in seconds (default: 60 secs) |
| AZURE_PULL_WAIT | How long to wait (in seconds) between pulls if no new messages present (default 3 secs) |
Creating a Datapipeline between Azure Blob and Data Bricks
Azure Blob Storage
Azure Blob Storage is a cloud-based storage service used for storing large amounts of unstructured data, such as text or binary data. These files are uploaded to Azure Blob Storage and act as the data source for our pipeline.
Databricks and the Need for a Notebook
Databricks is a cloud-based data processing platform that allows us to read, process, and store data efficiently. The Databricks Notebook is used to automate the process of:
-
Fetching data from Azure Blob Storage
-
Processing and transforming the data into a structured format
-
Storing the data in a Delta Table for further analysis
Why Do We Need This Connection?
The connection between Azure Blob Storage and Databricks is essential because:
-
Automates Data Processing – Instead of manually handling files, the notebook processes data automatically.
-
Ensures Data Consistency – The Delta Table format ensures data accuracy and reliability.
-
Supports Future Analysis – The processed data can be used for analytics, reporting, and machine learning.
This setup creates a seamless workflow where raw data stored in Azure Blob Storage is cleaned, structured, and stored efficiently using Databricks.oud.
Getting started
If your scenario requires a connection between your SAP system and Microsoft Azure, set that up first.
If it’s not needed, skip ahead to “Create an Azure Databricks workspace via Azure Marketplace”.
Create Connection between SAP and Azure
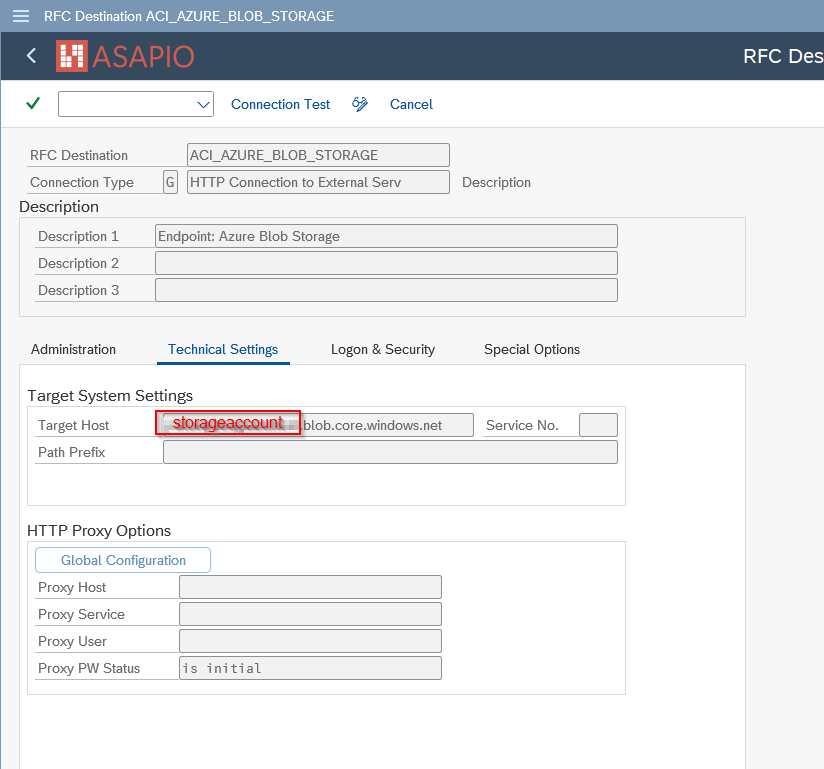
Create RFC destiantion for messaging endpoints
Create a new RFC destination of type “G” (HTTP Connection to External Server).
-
Transaction: SM59
-
Create new destination of type “G”
-
Specify Target Host: endpoint for storageaccount
Create RFC destination for OAuth Authentication (optional)
To use OAuth authentication with Entra ID, please configure a RFC destination specifying the OAuth endpoint
-
Transaction: SM59
-
Create new destination of type “G”
-
Specify Target Host: login.microsoftonline.com
-
Specify Path Prefix: <tenantID>/oauth2/token
Note: <tenantID> is the client id of the Entra ID, please find it at https://portal.azure.com/#blade/Microsoft_AAD_IAM/ActiveDirectoryMenuBlade/Properties
Add the certificates for the created destinations to the certificate list selected in tab Logon & Security:
Add Certificates to Trust Store
-
Transaction: STRUST
-
Select Certificate List as used in RFC destination created above
-
Click button Import certificate (1)
-
Click button Add to Certificate List (2)
Set-up connection instance
Create the connection instance customizing that ties together the RFC destination created earlier and the cloud connector type:
-
Transaction: SPRO
-
Goto ASAPIO Cloud Integrator – Connection and Replication Object Customizing
-
Or go directly to transaction: /ASADEV/68000202
-
Add New Entry and specify:
-
Field Instance: a name for this connection in
-
Field RFC Dest. (Upload): the RFC destination create for the messaging endpoint
-
Field ISO Code: the code page to use
-
Field Cloud Type: AZURE (or the name you chose when adding the connector)
-

Set-up Error Type Mapping
Create an entry in section Error Type Mapping and specify at least the following mapping:
|
Resp. Code |
Message Type |
|---|---|
|
201 |
Success |
Set-up Authentication
Please specify the desired authentication scheme to be used, in the connection data. You can choose from
-
OAuth using Entra ID
-
Shared Access Signatures (SAS)
OAuth using Entra ID
For OAuth based authentication using Entra ID, provide these values:
|
Default Attribute |
Default Attribute Value |
|---|---|
|
AZURE_AUTH_RESOURCE |
|
|
AZURE_AUTH_TYPE |
oauth |
|
AZURE_CLIENT_ID |
<tenant id> |
|
AZURE_SERVICE_TYPE |
blobstorage |
|
AZURE_STORAGE_ACCOUNT |
<name of storageaccount> |
|
TOKEN_DESTINATION |
<rfc destination of token endpoint> |
Shared access signatures (SAS)
For SAS based authentication, provide these values:
|
Default Attribute |
Default Attribute Value |
|---|---|
|
AZURE_AUTH_TYPE |
sas |
|
AZURE_SERVICE_TYPE |
blobstorage |
|
AZURE_STORAGE_ACCOUNT |
<name of storageaccount> |
Save Secret in SAP Secure Store
For OAuth and SAS based authentications, a secret has to be stored in the systems’ SAP Secure Store. This secret is either:
-
Client Secret for OAuth
-
Primary Key of SAS Policy
Enter the secret in the SAP Secure Store:
-
Transaction: SPRO
-
Goto ASAPIO Cloud Integrator – Set the cloud connection password
-
Or go directly to transaction: /ASADEV/SCI_TPW
-
Select the create Cloud Instance
-
Enter the client secret in the Cloud Shared Secret field and execute
Set-up outbound messaging
Simple Notification
Create Outbound Object configuration
-
Transaction: SPRO
-
Goto ASAPIO Cloud Integrator – Connection and Replication Object Customizing
-
Or go directly to transaction: /ASADEV/68000202
-
Select the created Connection
-
Go to section Outbound Objects
-
Add New Entry and specify:
-
Object: name of the outbound configuration
-
Extraction Func. Module: /ASADEV/ACI_SIMPLE_NOTIFY
-
Message Type: the created message type
-
Load Type: Incremental Load
-
Trace: activate for testing purposes
-
This example uses the built-in notification event.
Set-up target endpoint in ‘Header Attributes’
Configure the topic / queue / event hub name to send the events to:
-
Go to section Header Attributes
-
Add New Entry and specify:
|
Header Attribute |
Header Attribute Value |
|---|---|
|
ACI_HTTP_METHOD |
PUT |
|
AZURE_CONTAINER |
<your blob container> |
Set up ‘Business Object Event Linkage’
Link the configuration of the outbound object to a Business Object event:
-
Transaction: SWE2
-
Add New Entry and specify:
-
Object Category: BO BOR Object Type
-
Object Type: the Business Object Type sending the event
-
Event: the event to react to
-
Receiver Type: the message type of the outbound object (this is the link to the Addon configuration)
-
Receiver Call: Function Module
-
Receiver Function Module: /ASADEV/ACI_EVENTS_TRIGGER
-
Linkage Activated: tick the checkbox
-
Test the outbound event creation
In the example above, please pick any test sales order in transaction /nVA02 and force a change event, e.g. by changing the requested delivery date on header level.
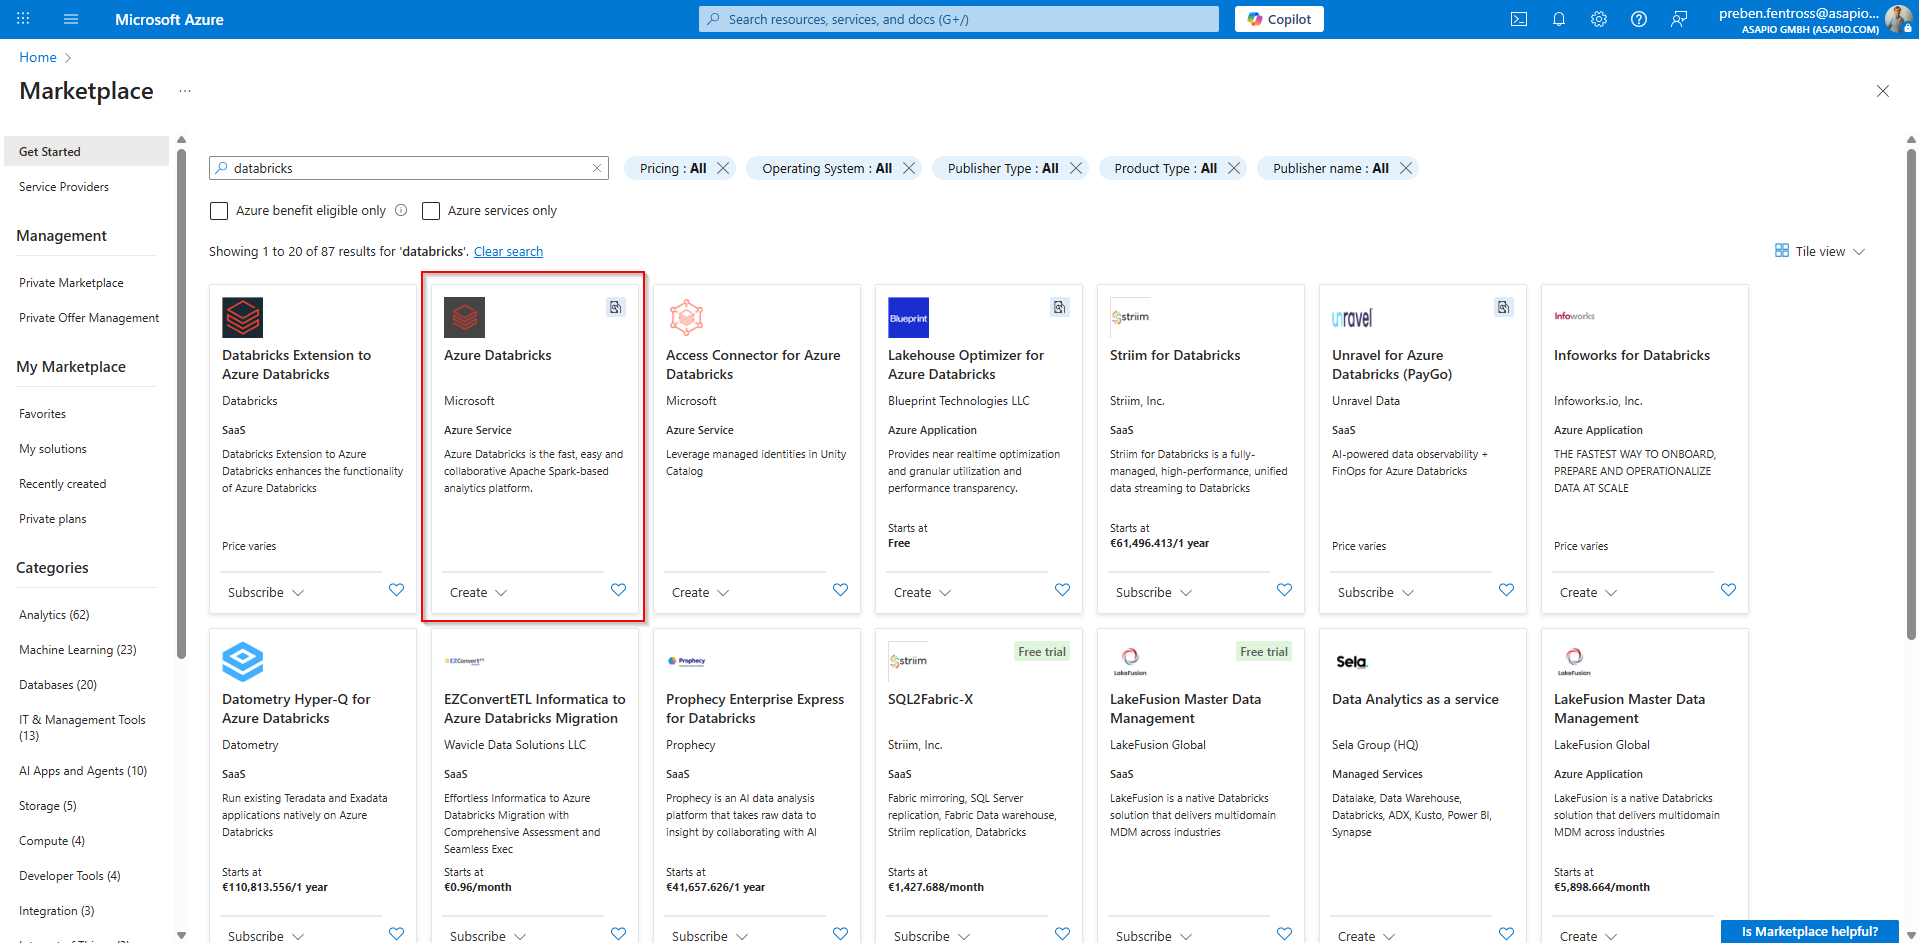
Create an Azure Databricks workspace via Azure Marketplace
-
In the Azure portal, open Marketplace.
-
Search for Azure Databricks and select the appropriate offering.
-
Choose the correct Subscription and Plan for your environment.
-
(Optional but recommended) Pick a Resource group and Region that meet your policies.
-
Select Create to deploy the workspace.
If you run into any issues setting up the storage account and containers, see the Azure Storage documentation. Create an Azure storage account – Azure Storage | Microsoft Learn
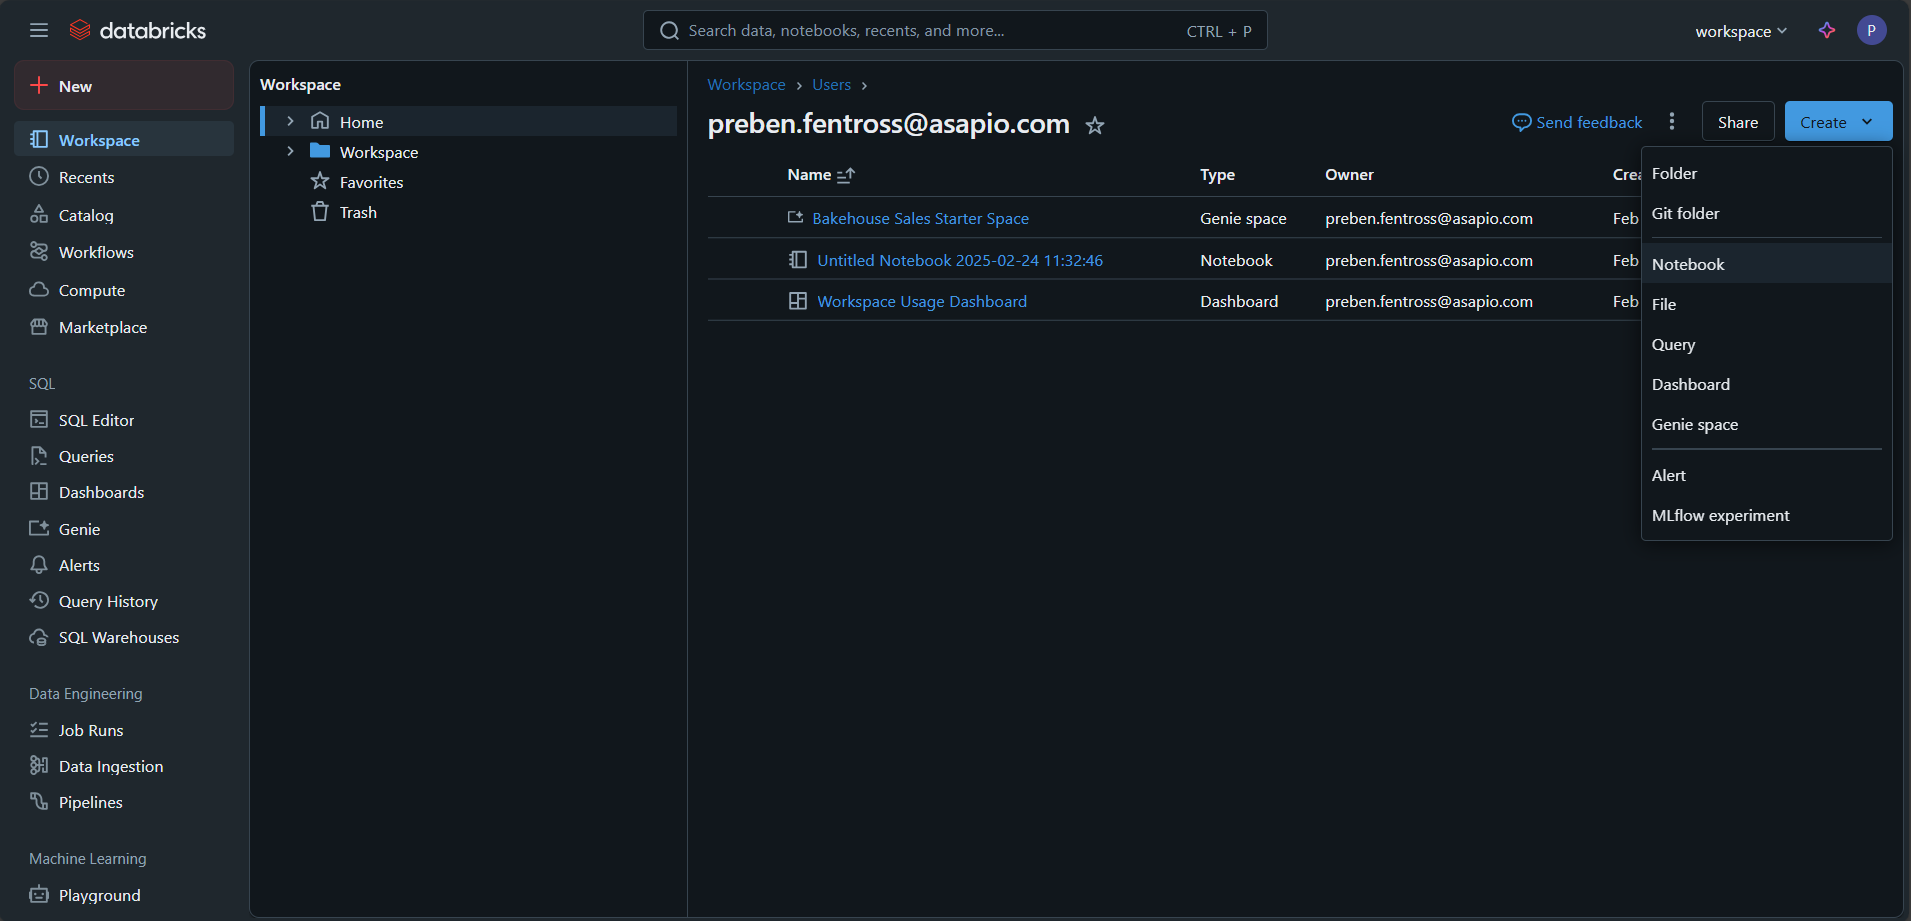
Set-up a Notebook on Databricks
-
Go to workspace
-
Go to Compute and create a new compute Cluster
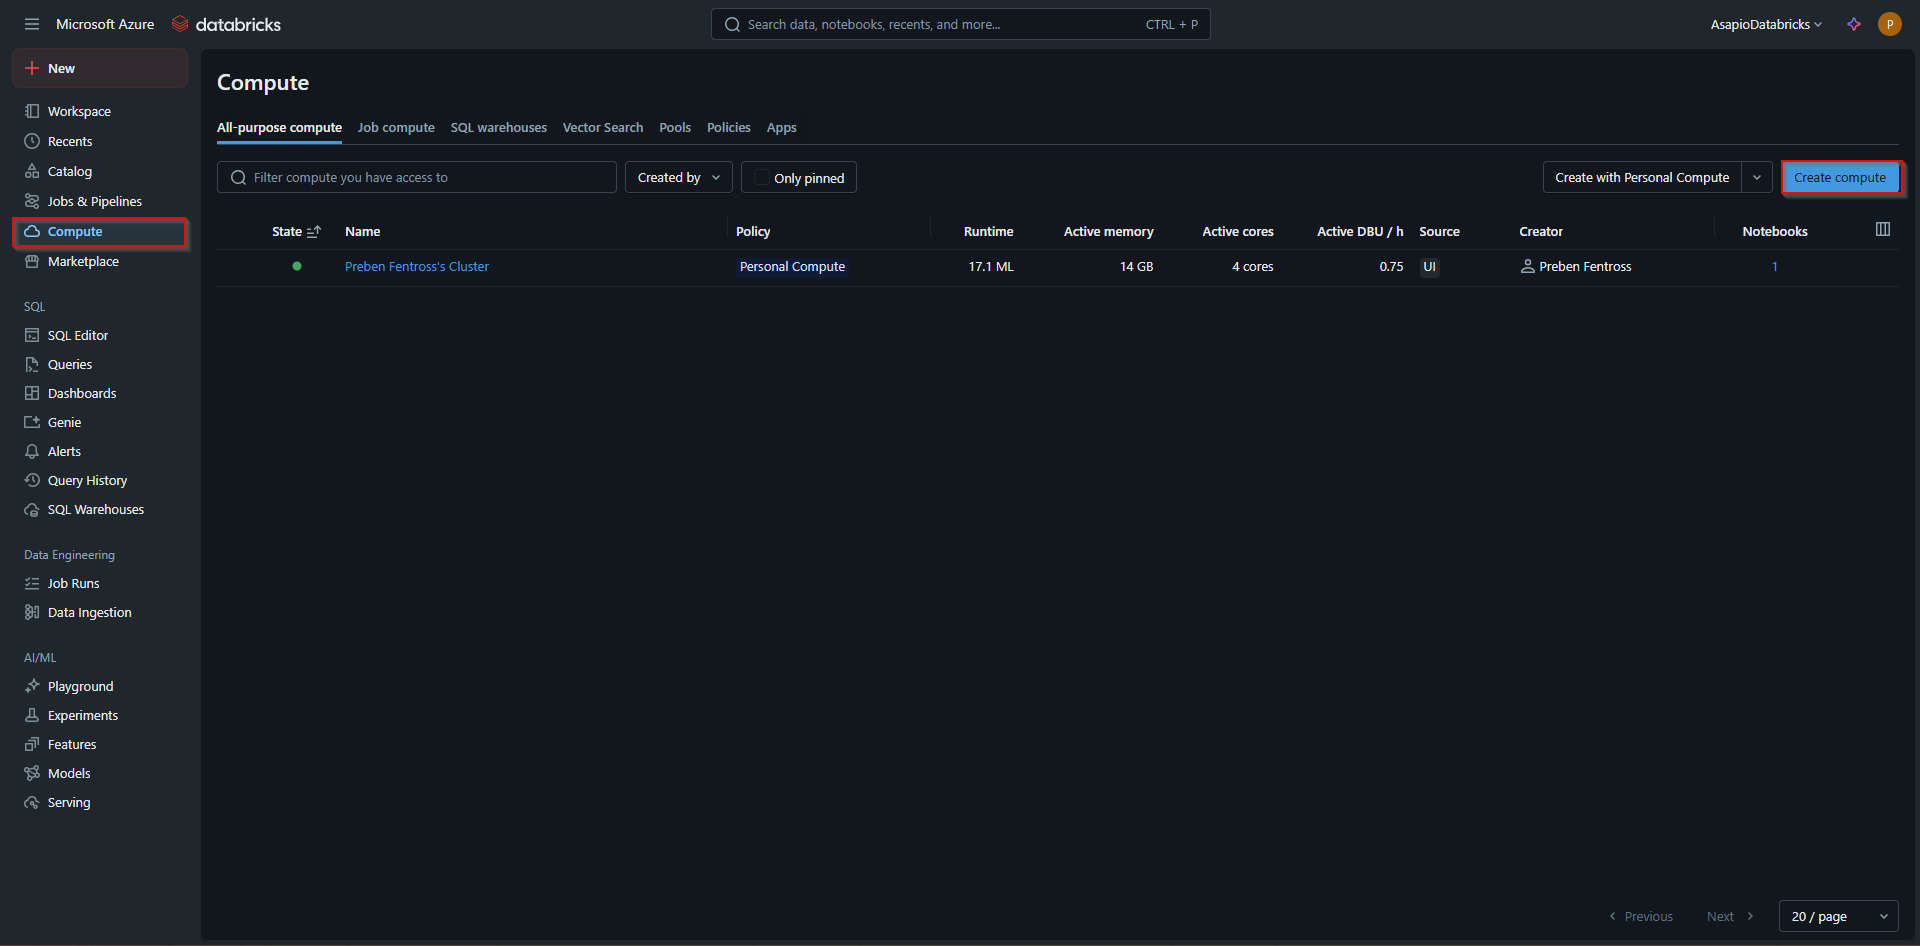
-
Create a new notebook and attach your Cluster
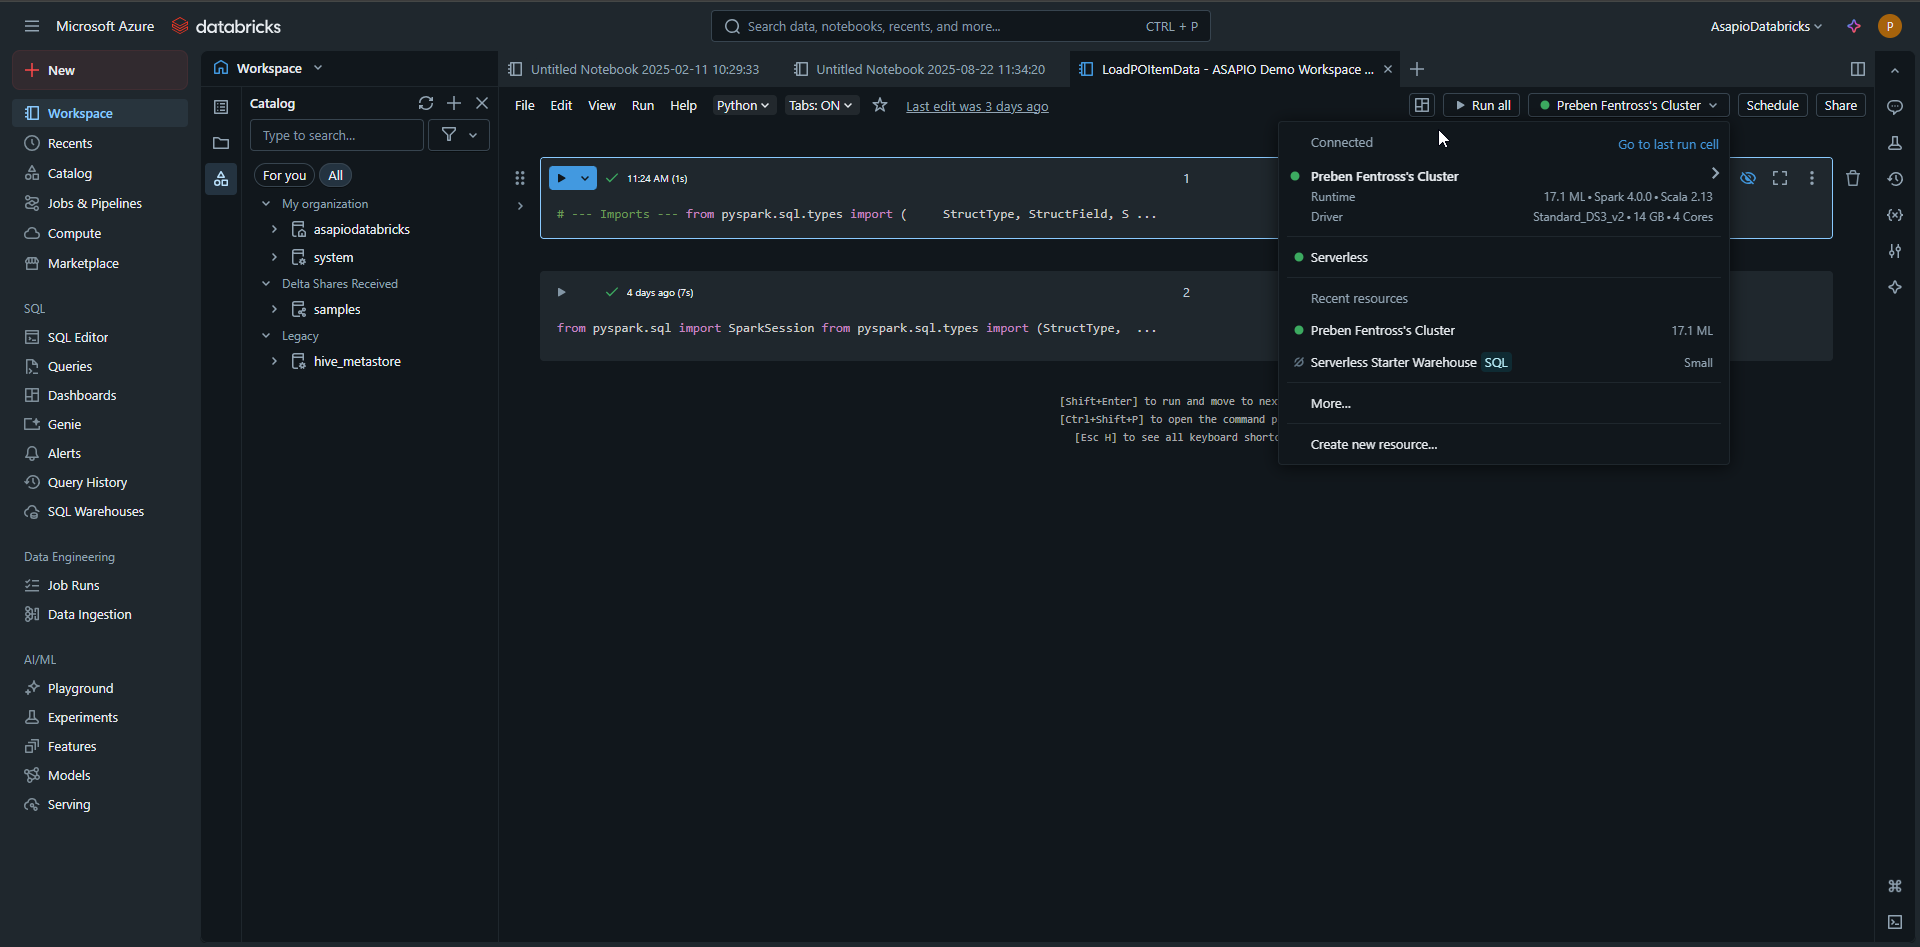
In your code …
Set up the configuration for accessing Azure Blob Storage
storage_account_name = “your_storage_account_name”
storage_account_access_key = “your_storage_account_access_key”
container_name = “your_container_name”
file_path = “path/to/your/file.csv“
Load the CSV file into a DataFrame
df = spark.read.format("csv").option("header", "true").load(f"wasbs://{container_name}@{storage_account_name}.blob.core.windows.net/{file_path}")
Write the DataFrame to a Delta table
df.write.format("delta").mode("overwrite").saveAsTable("your_delta_table_name")
Videos