Connectors > Google® Cloud Platform
Overview
ASAPIO Integration Add-on facilitates the direct integration of supported SAP NetWeaver® systems with Google Cloud Platform, Pub/Sub event messaging service.
| Add-on/component name | Type |
| ASAPIO Integration Add-on – Framework | Base component (required) |
| ASAPIO Integration Add-on – Connector for Google Pub/Sub | Additional package |
Key features:
- Supports a wide range of SAP NetWeaver based systems, including SAP ERP, S/4HANA, BW, HCM and many more
- Out-of-the-box connectivity to Google Pub/Sub
- Inbound connectivity is also possible, using a webhook to call the ASAPIO REST endpoint
- Switch between event-driven (single events) or batch mode (job-driven) calls
- Batch mode allows multi-threading with multiple SAP work processes
- From Pub/Sub, you can route the data to many more Google services, like
- Dataflow
- Cloud Storage
- Firestore
- BigQuery
- AppEngine
- …and many other services
Block Architecture (Example)

Pre-requisites
Pre-requisites for Google Pub/Sub services
Note
The following settings are specific to the connector for Google Pub/Sub.
A Google Cloud account is required with access to the Google Pub/Sub service.
Steps required to establish connectivity
To establish connectivity with the Google Pub/Sub service, please proceed with the following activities and refer to the specific documentation chapters:
- Create RFC destinations to Google Cloud platform in the SAP system settings
- Set-up authentication to Google Cloud platform
- Set-up basic configuration to lay the foundation of using the Google Pub/Sub connector
- Set-up connection instance to Google Pub/Sub in ASAPIO Integration Add on
- See chapter Send example outbound message for a simple example to test connectivity
Create RFC destinations
Add Certificate to Trust Store
- Download all certificates (root and intermediate) from the GlobalSign website: support.globalsign.com
- In transaction STRUST, double click the node “SSL Client (Anonymous)”.
- In the very bottom press the “Import certificate” button and select the downloaded certificate file
- Press the “Add to Certificate List” button. Confirm by pressing “Save” button at the very top.

Create RFC destination for OAuth2 Authentication
Create a new RFC destination of type “G” (HTTP Connection to External Server).
- Transaction: SM59
- Create new destination of type “G”
- On “Technical Settings” tab, specify Target Host: oauth2.googleapis.com

- On “Logon & Security” tab activate SSL and select ANONYM SSL Client

- On “Special Options” tab set HTTP version to HTTP 1.0 and Accept Cookie to Yes (All)

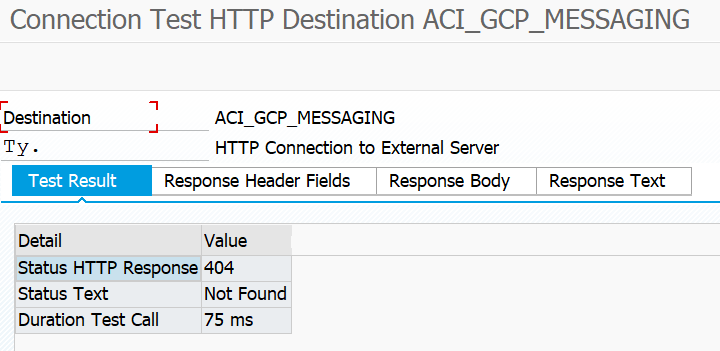
- Save and press on “Connection Test” to check the SSL settings. The test should result in HTTP status code 404, which can be considered a success. If the SSL configuration is wrong it will result in an SSL error.
Create RFC destination for Google Pub/Sub messaging
- Transaction: SM59
- Create new destination of type “G”
- On “Technical Settings” tab, specify Target Host: pubsub.googleapis.com

- On “Logon & Security” tab, activate SSL and select ANONYM SSL Client

- On “Special Options” tab, the default values are sufficient

- Save and press “Connection Test” to verify the setup. If the certificates have been correctly imported and configured this check will result in HTTP status code 404 otherwise it will return an SSL error.
The 404 is expected as the path is not complete when doing the connection test. The interface configuration will make it complete when running the integration.
Set-up Authentication
Create Service Account in Google Cloud Platform
To facilitate server to server connectivity you have to create a service account using the following steps:
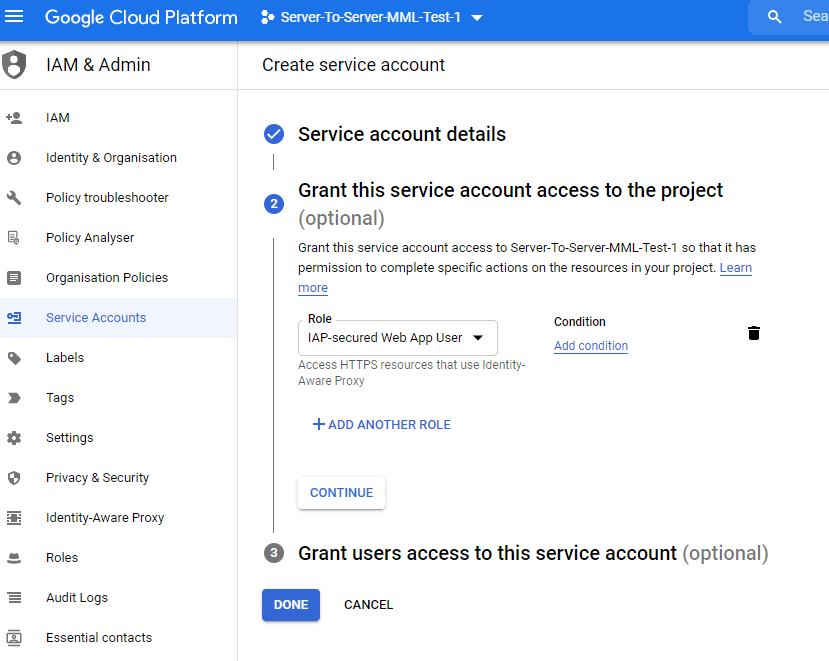
- Create a new IAP-secured Web App User:
Navigate to IAM & Admin -> Service accounts and create a new service account. Type in a name and description and press create. On the next screen you have to select a role. Type in IAP in the search and select the role IAP-secured Web App User.
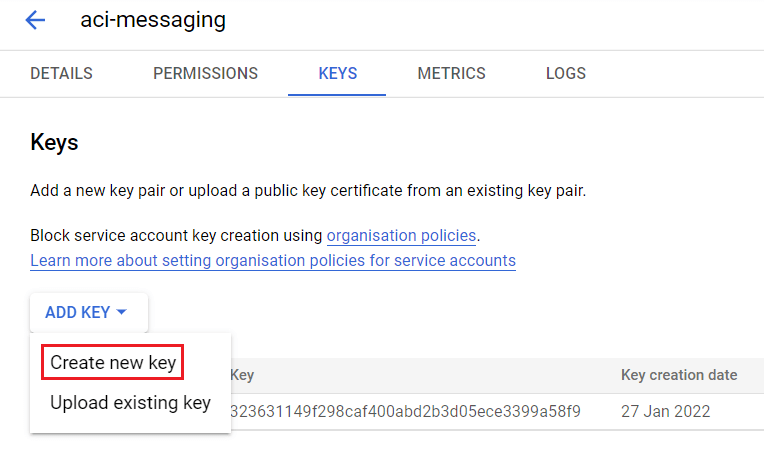
- Go to Actions > Manage keys and add a new P12 Key. Note down the password for later use.
Create new SSF Application
- Create a new entry in table SSFAPPLIC.
Transaction: SE16
Search for table SSFAPPLIC

Choose Execute

Create a new entry:

- Go to transaction: SSFA
Add new entry for the newly created SSF Application and set properties as shown in the screenshot (note especially the SSF Profile Name):

Import Service Account Certificate
The creation of the SSF application has created a new node in transaction STRUST.
For newer releases the following steps can be used:
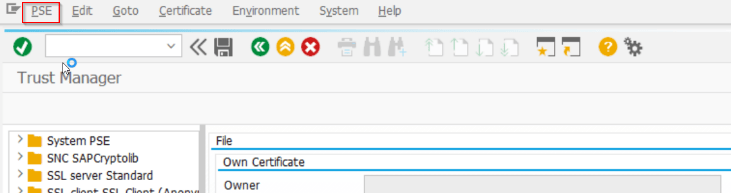
- Transaction: STRUST
- Go into “Edit” mode
- In the menu bar choose PSE > Import and Import the .p12 file that you downloaded earlier
Note: if the import of the .p12 file was not possible, use the command line to convert the .p12 file to a .pse file as described in the next section - On the top menu select PSE > Save as
- Select “SSF Application” and select the SSF application you have created in the previous step
- Confirm and save
For older releases that dont support P12 Files follow these steps:
- Copy the P12 Key into a directory of your choice: <drive>:usrexe
- Open a command window and navigate to the executables directory
- Execute the sapgenpse command:
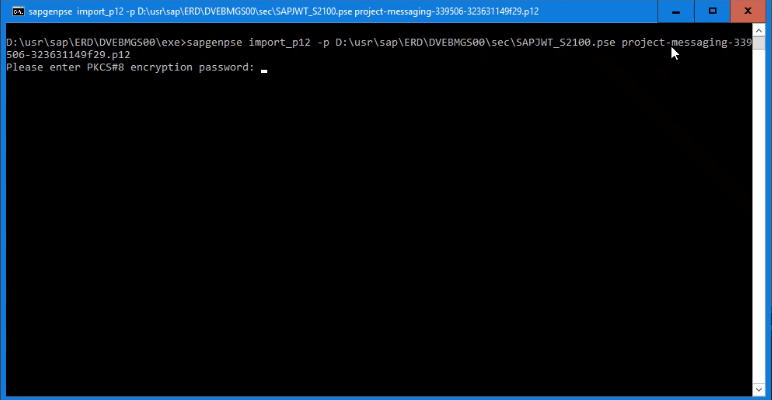
sapgenpse import_p12 -p <drive>:usr<SSF_Profile> <key_name>.p12
Example :
sapgenpse import_p12 -p D:usr/SAP/JWT_S2100.pse project-messaging-339506-323631149f29.p12
- Enter the password from your Google service account, that was shown while creating the P12 key.
- Go to transaction: STRUST
- In the menu bar choose PSE > Import and Import the just created .pse file

- On the top menu select PSE > Save as
- Select “SSF Application” and select the SSF application you have created earlier
- Confirm and save
Set-up basic settings
Note
The following settings are specific to the connector for Google Pub/Sub
Configure cloud adapter for Google Pub/Sub
Add an entry for the connector to the list of cloud adapters:
- Transaction: SPRO
- Go to IMG > ASAPIO Cloud Integrator – Maintain Cloud Adapter. Add New Entry and specify:
- Cloud Type
- ACI Handler Class: /ASADEV/CL_ACI_GPUBSUB_HANDLER

Set-up Codepages
Specify codepages used in the integration:
- Transaction: SPRO
- Go to IMG > ASAPIO Cloud Integrator – Maintain Cloud Codepages
- Add New Entry and specify the code pages to be used:

Set-up connection instance
Create the connection instance customizing together with the RFC destination created earlier and the cloud connector type:
- Transaction: SPRO
- Go to IMG > ASAPIO Cloud Integrator – Connection and Replication Object Customizing
- Add New Entry and specify:
- Field Instance: a name for this connection in
- Field RFC Dest. (Upload): the RFC destination create for the messaging endpoint
- Field ISO Code: the code page to use
- Field Cloud Type: GOOGLE_PS (or the name you chose when adding the connector)

Set-up Authentication
For OAuth based authentication using GCP, provide the following Default Attribute Values:
Mandatory Default Attribute Values:
- GCP_EMAIL_SERVICEACCT_JWT_ISS: The email address of your google service account created earlier.
- GCP_TOKEN_DESTINATION: The RFC destination created for the OAuth2 endpoint.
- GCP_SSF_PROFILE: Name for the PSE containing the certificate for the service account

Optional Default Attribute Values:
- GCP_EXPIRATION_TIME_JWT_EXP: The offset for the expiration time of the assertion, specified as seconds. This value has a maximum of 1 hour after the issued time.
- GCP_PERMISSION_JWT_SCOPE : A space-delimited list of the permissions that the application requests.
Set-up outbound messaging
Create Message Type
For each object to be sent via ACI you have to create a message type:
- Transaction: WE81
- Add New Entry and specify:
- Message Type: unique name for the integration
- Description: description of the purpose

Activate Message Type
The created message type has to be activated:
- Transaction: BD50
- Add New Entry and specify:
- Message Type: the created message type
- Active: tick the checkbox

Create Outbound Object Configuration
Create an outbound object configuration:
- Transaction: SPRO
- Go to IMG > ASAPIO Cloud Integrator – Connection and Replication Object Customizing
- Or go directly to transaction: /ASADEV/68000202
- Select the created Connection
- Go to section Outbound Objects
- Add New Entry and specify:
- Object: name of the outbound configuration
- Extraction Func. Module: /ASADEV/ACI_SIMPLE_NOTIFY
- Load Type: Incremental Load
- Trace: activate for testing purposes
- Formatting Func.: /ASADEV/ACI_EVNT_FORMATTER_GCP
This example uses the built-in notification event.

To utilize the built-in data events change the configuration of these fields:
- Extraction Func. Module: /ASADEV/ACI_GEN_VIEW_EXTRACTOR
- Formatting Function: /ASADEV/ACI_GEN_VIEWFORM_GCP
- Extraction View Name: Z_MARM_TEST

If you want to create different events with more data or different information in them then you can also create a custom extractor function module.
For more complex events we recommend splitting the extraction and formatting of the data by using the Formatting Function as well.
Set-up target endpoint in Header Attributes
Configure the topic / queue / event hub name to send the events to:
- Go to section Header Attributes
- Mandatory Header Attribute:
- Add New Entry and specify:
- Header Attribute: GOOGLE_TOPIC
- Header Attribute Value: projects/*********/topics/aci-messaging-topic

Set-up Business Object Event Linkage
Link the configuration of the outbound object to a Business Object event:
- Go to section Event Linkage
- Add New Entry and specify:
- Object Category: BOR Object Type
- Object Type: The Business Object Type sending the event
- Event: Event to react to
- Receiver Function Module: /ASADEV/ACI_EVENTS_TRIGGER
- Type linkage active: tick the checkbox

Custom message attributes
Note: Support for custom message attributes was added with release 9.32507
As part of the system integration and event-driven communication strategy, Google Cloud Pub/Sub allows publishers to include custom message attributes alongside the primary message payload. These attributes are key-value string pairs that can be used for filtering, routing, and metadata enrichment without modifying or parsing the base64-encoded payload.
By leveraging attributes like ORDER_NUMBER, SALES_ORG, or KUNNR, consumers can subscribe to only the messages relevant to their business domain—enabling selective message delivery based on metadata rules.
| Attribute Key | Example Value | Purpose |
|---|---|---|
| ORDER_NUMBER | 0000005452 |
Identifies the customer order |
| SALES_ORG | 2200 |
Sales organization ID |
| KUNNR | 0000002500 |
Customer number |
Reasons to use custom message attributes:
| Feature | Benefit |
|---|---|
| Attribute Filtering | Reduces load on subscribers |
| Routing Simplicity | No decoding of payload required for filtering |
| Standardized Format | Compatible with internal and external systems |
Note: Custom attributes are part of the message metadata and do not affect the base64-encoded
datapayload. They can be used directly in subscription filter expressions.
Using attributes in messages allows Pub/Sub to act as an intelligent message router. With attribute-based filters, you can ensure that only relevant consumers receive specific messages—without duplicating topics or implementing custom logic in consumer applications.
Example Payload with attributes
Base64 payload example from Monitor transaction
{
  {
    "messages": [
      {
        {
          "data": "eyJWQkFLIjpbeyJNQU5EVCI6IjEwMCIsIk9SREVSX05VTUJFUiI6IjU0NTIiLCJWQlRZUCI6IkMiLCJBVUFSVCI6Ik9SIiwiU0FMRVNfT1JHIjoiMjIwMCIsIlZEQVRVIjoiMTk5OC0wNi0xNiIsIktVTk5SIjoiMjUwMCIsIlZCQVAiOlt7IklURU1fTlVNQkVSIjoiMDAwMDEwIiwiUVVBTlRJVFkiOjUuMDAwLCJWUktNRSI6IlBDIiwiTUFUTlIiOiJNLTAxIiwiTkVUVkFMVUUiOjI2NjAwLjAwLCJBUktUWCI6IlN1bm55IFN1bm55IDAzIiwiQ1VSUkVOQ1kiOiJGUkYiLCJNQVRLTCI6IjAwMjA3IiwiTUFUV0EiOiJNLTAxIiwiUE1BVE4iOiIiLCJQT1NBUiI6IiIsIkZLUkVMIjoiQSJ9XX1dfQ==",
          "attributes": {
            {
              "ORDER_NUMBER": "0000005452",
              "SALES_ORG": "2200",
              "KUNNR": "0000002500"
            }
          }
        }
      }
    ]
  }
}
Configure Message attributes
To set up the message attributes execute the following steps:
- Go to section Field Mapping
- Add New Entry and specify:
- Source field: Field name from Payload design or View.
- Default value: Fallback value in case the source field does not have a value (Optional)
- Target Field: Name of the message attribute (Optional – if not given the name of the source field is used)

Message attributes are visible inside the monitor transaction:
