Outbound messaging
Overview
Available triggers for events:
- SAP Business Object events
- SAP Business Transaction Events (‘BTE’)
- SAP Change Documents (CDHDR/CDPOS): SAP Change Documents can trigger a custom SAP Business Object event (works for both custom or standard Business Objects)
- IDoc: IDoc payload will be message payload and IDoc number will be used as event key
- SAP Output Determination
- Custom-code trigger:
- Call standard SAP Business Object events using FM SWE_EVENT_CREATE (recommended approach)
- Call ASAPIO Framework directly
Architecture for outbound communication
- Add-on concept: ASAPIO would directly integrate with the SAP system as an add-on. It would leverage SAP’s own architecture and APIs to facilitate outbound communication with external systems. The ASAPIO add-on would be installed within the SAP landscape, typically within the SAP NetWeaver Application Server or a similar runtime environment. This allowstight integration with the SAP system and access to SAP functionalities.
- Outbound Communication: When external systems or applications need to communicate with SAP, ASAPIO would push the data out of the SAP environment. ASAPIO would handle the data transformation and load to the external system.
- Security and Authorization: ASAPIO Add-on inherits the SAP system security standards where it operates, including mechanisms for authentication and authorization. It would leverage SAP’s user management and access control functionalities to ensure that only authorized users and applications can access ASAPIO functionality.
Architecture diagram for outbound

SAP Business Object events
A lot of the application modules in SAP use Business Objects to provide different functionalities. A Business Object can also provide events that can be used as triggers for our framework.
For a list of all available SAP Business Objects and their events, you can use transaction SWO3. It shows a structured list of available objects.
Please also see section How to create custom events in case your desired SAP Business Object does not come with standard events.

Most searched SAP Business Objects
The following list is just a small extract from the over 2.500 available business objects in SAP NetWeaver systems:
| Object Name | Object Type |
| Material | BUS1001 |
| Sales Order | BUS2032 |
| Purchase Order | BUS2012 |
| Delivery | LIKP |
| Business Partner | BUS1006 |
How to identify event triggers?
If the correct Business Object / Event is not obvious you can use the following process to find out if there is a Business Object event for the business process you want to capture.
-
Activate event trace transaction SWELS
-
Switch Off and On.
Important: Activating event traces increases system load. Therefore we recommend to make use of the ‘Restrictions’ settings, at least to the user name.

-
Perform an action in your desired business process — e.g. go to a typical business transaction or SAP Fiori app and perform the changes you are considering to trigger the change.
-
After that, display event trace in transaction SWEL
-
Look at the triggered Object Type.


Business Transaction Events (BTE)
In some modules and Business Objects the available events are not always active out of the box.
A BTE has a predefined interface that allows to add additional functionality through a custom function module defined in BTE customizing (e.g. filtering when the event should be triggered). BTE conifguration is checked by SAP standard functionality and executes the configured FMs if present. There are two types of BTEs available:
- Publish and Subscribe Interface
- Process Interface
For triggering outbound events the Publish and Subscribe interfaces are used.
A typical sign that there might be a Business Transaction Event (BTE) is that the Business Object shows events in transaction SWO1 but when recording the event trace they are not triggered by the typical transactions for this Business Object.
Which BTEs are available in each functional component of SAP has to be checked in the SAP Help for that component.
How to find BTEs
To get a list of available Business Transaction Events you can go to transaction FIBF and then in the menu select Environment / Info system (P/S):

You can list either all available BTEs or use one of the available search options to filter the list. In our example we search for BTEs related to the Business Object BKPF (Accounting document):

From the list of the available BTEs we will use 1030 and 1050 as we know that these are triggered when an accounting document is created:

From here we also can access the sample function modules for each BTE that serves as an example to copy in order to get the interface correct.
Implement BTEs
To implement a BTE you have to:
- Create a “Product”
- Create a copy of the sample FM of the BTE to implement
- Register the FM with the BTE
For some BTEs this process can be simplified by standard wizard with transaction code SWU_EWBTE. Unfortunately this does not work for all BTEs, so we describe the manual process here.
Create Product
To configure a BTE implementation a product has to be defined. A product can bundle multiple BTE implementation that go together.
To create a new product go to transaction FIBF go to Settings / Products / … of a customer :


Copy sample Function Module
After identifying the BTE you can also get to the sample FM and a interface description from transaction FIBF.
You can copy the sample FM and implement the triggering of the BO event (typically using FM SWE_EVENT_CREATE). If you want to filter the evens to only trigger for a subset of the objects then this is the best place to implement it.
Register Function Modules with BTE
To complete the implementation the new function module has to be assigned to the BTE.
This is done in transaction FIBF under Settings / P/S Modules / … of a customer:


Further info
How to filter events?
ASAPIO Check Function Module /ASADEV/ACI_EVENTS_CHECK
To implement a filter in ASAPIO Integration Add-on, you can use the standard ASAPIO Check function module.
It allows to filter on attributes of the Business Object.
The Example shows how to react only to events from a Material master data change, for a specific Material Group (table MARA, field MATKL).
1. Search the Business Object in transaction SWO1


- Add the Attribute ID to your Header Attribute customizing in ASAPIO Add-on:
BOR_ATTRIBUTE_<BOR Attribute from SWO1>
Example:
Here we only trigger a material group with value “004”:
BOR_ATTRIBUTE_MaterialGroup

- Add the Check Function Module /ASADEV/ACI_EVENTS_CHECK to the Event Linkage customizing.

Custom Check Function Module
If checks are necessary that cannot be handled by the check function module that is provided you can implement a custom check function module.
Simply create a new function module with the same interface as /ASADEV/ACI_EVENTS_CHECK and implement the custom check as necessary.
To filter an event you have to raise an exception. To let an event pass the check FM you just have to let it run through without raising an exception.
In the event linkage you set your custom check FM as Check Function Module
BAdI Implementation in Function Module ASADEV/ACI_EVENTS_TRIGGER
With a BAdI implementation in the trigger FM you can also filter the events. You will get the info of the event trigger and the change pointer the framework would normally create (and execute).
In order to filter you have to clear the change pointer you want to filter as shown in the following example. The framework then processes only the change pointers it still has after the BAdI call. In case there are no change pointers left it will simply abort the execution.
- Transaction: SE18
- BAdI Name: /ASADEV/TRIGGER_BADI
- Filter Val.: Add your Instance and Object that shall use the BAdI implementation.
- Method:/ASADEV/TRIGGER_IF~SET_BDCP_LINES
- Add Implementation: With the change pointer key, you can add SELECT statements. If a SELECT statement does not fulfill a condition, you clear the BDCP lines. This action will lead to a return. After this, no change pointers are being written, and the ASAPIO Integration Add-On will not be called. There will be no entry inside the ACI_Monitor.
- Example:
-
- Filter Val.: Add your Instance and Object that will make use of the BAdI implementation.

 Method: /ASADEV/TRIGGER_IF~SET_BDCP_LINES
 - Add Implementation:

- Filter Val.: Add your Instance and Object that will make use of the BAdI implementation.
Where Condition in Payload Design
- Transaction: /ASADEV/DESIGN
- Use a where clause in the tables section:

Set-up outbound messaging
For outbound messaging, you can use and even combine the following methods:
- Simple Notifications
- Message Builder (Generic View Generator)
- IDoc capturing
- Custom-built triggers and extractors
Pre-requisite for all methods is to create a message type, which will be used throughout the configuration process.
The following articles explain the individual possibilities.
Create a Message Type
For each ‘Object’ you are going to configure in ASAPIO Integration Add-on, please create a message type.
Note: In the example below, we use the Sales Order (BUS2032) event. Please use suitable data for your use-case as required.
- Transaction: WE81
- Add New Entry and specify:
- Message Type: unique name for the integration
- Description: description of the purpose

Activate Message Type
- Transaction: BD50
- Add New Entry and specify:
- Message Type: the created message type
- Active: tick the checkbox

Simple Notifications
Create Outbound Object configuration
- Transaction: SPRO
- Goto ASAPIO Cloud Integrator – Connection and Replication Object Customizing
- Or go directly to transaction: /ASADEV/68000202
- Select the created Connection
- Go to section Outbound Objects
- Add New Entry and specify:
- Object: name of the outbound configuration
- Extraction Func. Module: /ASADEV/ACI_SIMPLE_NOTIFY
- Message Type: the created message type
- Load Type: Incremental Load
- Trace: activate for testing purposes
This example uses the built-in notification event.

Set-up target endpoint in ‘Header Attributes’
Configure the topic / queue / event hub name to send the events to:
- Go to section Header Attributes
- Add New Entry and specify:
- Header Attribute: AZURE_TOPIC (mandatory)
- Header Attribute Value: the topic/queue/event hub

Set up ‘Business Object Event Linkage’
Link the configuration of the outbound object to a Business Object event:
- Transaction: SWE2
- Add New Entry and specify:
- Object Category: BO BOR Object Type
- Object Type: the Business Object Type sending the event
- Event: the event to react to
- Receiver Type: the message type of the outbound object (this is the link to the Addon configuration)
- Receiver Call: Function Module
- Receiver Function Module: /ASADEV/ACI_EVENTS_TRIGGER
- Linkage Activated: tick the checkbox

Test the outbound event creation
In the example above, please pick any test sales order in transaction /nVA02 and force a change event, e.g. by changing the requested delivery date on header level.
Message Builder (define payload as database views)
Message Builder uses SAP Data Dictionary Views (database views) to model the payload of a message. It can extract and format data based on the table and field selection of the database view. The formatter nests the data based on the relations of the tables.
Create database view
For the data events also configure the DB view that is used to define the extraction:
- Transaction: SE11 (for SAP ERP or S/4HANA on-prem deployments with SAP GUI access)
- Alternatively, you can use other supported development environments, e.g. WebIDE, Business Application Studio, Eclipse with ABAP Development Tools, or the SAP Fiori App “Create Custom CDS Views” to create a database view.
Example: Material master view (e.g. to be used for Material Master (BUS1001) change events)

Create Outbound Object configuration
- Transaction: SPRO
- Goto ASAPIO Cloud Integrator – Connection and Replication Object Customizing
- Or go directly to transaction: /ASADEV/68000202
- Select the created Connection
- Go to section Outbound Objects
- Add New Entry and specify:
- Object: name of the outbound configuration
- Extraction Func. Module: /ASADEV/ACI_GEN_VIEW_EXTRACTOR
- Message Type: the created message type
- Load Type: Incremental Load
- Trace: activate for testing purposes
- Formatting Function: /ASADEV/ACI_GEN_VIEW_FORMATTER
- Extraction View Name: name of the DB view

Set-up ‘Header Attributes’
Configure the topic / queue / event hub name to send the events to:
- Go to section Header Attributes
- Add New Entry and specify the header attributes and values
Please note the header attributes are endpoint/platform specific. Here are examples:
| Header attribute | Header attribute value | Example | required for Connector |
|---|---|---|---|
| AZURE_TOPIC | the topic/queue/event hub | MaterialMaster | Microsoft Azure |
| ACI_ADD_LOGSYS | To add the logical system to the top level of the payload.
Only works for the generic view extractors / formatters |
X | All connectors – optional |
| SWITCH_OFF_LASTRUN_TIMESTAMP | To improve performance in high-frequency / high-load scenarios set this to ‘X’ | X | All Connectors |

Set up ‘Header Attributes’ for change pointer fields (optional)
To add fields from the change pointer to your payload:
Configure the change pointer info:
- Go to section Header Attributes
- Add New Entry and specify:
| Header Attribute | Header Attribute Value |
|---|---|
| ACI_CP_INFO | X |

Information can be transferred from the change pointer to the payload.
The following information can be used:
| Information field | Description |
| ACICPIDENT | Change pointer ID |
| ACITABNAME | Table name (Event Object Type) |
| ACITABKEY | Composed of: Event Type, Mandt, Entry Key |
| ACICRETIME | Creation time |
| ACIACTTIME | Activation time |
| ACICDCHGID | Change Indicator |
Fields can be renamed or omitted:
- Go to section Field Mapping
- Add New Entry and specify:
| Target structure | Target field | Default value |
| FIELD_RENAME | ACICDCHGID | ChangeIndicator |
| SKIP_FIELD | ACITABKEY |
Set up ‘Business Object Event Linkage’
Link the configuration of the outbound object to a Business Object event:
- Transaction: SWE2
- Add New Entry and specify:
- Object Category: BO BOR Object Type
- Object Type: the Business Object Type sending the event
- Event: the event to react to
- Receiver Type: the message type of the outbound object (this is the link to the Addon configuration)
- Receiver Call: Function Module
- Receiver Function Module: /ASADEV/ACI_EVENTS_TRIGGER
- Linkage Activated: tick the checkbox

Test the outbound event creation
In the example above, please pick any test sales order in transaction /nVA02 and force a change event, e.g. by changing the requested delivery date on header level.
Flat formatter variant (optional) – new with release 2504 (9.32504)
The standard formatters typically produce a nested JSON representing the joined tables as sub-objects.
For some use cases this can be an issue, e.g. if the consumers cannot handle this kind of structure. So you can use new fomatter /ASADEV/ACI_GEN_VIEW_FORM_FLAT to get a flat JSON structure (i.e. the JSON has no sub objects).
Example payload with nesting:
{
  "bestellungId": 789,
  "datum": "2025-02-07",
  "kunde": {
    "kundeId": 101,
    "name": "Erika Mustermann",
    "adresse": "Beispielstraße 10, 80333 München"
  },
  "artikel": [
    {
      "artikelId": 1,
      "menge": 2,
      "produkt": {
        "produktId": 201,
        "bezeichnung": "Laptop",
        "preis": 999.99
      }
    },
    {
      "artikelId": 2,
      "menge": 1,
      "produkt": {
        "produktId": 202,
        "bezeichnung": "Monitor",
        "preis": 299.99
      }
    }
  ]
}
Example payload using the flat formatter:
[
  {
    "bestellungId": 789,
    "datum": "2025-02-07",
    "kundeId": 101,
    "kundeName": "Erika Mustermann",
    "kundeAdresse": "Beispielstraße 10, 80333 München",
    "artikelId": 1,
    "menge": 2,
    "produktId": 201,
    "produktBezeichnung": "Laptop",
    "produktPreis": 999.99
  },
  {
    "bestellungId": 789,
    "datum": "2025-02-07",
    "kundeId": 101,
    "kundeName": "Erika Mustermann",
    "kundeAdresse": "Beispielstraße 10, 80333 München",
    "artikelId": 2,
    "menge": 1,
    "produktId": 202,
    "produktBezeichnung": "Monitor",
    "produktPreis": 299.99
  }
]
CDS View Entities – new with release 2504 (9.32504)
- As ‘Extraction View’ for Outbound interfaces
- Extraction Func. Mod: /ASADEV/ACI_GEN_VIEW_EXTRCT_S4
- Format Function: /ASADEV/ACI_GEN_VIEW_FRM_CB_S4
- Extraction View Name: the name of your CDS View Entity

How to change the payload
General modification options
Adjust payload with following options:
- Rename table: renaming for the tables involved
- Rename field: better and more JSON friendly names for the fields
- Append a new field: e.g. a custom computed field or some additional fixed values
- Skip a field: e.g. a key field like client/mandt
- Camel Case Style: change field and table names into a camelCase style
- Parent-Child relationship: change the hierarchy of tables inside the JSON
- Cardinality functionality: Declare if the table has 1:1 One-to-One (Structure) or n:m Many-to-Many (Array) relationship.
- Disable conversion exit: Switch off the conversion exit.
- Unique message Id: adds a GUID to each message
Rename Table / Field
To rename a table or field you:
- Go to Field Mapping, add New Entry and specify:
- Target structure: TABLE_RENAME or FIELD_RENAME
- Target field: the original name of the table (e.g. MARA) or field (e.g. EAN11)
- Default value: the new name as it should appear in the JSON (e.g. MATERIAL_MASTER)

In an older version before 9.32304 the configuration of the field mapping used the “Source field” instead of “Default value”. A program is now provided which automatically changes the old configuration to the new configuration.
- Go to program /asadev/aci_conv_field_mapping and specify:
- Instance: Instance to be changed
- Object: Object to be changed
- Execute.
Append New Field
To append a new field you:
- Go to Field Mapping, add New Entry and specify:
- Target structure: APPEND_<tablename> (e.g. APPEND_MAKT); the table name is used to determine the level where the new field is added to the JSON
- Target field: the name of the field as it should appear in the JSON (e.g. CustomField)
- Default value: if the field should be set to a fixed value
- Conversion class/method name: name of a class and method used to determine the value of the field; the class must implement interface /ASADEV/ACI_CONVER_IF, /ASADEV/IF_ACI_FIELDCONVERSION or /ASADEV/IF_ACI_CONVERSION

Convert Field Value
Very similar to appending completely new fields you can also just convert the value of an existing field by specifying the following:
- Go to Field Mapping, add New Entry and specify:
- Target structure: FIELD_CONVERSION
- Target field: the name of the field as it is specified in the view or Payload Design
- Default value: if the field should be set to a fixed value
- Conversion class/method name: name of a class and method used to determine the value of the field; the class must implement interface /ASADEV/ACI_CONVER_IF, /ASADEV/IF_ACI_FIELDCONVERSION or /ASADEV/IF_ACI_CONVERSION
Conversion method options
Over the various releases we added several options on how to implement conversion methods. To use you implement the interface and a method with the same signature as the specific interface method. This deviation from the standard behavior of interfaces allows to have multiple conversion methods combined in one class. To make this possible you have to specify class name and method name in our configuration. That way the framework knows which method to call instead of relying on the defined method of the interface.
- /ASADEV/ACI_CONVER_IF (template method: ACI_CONVER_FIELD) – now deprecated
- /ASADEV/IF_ACI_FIELDCONVERSION (template method: GET_FIELD_VALUE)
- /ASADEV/IF_ACI_CONVERSION (template method: GET_FIELD_VALUE) – since 9.32410 (SP10)
The first two simply return the value of a field, e.g. the framework assumes it is a string based value and always wraps the result in quotation marks (“) in the JSON.
The latest interface/method /ASADEV/IF_ACI_CONVERSION~GET_FIELD_VALUE has a TYPE parameter that allows for specifying if the returned value is a simple string or if it is a raw JSON structure (values string and raw):

When returning raw it is possible to return sub structures of JSON (e.g. a JSON sub object, array etc.). This enables conversion that return complex objects (e.g. longtexts with additional info) that were previously impossible.
Skip Field
To remove a field from the output:
- Go to Field Mapping, add New Entry and specify:
- Target structure: SKIP_FIELD
- Target field: field to skip, e.g. key fields client/mandt

Camel Case
Activate camel casing:
- Go to Header Attributes, add New Entry and specify:
- Header Attribute: FIELD_CAMELCASE_ACTIVE
- Header Attribute Value: Activate with X. This will transform all letters in the character string to lowercase letters from the first position. After a separator as underscore (_) it will remove the separator and start the next character after the separator in upper case and then lower case in all occurrences. Example: MY_STRING -> myString

Change Hierarchy
To change the resulting hierarchy in the JSON output you can specify the Parent-Child Relationship between tables:
- Go to Field Mapping, add New Entry and specify:
- Target structure: TABLE_PARENT
- Target field: Child table
- Source structure: Parent table

Change Cardinality
Typically the framework has no way to know how tables are related to one another, and therefore it always assumes that there can be multiple subtable entries and produces an array in the JSON output.
If you are certain that the tables have a 1:1 relationship you can change this behavior and force the framework to remove the array but instead uses a simple subobject in the JSON.
To specifiy the cardinality:
- Go to Field Mapping, add New Entry and specify:
- Target structure: CARDINALITY_FUNCTIONALITY
- Target field: Table
- Source structure: 1 or * (Depends if the relationship is 1:1 or n:m, where * is the default if not configured)

Disable Conversion Exit
Fields with a conversion exit will be formatted using the associated conversion routine. This can be disabled with the following setting:
- Go to Header Attributes, add New Entry and specify:
- Header Attribute: DISABLE_CONVERSION_EXIT
- Header Attribute Value: Activate with X.

Unique Message ID
Note: this feature is new with release 2507 (9.32507)
A unique message ID (GUID) will be added to each payload.
- Go to Header Attributes, add New Entry and specify:
- Header Attribute: ENABLE_MESSAGE_ID
- Header Attribute Value: Activate with X


You can also add this configuration in Default Values and then it will be applied to all Outbound Objects of the specific Instance:

Note:
Feature supported when using Format Function: /ASADEV/ACI_GEN_VIEW_FORM_CB with all connectors.
At the moment the unique message id is not searchable in /ASADEV/ACI_MONITOR.
The unique message id along with other log info is being stored in table /ASADEV/LGCP_LNK
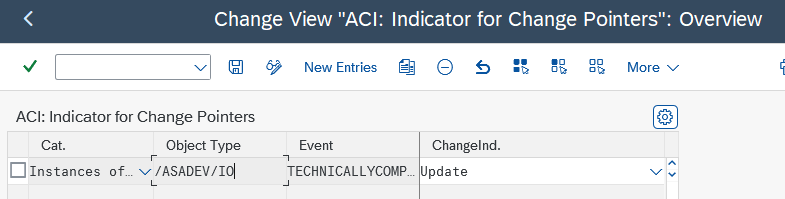
Modify Change Pointers in Table BDCP2
Configuring the Change Indicator
With release 9.32405 (SP09) we introduce an option to fill the change indicator of the created change pointer with a proper value (I,U or D) base on the event name.
The following convention is used:
- event names containing CHANGE or MODIF will produce ‘U’ as the change indicator
- event names containing DELETE will produce ‘D’ as the change indicator
- other event names will produce ‘I’ as the change indicator (as before)
In addition to this assignment by convention there is also a configuration table you can fill to determine the correct indicator also for other event names.
For this configuration:
- Go to transaction SM30
- Enter table name /ASADEV/ACI_CP_I
- Fill in BO Type, Event Name and specify the mapped change indicator
BAdI /ASADEV/TRIGGER_BADI
The /ASADEV/TRIGGER_BADI enables the integration of custom logic into the function module /ASADEV/ACI_EVENTS_TRIGGER which is called when the BOR event fires.
Implementations allows full modification of the change pointers being generated.
Typical use case scenarios:
- Need to remap the key to a different format (e.g. ATP use case or sub-object/item base events)
- Applying filtering to the create change pointers
- Changing other parts of the change pointer for custom use cases
Implementation Guidelines:
- BAdI Name: /ASADEV/TRIGGER_BADI
- Method: /ASADEV/TRIGGER_IF~SET_BDCP_LINES
- Method parameters:

- Filter Val.: Use the filter value to use your custom logic only on a specific Instance and Object.

Example Usage:
- There are scenarios where a key translation is required before writing the key into table BDCP2.
- Another use case for the BAdI is ATP
Set-up Batch Job (Job processed messaging)
Set-up synchronous call for message type
Note: With the following settings change pointers will be set but not being sent directly.
- Transaction: SPRO
- Goto ASAPIO Cloud Integrator – Connection and Replication Object Customizing
- Or go directly to transaction: /ASADEV/68000202
- Click on Synchronous call for message type
- Or go directly to transaction: /ASADEV/ACI_SYNC
- Add New Entry and specify:
- Message Type: the created message type
- Sync. On: Clear checkbox (Change Pointers will be set and the event is not being send)


Define Variant
- Transaction: n/ASADEV/ACI
- Select the Connection and hit enter
- Select Upload Type: I
- Select Replication Object
- Save Variant

Schedule background job
- Transaction: SM36
- ABAP Program: /ASADEV/AMR_REPLICATOR
- Variant that was previously created and saved in transaction /ASADEV/ACI

Test background job
- Create an Event
- Run the job
- Check the ACI_Monitor in transaction /ASADEV/ACI_MONITOR: You will be able to see the variant and a trace. For troubleshooting, check the SLG1-Log.

Set-up Packed Load/Initial load (split large data)
Create Outbound Object configuration
- Transaction: SPRO
- Goto ASAPIO Cloud Integrator – Connection and Replication Object Customizing
- Or go directly to transaction: /ASADEV/68000202
- Select the created Connection
- Go to section Outbound Objects
- Add New Entry and specify:
- Object: name of the outbound configuration
- Extraction Func. Module: /ASADEV/ACI_GEN_VIEW_EXTRACTOR
- Message Type: the created message type(optional)
- Load Type: Packed Load
- Trace: activate for testing purposes
- Formatting Function: /ASADEV/ACI_GEN_VIEW_FORMATTER (depending on your use case)
Create database view
Note
Please also refer to section Message Builder
For the data events also configure the DB view that is used to define the extraction:
- Transaction: SE11 (for SAP ERP or S/4HANA on-prem deployments with SAP GUI access)
- Alternatively, you can use Eclipse with ABAP Development Tools, or the SAP Fiori App “Create Custom CDS Views” to create a database view if you have this app available in SAP S/4HANA.
Example: Material master view

Set-up ‘Header Attributes’
- Go to section Header Attributes of the outbound object created previously
- Add New Entry and specify the header attributes and values
| Header attribute | Header attribute value | Example |
|---|---|---|
| ACI_PACK_BDCP_COMMIT | Flag for changepointer creation.
If set, changepointers will be generated for every entry. IF this flag is set, a messagetype has to be maintained in the outbound object. Caution: This may heavily impact performance. |
X |
| ACI_PACK_TABLE | Name of the table to take the keyfields from. This is typically different then the db view specified in ‘ACI_VIEW‘ as we only want to build packages based on the header object and the db view typically contains sub-objects as well | MARA |
| ACI_PACK_RETRY_TIME | Time in seconds. This is the duration in which the framework will attempt to get a new resource from the servergroup.
If it can’t get a new resource within this time then the load is aborted with an error message.
|
300 |
| ACI_PACK_WHERE_COND | Condition that is applied to the table defined in ‘ACI_PACK_TABLE‘ – with 9.32504 this can now also be defined in transaction /ASADEV/ACI when executing the intial load | |
| ACI_PACK_SIZE | Number of entries to send | 500 |
| ACI_PACK_KEY_LENGTH | Length of the key to use from the ACI_PACK_TABLE (e.g. MANDT + MATNR) | 13 |
| ACI_VIEW | deprecated – instead use the extraction defined in the outbound object either as extraction view or Payload Design | Z_MARM_TEST |

Test the initial load
Warning
Depending on the amount of data this can stress the SAP system servers immensely.
Please always consult with your basis team for the correct server group to use.
- Transaction: /ASADEV/ACI
- Select the Connection and hit enter
- Select Upload Type: P
- Select Replication Object
- Select a Servergroup (this is mandatory)
New options with version 9.32504 (SP11):
- Specify the number of threads to use in Max. Threads (0 to get unlimited threads)
- Specify a number of threads to keep free in Thread Buffer (this is what the field Threads in previous versions did)
- Specify a Packed Load WHERE condition to apply to the data extraction (this replaces the WHERE condition in the header attributes)

Set up packed reprocessing
When an interface had connection issues or other problems for an extended period of time or just accumulated a lot of change pointers to reprocess (e.g. during a cut-over period) the standard way of reprocessing can fall down.
To improve capabilities on reprocessing large amounts of unprocessed change pointers the “Packed Load” processing mode can be used to reprocess these change pointers.
Reprocessing outbound object
Configuration is similar to the normal packed (or incremental) loads:

The key settings are:
- Load Type: Packed Load
- Full Obj. Reference: the incremental object for which to do the reprocessing
This is the most important setting as this will determine which change pointers are read and reprocessed.
The extractor and formatter settings have to be the same as for the referenced incremental outbound object.
Header Attributes
In general, the same attributes are required as for initial loads based on “Packed Load” mode, but there are a few tweaks:
- ACI_PACK_TABLE: this must be BDCP2 because this is where we get the keys from for the reprocessing
- ACI_PACK_KEY_LENGTH: 43 (number of characters in the BDCP2 key)
Header attributes for the topic or other connector specific attributes have to be the same as for the referenced incremental outbound objects.

Custom Extractor Changes
If you are using a custom extractor it will contain some coding to handle the different styles of change pointers for incremental and packed load. This piece of coding has to be adapted to treat packed load with reference object like it treats incremental configurations, otherwise the extraction will not find any data and the reprocessing will not work.
Configure Immediate Retry Feature
A new feature was introduce in release 9.32410 (or SP10) to immediately retry failed calls. In our experience most calls fail due to very temporary issues (e.g. network glitches) and can be executed successful if retried immediately.
To configure the options for an immediate retry of failed calls you can use the following parameters:
- ACI_IMMEDIATE_RETRIES: determining how many retries should be executed in case of failures (defaults to 1 if not specified)
- ACI_RETRY_WAIT_TIME: specifying a time in seconds before executing each retry (if not specified the retry will be executed without any wait time)
These parameters can be specified on the connection level (in Default values) or on object level (in Header Attributes):


Configurations are optional. Default values are:
- ACI_IMMEDIATE_RETRIES: 1
- ACI_RETRY_WAIT_TIME: 0
If there are configurations on object level and connection level, then the object level values will override the connection values levels.
Custom events, extractors, formatters and triggers
The following chapter explains how you can build and use your own extractors, formatters and how you can trigger events/data transfer from your own program. This might be required in the rare occasions where there are no SAP standard triggers available.
How to create a custom event for an SAP Business Object?
For certain business objects, there are no standard events delivered by SAP.
An example is BUS2015, the master data object for GL accounts.
For such objects, you can create a custom event on your own in the system:
- Please proceed as following screenshots indicate.
- After creating the custom business objects and events, you are able to select it in ASAPIO customizing
Start transaction SWU_EWCD
Please choose package name and object namespace as required


Implementation – User Exit
This example shows the configuraition and implementation that needs to be done to trigger a Material Reservation (BUS2093).
- After creating the custom business objects and events, you are able to select it in ASAPIO customizing
Event Customization (tutorial)
- Transaction: SWO1
- Create subtype of BUS2093
- Create events;
- created
- changed

Events For Change Document
- Transaction: SWEC
- Add the events created and changed to the subtype of BUS2093.
- Change doc. Object: ORDER
- Object Category: BOR Object Type
- Object Type: Subtype of BUS2093
- Event: CREATED/CHANGED
- Trigger Event: On Change/On Create
- Event Container: /ASADEV/ACI_CPIDENT_TRANSFER


Enhancement – User Exit
- Transaction: CMOD
- Enhancement: MBCF0007
- Function module: EXIT_SAPMM07R_001
- Add implementation to trigger the “created”/”changed” events for the subtype BUS2093

Implementation – BAdI
This example shows the configuraition and implementation that needs to be done to trigger Goods Movement (BUS2017).
- After creating the custom business objects and events, you are able to select it in ASAPIO customizing

Use replicated data from SAP CAR or other applications using SLT to trigger messages
SAP Customer Activity Repository (CAR) is an application package from SAP to capture, cleanse, and centralize customer and point-of-sale data for real-time analytics.
SAP CAR is typcially connected to SAP ECC or SAP S/4HANA using SAP System Landscape Transformation (SLT). Please find more in this SAP Blog post.
To trigger ASAPIO interfaces from SAP CAR data transferred via SLT, you can use enhancement spot ES_IUUC_REPL_RUNTIME_OLO_EXIT, following SAP note 2652704 – Replicating Data Using SAP LT Replication Server SDK
Implement the different methods of the enhancement spot implementation for
- initial load
- delta load
accordingly.
This SAP Blog post gives example code on how to implement this. Instead of uploading to some cloud endpoint, you would call ASAPIO framework via an RFC function call and handover the payload data and message definition.
Authorization and Global Control Flags
As of release 2510 (9.32510)/SP12 (ASANWEE), additional global authorization controls are available to influence outbound processing behavior.
These enhancements are delivered with the following SAP Notes:
-
SAP Note 3720777 – New global authorization control for CP write operations
-
SAP Note 3713646 – Outbound IDocs stuck in status 03
Outbound processing performs standard authorization checks for object /ASADEV/RC.
If the required authorization is missing, processing is terminated and no data (for example, change pointers or IDoc-related processing steps) is executed.
To allow controlled adjustment of specific authorization checks, global configuration constants can be maintained as described below.
1. Global Authorization for Change Pointer Write
Constant: ACI_AUTH_GLOBAL_CP_WRITE
If CP write processing should be permitted independently of the standard authorization check, perform the following steps:
Step 1 – Maintain Global Constant
Go to transaction /ASADEV/ACI_PART.
Create or update the entry with the following value:
-
ACI Global Constant =
ACI_AUTH_GLOBAL_CP_WRITE
Step 2 – Maintain Global Parameter
Go to transaction /ASADEV/ACI_PAR.
Create or update the entry with the following values:
-
ACI Global Constant =
ACI_AUTH_GLOBAL_CP_WRITE -
Field Value =
X
When this parameter is set to X, the system will write CP to table BDCP2 for reprocessing messages.
2. Global Authorization for IDoc Port Processing
Constant: ACI_AUTH_GLOBAL_IDOC_PORT
If IDoc port processing should be permitted independently of the standard authorization check, perform the following steps:
Step 1 – Maintain Global Constant
Go to transaction /ASADEV/ACI_PART.
Create or update the entry with the following value:
-
ACI Global Constant =
ACI_AUTH_GLOBAL_IDOC_PORT
Step 2 – Maintain Global Parameter
Go to transaction /ASADEV/ACI_PAR.
Create or update the entry with the following values:
-
ACI Global Constant =
ACI_AUTH_GLOBAL_IDOC_PORT -
Field Value =
X
When this parameter is set to X, the system continues processing even if the standard authorization check related to IDoc port processing is not fulfilled.
Standard Authorization Concept
If no global authorization override is required, ensure that users are assigned the necessary authorization for object /ASADEV/RC.
Events are typically processed by the workflow users SAP_WFRT or WF-BATCH, using the authorization role /ASADEV/ACI_JOB_ROLE, which contains the required authorizations.
After maintaining the customizing entries, no further system changes are required.