Connectors > SAP Integration Suite, Advanced Event Mesh (SAP OEM Edition)
Overview
Connect SAP S/4HANA and SAP ERP Central Component (ECC) with SAP Integration Suite, Advanced Event Mesh. (“AEM”).
Because AEM is based on Solace PubSub+, many settings are similar and you may find configuration values to be named “Solace” within this guide.
| Add-on/component name | Type |
| Netweaver Event Enablement Add-on (ASANWEE) | Base component (required) |
| SAP Integration Suite, Advanced Event Mesh – Event Add-on for ERP (ASAAEMEE) | Connector package |
| SAP AEM ERP Add-on (AEMERP) | S/4HANA-specific event enablement content (AMQP protocol for Advanced Event Mesh, CDS entities, Fiori App “Event Studio”) |
Key features:
- Supports SAP NetWeaver based systems, including SAP ERP and S/4HANA
- Out-of-the-box connectivity to SAP AEM broker
- Supported communication direction: Outbound, push-based
- Support for high-availability scenarios with a fallback broker
- Support for dynamic topics
- Mass data capable
- Switch between event-driven (single events) or batch mode (job-driven) calls
- Batch mode allows multi-threading with multiple SAP work processes
Pre-requisites
Create a broker instance
An instance of Advanced Event Mesh is required, which is part of Integration Suite on SAP BTP.
Please follow available documentation from SAP or Community Blogs on how to create an AEM instance, e.g.:
Configuration for SAP advanced event mesh
For the integration scenario of SAP advanced event mesh. Some RFC destinations and cloud instances are required for the configuration of the Integration Add-on. The integration with SAP advanced event mesh also offers some special default values, header attributes, extractors and formatters that are outlined in this documentation.
Necessary Configuration:
- RFC-Destination for Validation service endpoint
- RFC-Destination for token endpoint for the Validation service
- Addon Instance for Validation service
- RFC-Destination for Advanced Event Mesh endpoint
- Addon Instance for AEM
To use the add-on with your broker instance, it must be activated in the Cluster Manager

Setting options specific for Advanced Event Mesh
Please find here a quick reference of the settings specific to the Advanced Event Mesh.
Default values (on instance level)
| Default value name | Default value | Description |
|---|---|---|
| AUTH_INSTANCE | <cloud instance> | Instance of validation service The validation service will check if the addon is activated for the AEM broker |
| ACI_CLIENT_ID | <client id> | Client id |
| ACI_TOKEN_DESTINATION | <token rfc destination> | RFC destination for the OAuth token endpoint |
| AUTH_TYPE | CERTIFICATE or OAUTH | Authorization type (e.g. CERTIFICATE or OAUTH via ClientID/ClientSecret) |
Header attributes (on outbound interface level)
| Header attribute name | Header attribute value | Description |
|---|---|---|
| SOLACE_CALL_METHOD | POST | mandatory, needs to be POST |
| SOLACE_CONT_TYPE | application/json | mandatory, Content type (e.g. application/json or text/plain) |
| SOLACE_DELIV_MODE | Persistent | mandatory, Delivery mode (typically should be Persistent) |
| SOLACE_DMQ_ELIGIBLE | true | optional, Activate DMQ eligible |
| SOLACE_TIME_TO_LIVE | 2000 | optional, Time to live |
Extraction and format functions
| Function name | Function type | Supports payload designs | Comment |
|---|---|---|---|
| /ASADEV/ACI_GEN_PDVIEW_EXTRACT | Extraction function | Yes | Recommended extractor for Payload Design based interfaces |
| /ASADEV/ACI_GEN_VIEW_FORM_CB | Format function | Yes | Recommended standard formatter |
| /ASADEV/ACI_IDOC_FORMATTER_AEM | Format function | No | Formatter for IDoc conversions |
| /ASADEV/ACI_GEN_FORM_CE_CB_AEM | Format function | Yes | Combination of the standard formatter and wrapping the payload in the CloudEvents header |
| /ASADEV/ACI_GEN_VIEWEXT_AEM | Extraction function | No | Extractor for DB view based interfaces |
| /ASADEV/ACI_GEN_NOTIFY_AEM | Extraction function / Format function | No | Extraktor for notification events |
| /ASADEV/ACI_GEN_META_AEM | Extraction function | No | Example extractor |
| /ASADEV/ACI_GEN_DATA_AEM | Extraction function | No | Example extractor |
| /ASADEV/ACI_GEN_CHANGES_AEM | Extraction function | No | Example extractor |
| /ASADEV/ACI_GEN_VIEWFRM_AEM | Format function | Yes | Deprecated formatter (use /ASADEV/ACI_GEN_VIEW_FORM_CB instead) |
Response Handler: /ASADEV/ACI_GEN_RH_AEM
Set-up instance for Validation service
The credentials can be taken from the service key in BTP. The following authentication variants are available:
- OAuth 2.0 with ClientID / ClientSecret
- OAuth 2.0 with client certificate
Create RFC destination
Two RFC destinations are required, one for the validation service endpoint and one for the OAuth token endpoint.
Create destination for validation endpoint
Create a new RFC destination of type ‘’G’’ (HTTP Connection to External Server).
- Transaction: SM59
- Create new destination of type ‘’G’’
- Specify Target Host and Service No. (Port): endpoint for the validation service endpoint

Create OAuth token destination
Create a new RFC destination of type ‘’G’’ (HTTP Connection to External Server).
- Transaction: SM59
- Create new destination of type ‘’G’’
- Specify Target Host and Service No. (Port): endpoint for token endpoint

Specify on Logon & Security the default anonymous certificate store:

Create token certificate
💡 This part is only required when using certificate-based authentication!
To use this you have to download the service key and combine the key and certificate info from the service key into a .p12 or .pfx file.
Create a SSL Client Identity on transaction STRUST.
- Go to Enviroment->SSL Client Identities

- On the table use create New Entries.

Import and create Certificate
For newer ECC or S/4 releases the following steps can be used:
- Transaction: STRUST
- Go into “Edit” mode
- In the menu bar choose PSE > Import and Import the .p12 file that you downloaded earlier
Note: if the import of the .p12 file was not possible, use the command line to convert the .p12 file to a .pse file as described in the next section

- On the top menu select PSE > Save as
- Select ‘’SSL Client’’ and select the client identity you have create in the previous step:

- Confirm and save
For older releases that dont support P12 Files follow these steps:
- Copy the P12 Key into a directory of your choice: <drive>:usrexe
- Open a command window and navigate to the executables directory
- Execute the sapgenpse command:
sapgenpse import_p12 -p <drive>:usr<SSF_Profile> <key_name>.p12Example :
sapgenpse import_p12 -p D:usr/SAP/JWT_S2100.pse project-messaging-339506-323631149f29.p12
- Go to transaction: STRUST
- In the menu bar choose PSE > Import and Import the just created .pse file

- On the top menu select PSE > Save as
- Select “SSL Client” and select the client identity you have created earlier
- Confirm and save
Update OAuth destination with certificate settings
After you have imported the certificate in this way you have to change the setting on the RFC destination to now use the new client identity store:
Specify on Logon & Security your SSL Certificate:

Create instance
Create the validation instance that ties together the RFC destinations:
- Transaction: SPRO
- Goto ASAPIO Integration Add-on – Connection and Replication Object Customizing
- Or go directly to transaction: /ASADEV/ACI_SETTINGS
- Add New Entry and specify:
- Field Instance: a name for this connection in
- Field RFC Rest. (Upload): the RFC destination create for the validation endpoint

Configure Default Values
Three default values, the client ID and the token RFC destination, are required for the validation service:
| Default Attribute | Default Attribute Value |
|---|---|
| ACI_CLIENT_ID | <client id> |
| ACI_TOKEN_DESTINATION | <token rfc destination> |
| AUTH_TYPE | CERTIFICATE or OAUTH |

Configure client secret
You can select the client secret from your service bindings. This is only required when using OAuth 2.0 authentication with ClientID / ClientSecret.
If you are using certificate based authentication then this step is not necessary. Specifying the certificate store in the RFC destination is sufficient.
- Transaction: SPRO
- Goto ASAPIO Integration Add-on – Set the cloud connection password
- Or go directly to transaction: /ASADEV/SCI_TPW
- Select the created Cloud Instance
- Enter the client secret in the Cloud Shared Secret field and execute

Set-up instance for AEM service
After the configuring of Validation service, we configure the connection to the AEM broker.
Create RFC-destination
Create a new RFC destination of type ‘’G’’ (HTTP Connection to External Server).
- Transaction: SM59
- Create new destination of type ‘’G’’
- Specify Target Host and Service No. (Port): aem service endpoint

Add Username and password on Logon & Security.
The credentials can be obtained in the Advanced Event Mesh cluster manager under Service Details and Tab Connect:


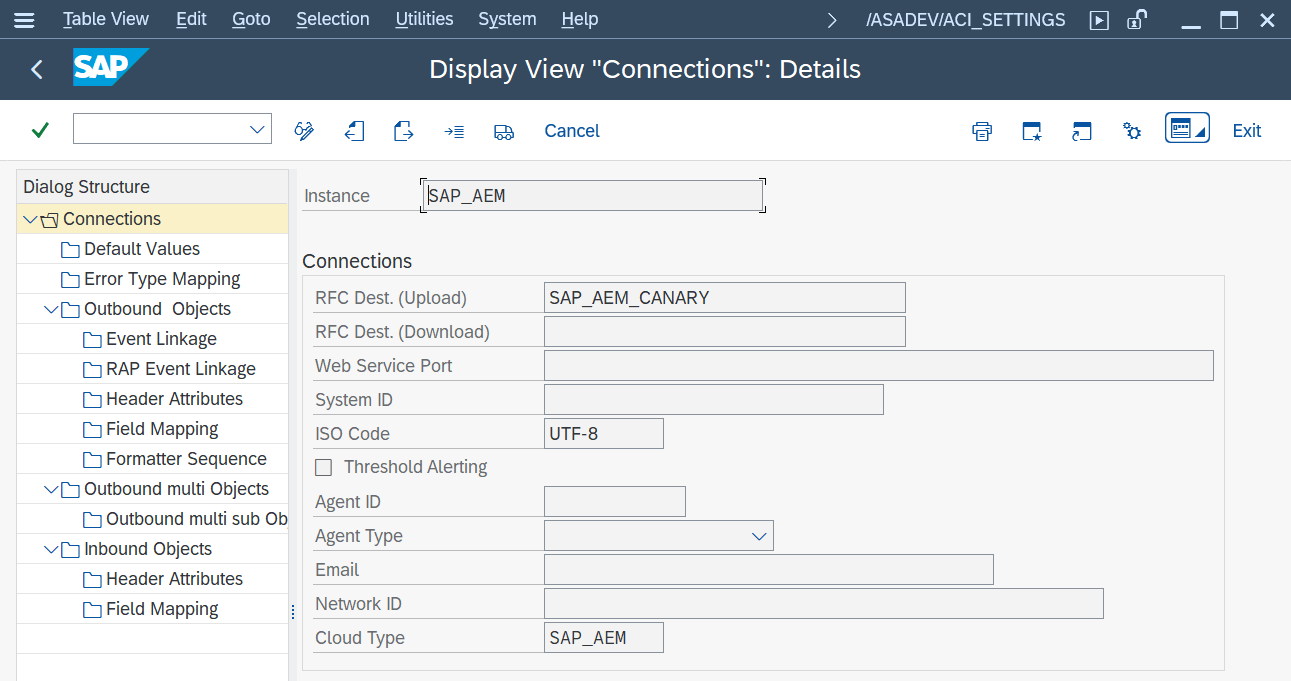
Create instance for AEM service
Create the connection instance customizing that ties together the RFC destination created earlier and the cloud connector type:
- Transaction: SPRO
- Goto ASAPIO Cloud Integrator – Connection and Replication Object Customizing
- Or go directly to transaction: /ASADEV/ACI_SETTINGS
- Add New Entry and specify:
- Field Instance: a name for this connection in
- Field RFC Dest. (Upload): the RFC destination create for the messaging endpoint
- Field ISO Code: the code page to use
- Field Cloud Type: SAP_AEM (or the name you chose when adding the connector)
Configure Default values
- Transaction: SPRO
- Goto ASAPIO Integration Add-on – Connection and Replication Object Customizing
- Or go directly to transaction: /ASADEV/ACI_SETTINGS
- Select your instance and go to Default Values
- Add New Entry and specify:
| Default Attribute | Default Attribute Value |
|---|---|
| AUTH_INSTANCE | <validation instance> |

Setting up the outbound interfaces is described at Outbound messaging
Please see the specific header attributes and the settings for dynamic topics below.
Set-up dynamic topics
The dynamic topics can be used to generate topics with the values from the payload. Values can be configured as fixed values and as generic values from the payload.
Set-up Field Mapping
- Go to section Field Mapping
- Add New Entry and specify:
- Target structure: URL segment
- Target field: Description
- Source structure: Table for the dynamic field.
- Source field: Dynamic value for URL segment.
- Default value: Static value for URL segment.

New option with release 2504 (9.32504): Conversion methods:
With the new option you can specify a conversion class/method to determine the value of the topic level, e.g. to translate SAP specific values to more commonly used terms or to determine a new value like a region based on the data which only contains plant/country info.

Dynamic topic is visible inside the monitor with dynamic (highlighted) and static URL segments:

Demo
Event-enable your SAP data with Solace
Demo with SAP sales orders, inbound and outbound. Also shows dynamic topics features.
