RAP Events
Overview
With release 2504 (9.32504) the ASAPIO Integration Addon supports RAP events as triggers for outbound interfaces. SAP offers local consumption of RAP Business Object events since release S/4 HANA 2023. With this SAP has opened up the possibilities for custom application integrations by giving access to all new events that are added by the new RAP Business Objects.
Prerequisites
To use the RAP events integration you need:
- a SAP System with release S/4 HANA 2023 (or later)
- the ASAPIO Event Studio
Base line configuration
Create default bgRFC destination BGPF
First check if this default destination is already created in your system. In most systems this will already be present.
If not please follow https://help.sap.com/docs/abap-cloud/abap-concepts/creating-default-destination-bgpf?locale=en-US or execute the following steps:
- Go to transaction SBGRFCCONF.
- Click on the tab Define Inbound Dest.
- Press the button with the tooltip Create.
On the Configure Inbound Destination dialog box, do the following.- Enter the Inb. Dest. Name BGPF.
Restriction
Do not enter information for Logon/Server Group or Add Queue Prefix. - Choose Save.
- Enter the Inb. Dest. Name BGPF.
Create application specific bgRFC destination
For the processing of RAP events our implementation uses bgRFC calls. To configure the necessary destination
- Go to transaction SBGRFCCONF.
- Click on the tab Define Inbound Dest.
- Press the button with the tooltip Create.
On the Configure Inbound Destination dialog box, do the following.
Enter an Inb. Dest. Name of your choice (e.g. ASAPIO). - Choose Save.
Setup connector instance
First setup the connector instance following the guide at Connectors for your specific connector type.
Then add the application specific bgRFC destination in the default values of the connection instance:
- add attribute ACI_BGRFC_DESTINATION and give the created application specific bgRFC destination

Activating RAP events
Using SAP GUI Configuration
With release January 2026 it is also possible to activate the linkage to a RAP Event in the classic SAP GUI based configuration.
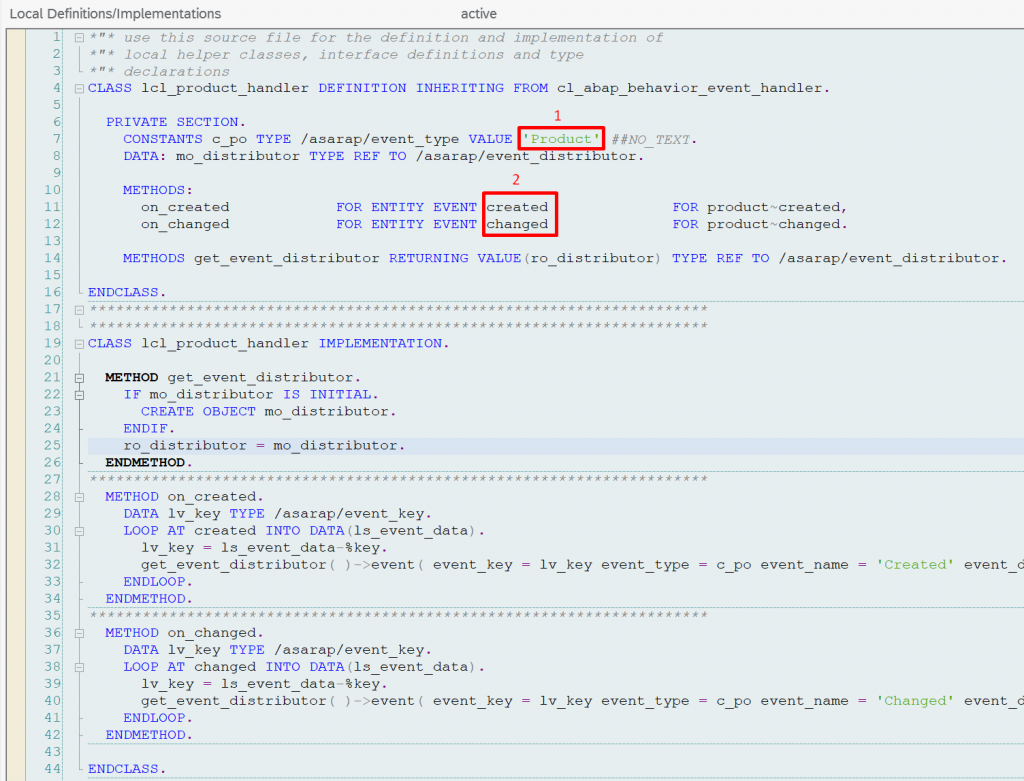
For the local consumption of the RAP Event you download one of our Event Handler classes (https://asapio.com/docs/catalog/) and depending on this class you have to enter the values.
In our example we use the handler for Products /ASARAP/CL_PRODUCT_HANDLER. In this class you find the relevant information to be entered in the configuration screen:
To now configure these events:
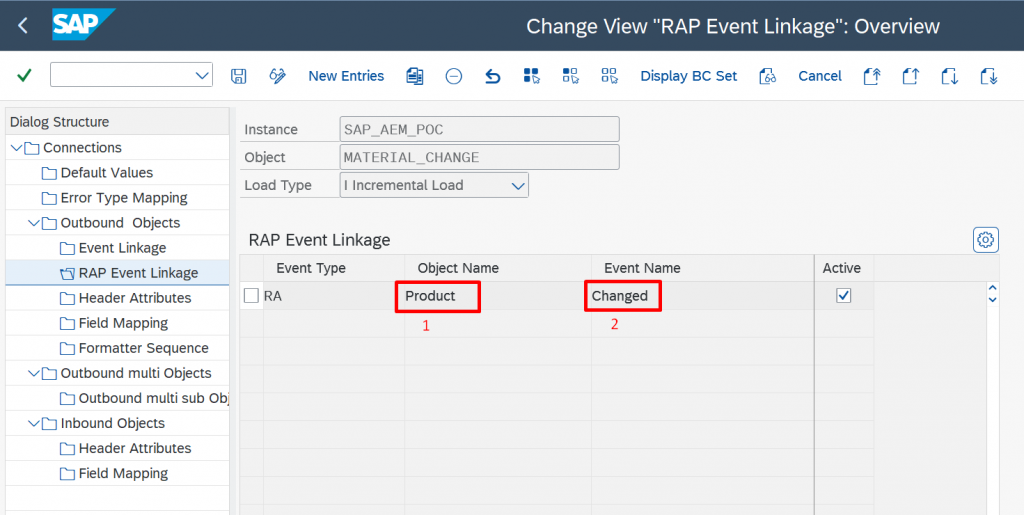
- Transaction: /ASADEV/ACI_SETTINGS
- Select the Outbound Object for which to activate the linkage
- Go to section RAP Event Linkage
- Add New Entry and specify:
- Event Type: RA
- Object Name: <RAP Business Object Alias (1 in screenshot)>
- Event Name: <RAP Event (2 in screenshot)>
- Active: <check to activate>
Using Event Studio
Please follow the Event Studio guide on how to deploy interfaces.
The Event Studio comes with the predefined events for the supported RAP objects:
| RAP Business Object | Event |
|---|---|
| Equipment | Created |
| Changed | |
| BusinessPartner | Created |
| Changed | |
| BillingDocument | Created |
| Changed | |
| Canceled | |
| CreditMemoRequest | Created |
| Changed | |
| Deleted | |
| Order-related billing status changed | |
| Total block status changed | |
| Overall rejection status changed | |
| Overall processing status changed | |
| Item created | |
| Item changed | |
| Item deleted | |
| Item overall processing status changed | |
| Item order-related billing status changed | |
| CustomerReturn | Created |
| Changed | |
| Deleted | |
| Item created | |
| Item changed | |
| Item deleted | |
| DebitMemoRequest | Created |
| Changed | |
| Deleted | |
| Order-related billing status changed | |
| Total block status changed | |
| Overall rejection status changed | |
| Overall processing status changed | |
| Overall credit check status changed | |
| Item created | |
| Item changed | |
| Item deleted | |
| Item overall processing status changed | |
| Item order-related billing status changed | |
| FunctionalLocation | Created |
| Changed | |
| InboundDelivery | Created |
| Changed | |
| Deleted | |
| InspectionLot | Created |
| Changed | |
| Canceled | |
| Operation created | |
| JournalEntry | Created |
| MaintenanceNotification | Created |
| Completed | |
| Set to in process | |
| MaintenanceOrder | Approved |
| Closed | |
| Rejected | |
| Set to ready to schedule | |
| Set to Work done | |
| Set to Work started | |
| Set to Work not performed | |
| Set to Ready for execution | |
| Set to deletion flagged | |
| Set to in planning | |
| Set to in preparation | |
| Set to Maintenance work completed | |
| Set to technical completed | |
| Submitted for approval | |
| Order Phase control activated | |
| Order Phase control deactivated | |
| Operation phase control activated | |
| Operation phase control deactivated | |
| MaterialDocument | Created |
| Canceled | |
| OutboundDelivery | Created |
| Changed | |
| Deleted | |
| Delivery block changed | |
| GI status changed | |
| Packing status changed | |
| Picking status changed | |
| Item created | |
| Item changed | |
| Item deleted | |
| Product | Created |
| Changed | |
| PurchaseContract | Created |
| Changed | |
| Target value changed | |
| Validity changed | |
| Item created | |
| Item deleted | |
| Item restored | |
| Item blocked | |
| Item unblocked | |
| Item target quantity changed | |
| Item net price amount changed | |
| PurchaseOrder | Created |
| Changed | |
| Approved | |
| Approval rejected | |
| Item created | |
| Item changed | |
| Item deleted | |
| Item blocked | |
| Item unblocked | |
| PurchaseRequisition | Created |
| Changed | |
| Approved | |
| Rejected | |
| Item approved | |
| Item rejected | |
| Item created | |
| Item changed | |
| PurchasingInfoRecord | Created |
| Changed | |
| QualityNotification | Created |
| Activated | |
| In process | |
| Changed | |
| Not approved | |
| For approval | |
| Deletion flag set | |
| Completed | |
| Processor assigned | |
| All tasks completed | |
| Defect created | |
| In process again | |
| Approved | |
| QualityTask | Created |
| Changed | |
| Completed | |
| Set to in process | |
| Processor assigned | |
| RequestForQuotation | Published |
| Follow-on document created | |
| SalesContract | Created |
| Changed | |
| Deleted | |
| Item created | |
| Item changed | |
| Item deleted | |
| SalesInquiry | Created |
| Changed | |
| Deleted | |
| SalesOrder | Created |
| Changed | |
| Deleted | |
| Approval status changed | |
| Billing block status changed | |
| Delivery confirmation status changed | |
| Delivery status changed | |
| Overall delivery block status changed | |
| Rejection status changed | |
| Overall processing status changed | |
| Overall credit check status changed | |
| Item created | |
| Item changed | |
| Item deleted | |
| Item billing block status changed | |
| Item delivery block status changed | |
| Item delivery confirmation status changed | |
| Item delivery status changed | |
| Item general incompletion status changed | |
| Item profit center changed | |
| Item rejection status changed | |
| Item overall processing status changed | |
| Item WBS element changed | |
| SalesOrderWithoutCharge | Created |
| Changed | |
| Deleted | |
| SalesQuotation | Created |
| Changed | |
| Deleted | |
| Overal rejection status changed | |
| Overall processing status changed | |
| Approval status changed | |
| Item created | |
| Item changed | |
| Item deleted | |
| Item rejection status changed | |
| Item general incompletion status changed | |
| Item overall processing status changed | |
| SalesSchedulingAgreement | Created |
| Changed | |
| Deleted | |
| Item created | |
| Item changed | |
| Item deleted | |
| PurchaseSchedulingAgreement | Created |
| Changed | |
| Released | |
| ServiceEntrySheet | Created |
| Changed | |
| ServiceOrder | Created |
| Changed | |
| Deleted | |
| Completed | |
| Released | |
| Release revoked | |
| Change when released | |
| SalesPricingConditionRecord | Created |
| Changed | |
| Deleted | |
| Amount changed | |
| Condition ratio changed | |
| Validity period changed | |
| SupplierInvoice | Created |
| Canceled | |
| SupplierQuotation | Submitted |
| Awarded | |
| Follow-on document created | |
| WorkCenter | Created |
| Changed | |
| Deleted |
How to add custom payloads
With the following steps you can add custom payloads:
- Create your Payload Design
- Add event definition in Event Studio
- you need to specify your Payload Design in Catalog Object Id / Version
- enter the event information in Event Type, Object ID and Event Name
With these steps your Payload Design will be available in the Data Catalog screen and the details will have the event listed with which you can deploy the interface.